Azure
Integrating Hawkeye with your Azure environment allows for real-time telemetry collection, including resource configurations, activity logs, metrics, and alerts. The amount of data collected will depend on the permissions set for the resources in your Azure subscription.
To securely connect Azure to Hawkeye, you need to register an Azure application and configure permissions so that Hawkeye can access the necessary resources.
The following steps will guide you in setting this up:
Step 1: Register an Azure application
Fig.1 - A walkthrough of how to register an Azure application
To start, you need to register an application within the Microsoft Extra ID Directory. This will allow Hawkeye to interact securely with your Azure resources.
-
Access Microsoft Extra ID: Log in to the Azure portal and navigate to the Microsoft Extra ID section from the sidebar.
-
Create a new registration: In the overview of the Microsoft Extra ID section, click Add > App registration.
-
Fill in the application details: Provide a name for your application, and select the supported account types.
After completing the form, click Register to create the application.
Step 2: Generate client secret for authentication
Fig.2 - A walkthrough of how to generate client secret for authentication
Now that your application is registered, you need to create a client secret to authenticate Hawkeye’s connection.
-
Navigate to Certificates & Secrets: On your application’s page, click on Add a certificate or secret as seen in pin 3 below:
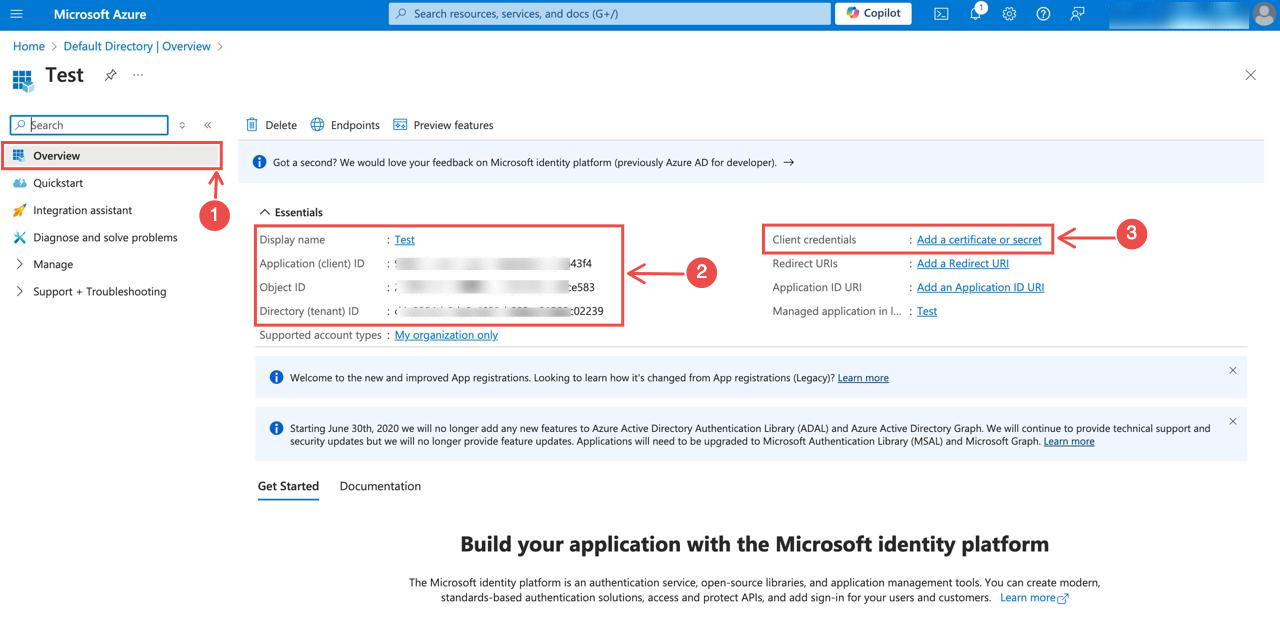
Fig.3 - Navigate to Certificates & Secrets
-
Create a new client secret: On the Certificates & Secrets section, click Client secrets > New client secret.
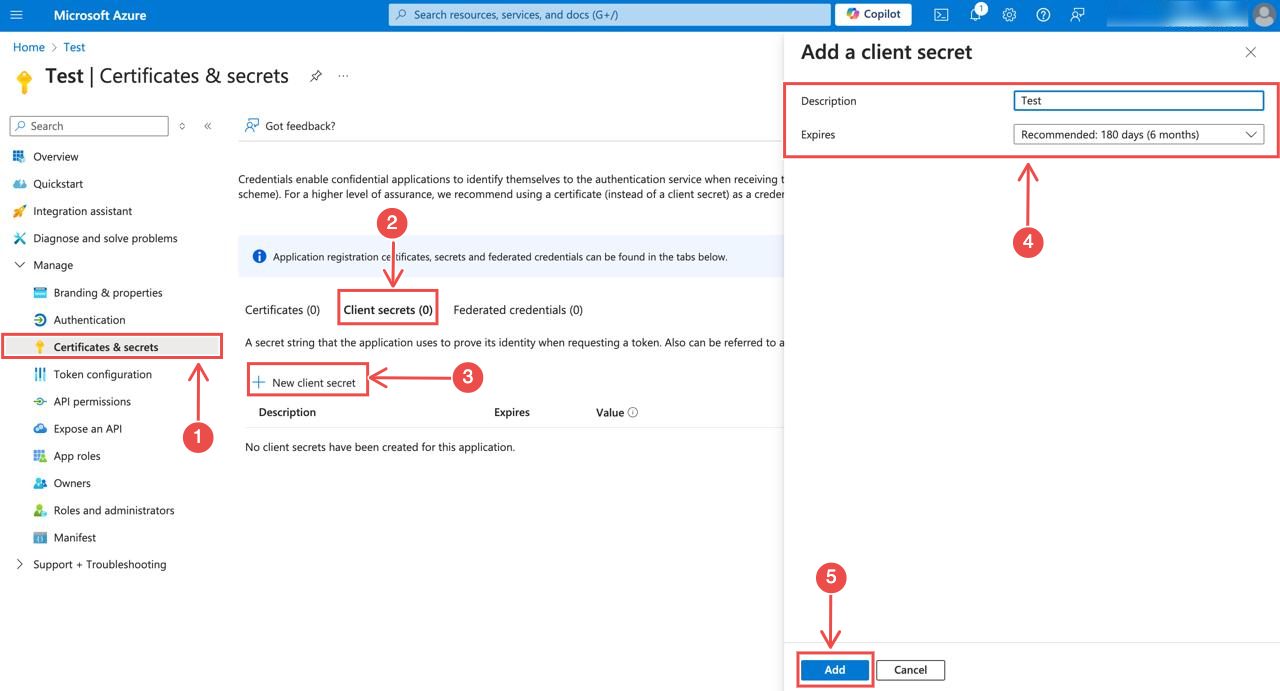
Fig.4 - Create a new client secret
Add a description and select the expiration duration. After that, click on the button labeled Add to create the secret.
Note: When you add an expiration duration for an Azure client secret, this will determines the time period that you’ll have to go into Hawkeye and update or delete the connection.
-
Copy the client secret: After creating the secret, copy and save the value. This will be required when configuring the Hawkeye connection.
Step 3: Assign required roles to service principal
To enable proper access for monitoring and cluster operations, you need to assign the Reader, Azure Kubernetes Service Cluster User Role and Azure Kubernetes Service RBAC Reader roles to your subscription.
- Access Azure subscriptions:
-
In the Azure portal, use the search bar to find and select Subscriptions
-
Choose the specific subscription where you want to assign roles
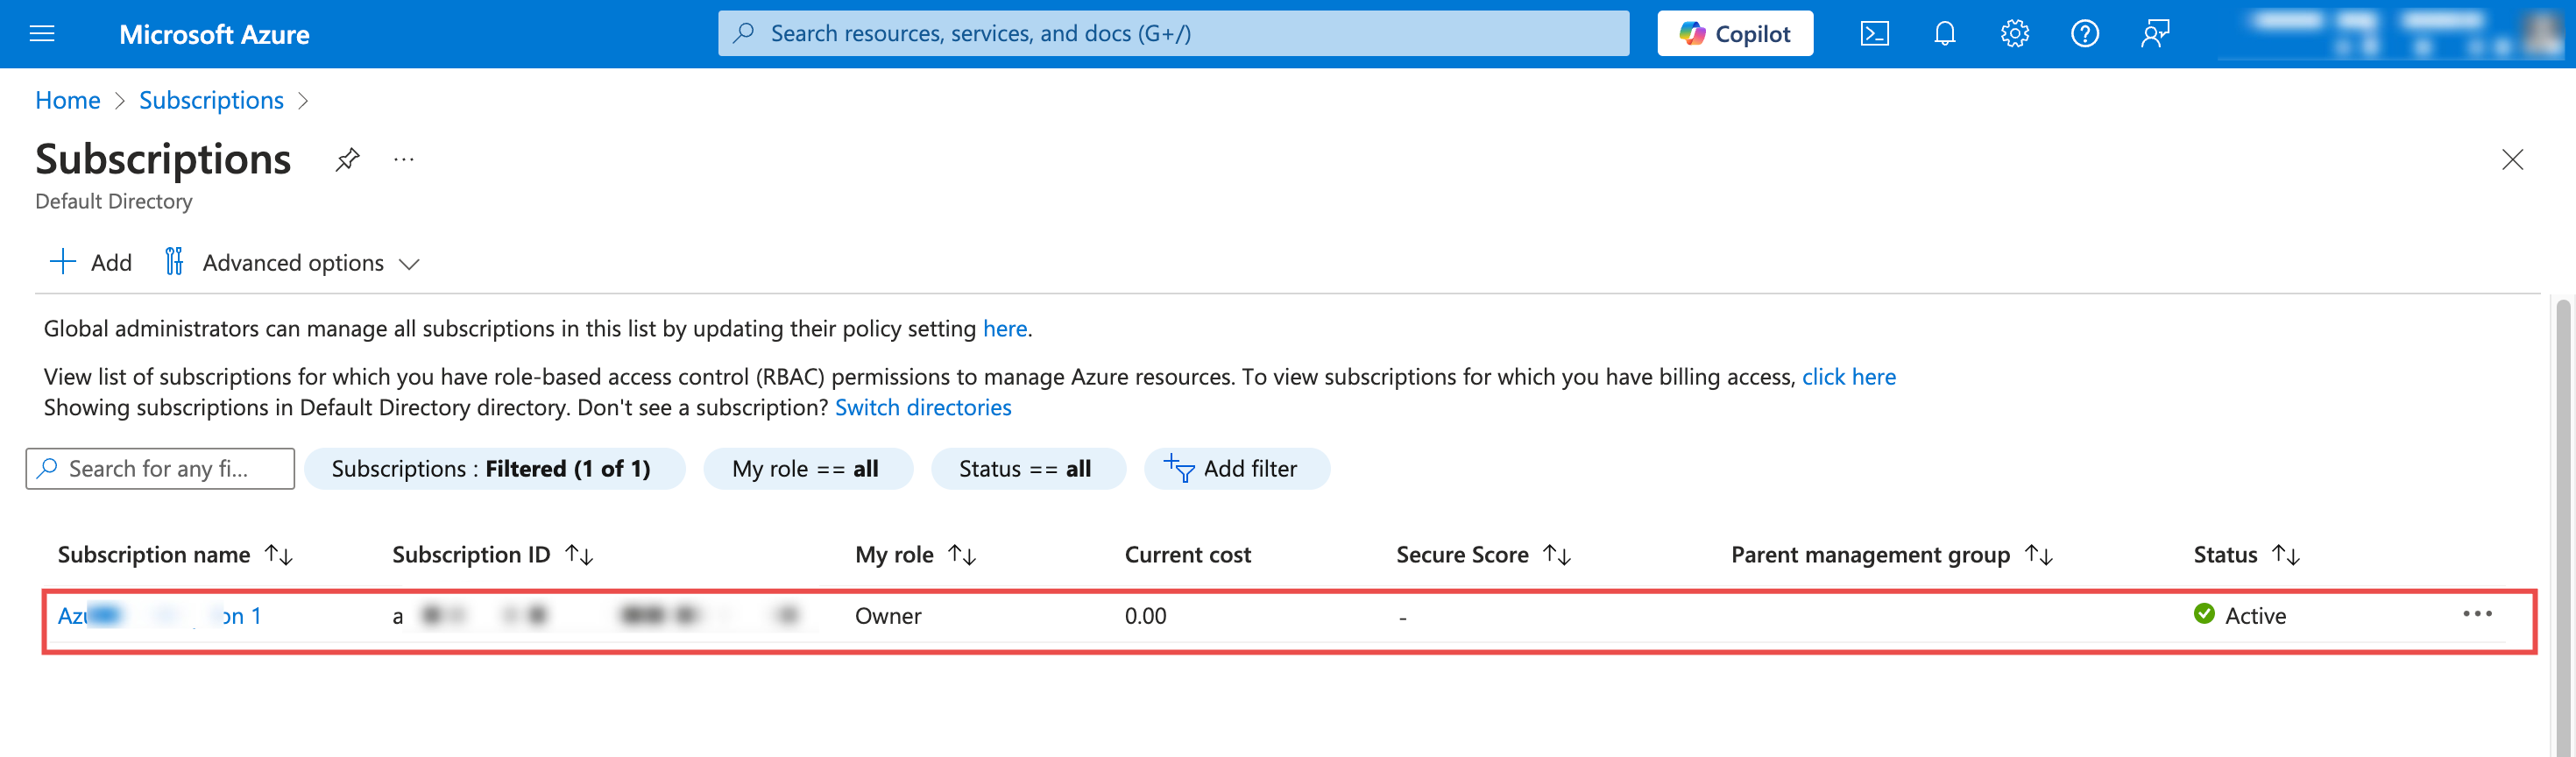
Fig.5 - Access Azure subscriptions
-
- Open Access Control:
-
From the subscription navigation menu, select Access control (IAM)
-
Click + Add > Add role assignment
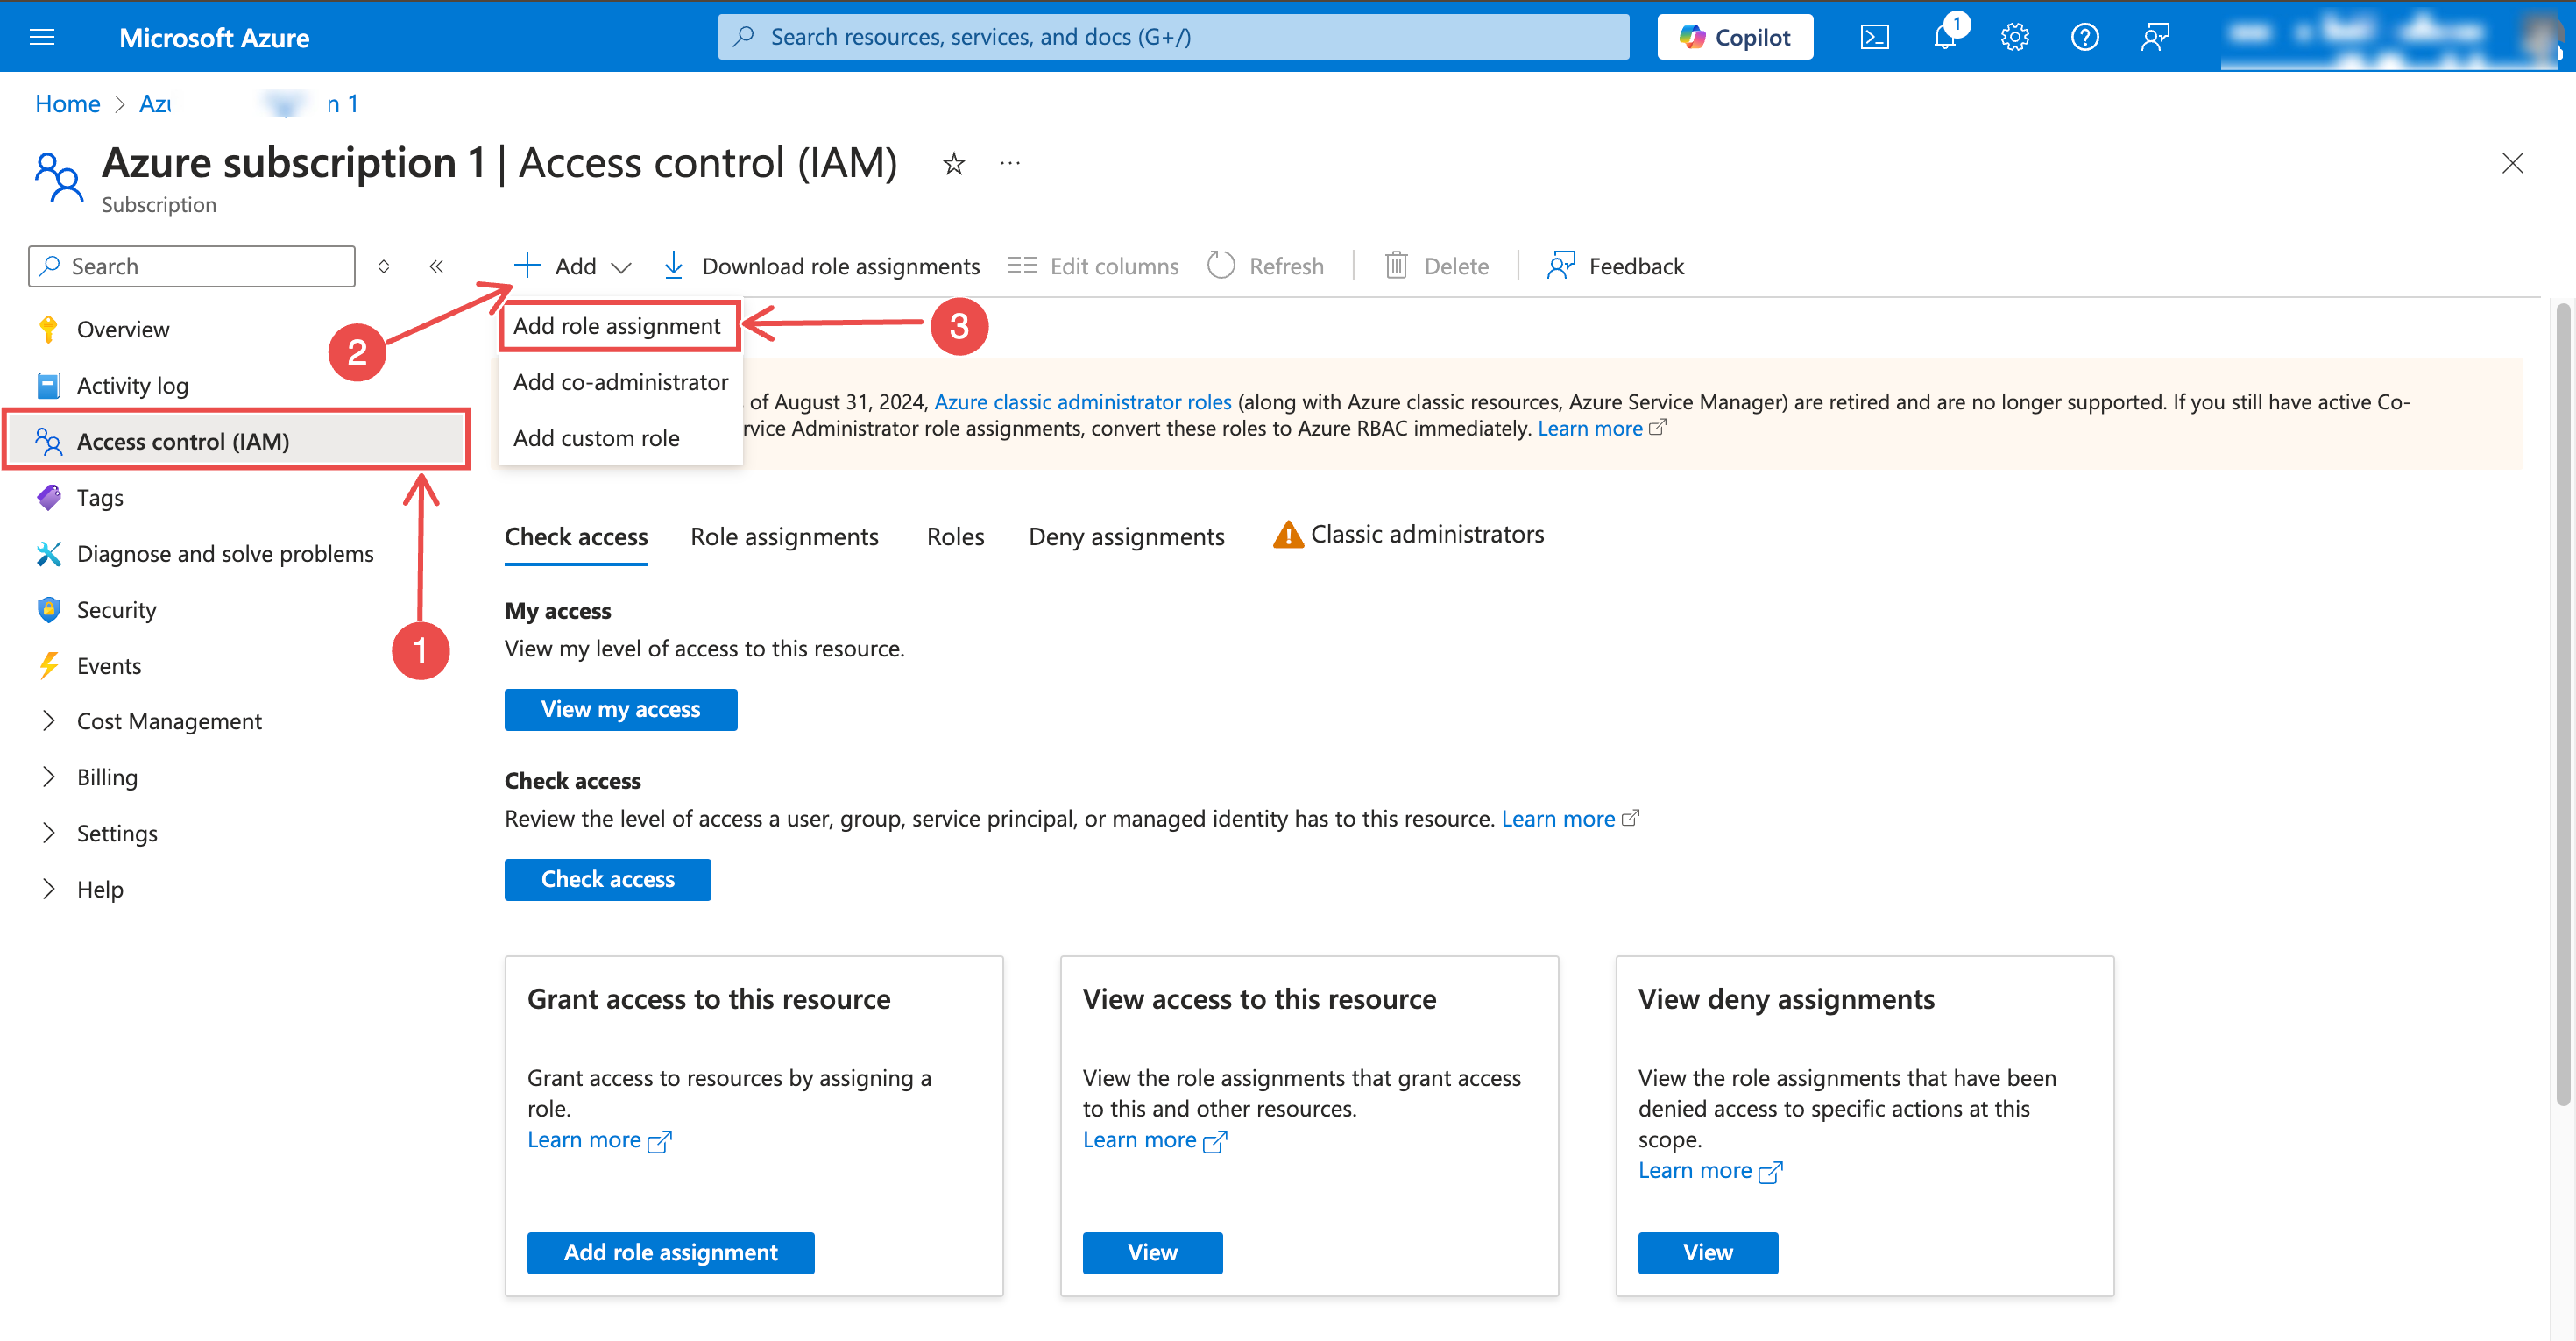
Fig.6 - Open Access Control
-
- Assign Reader role:
-
In the Role dropdown, select Reader
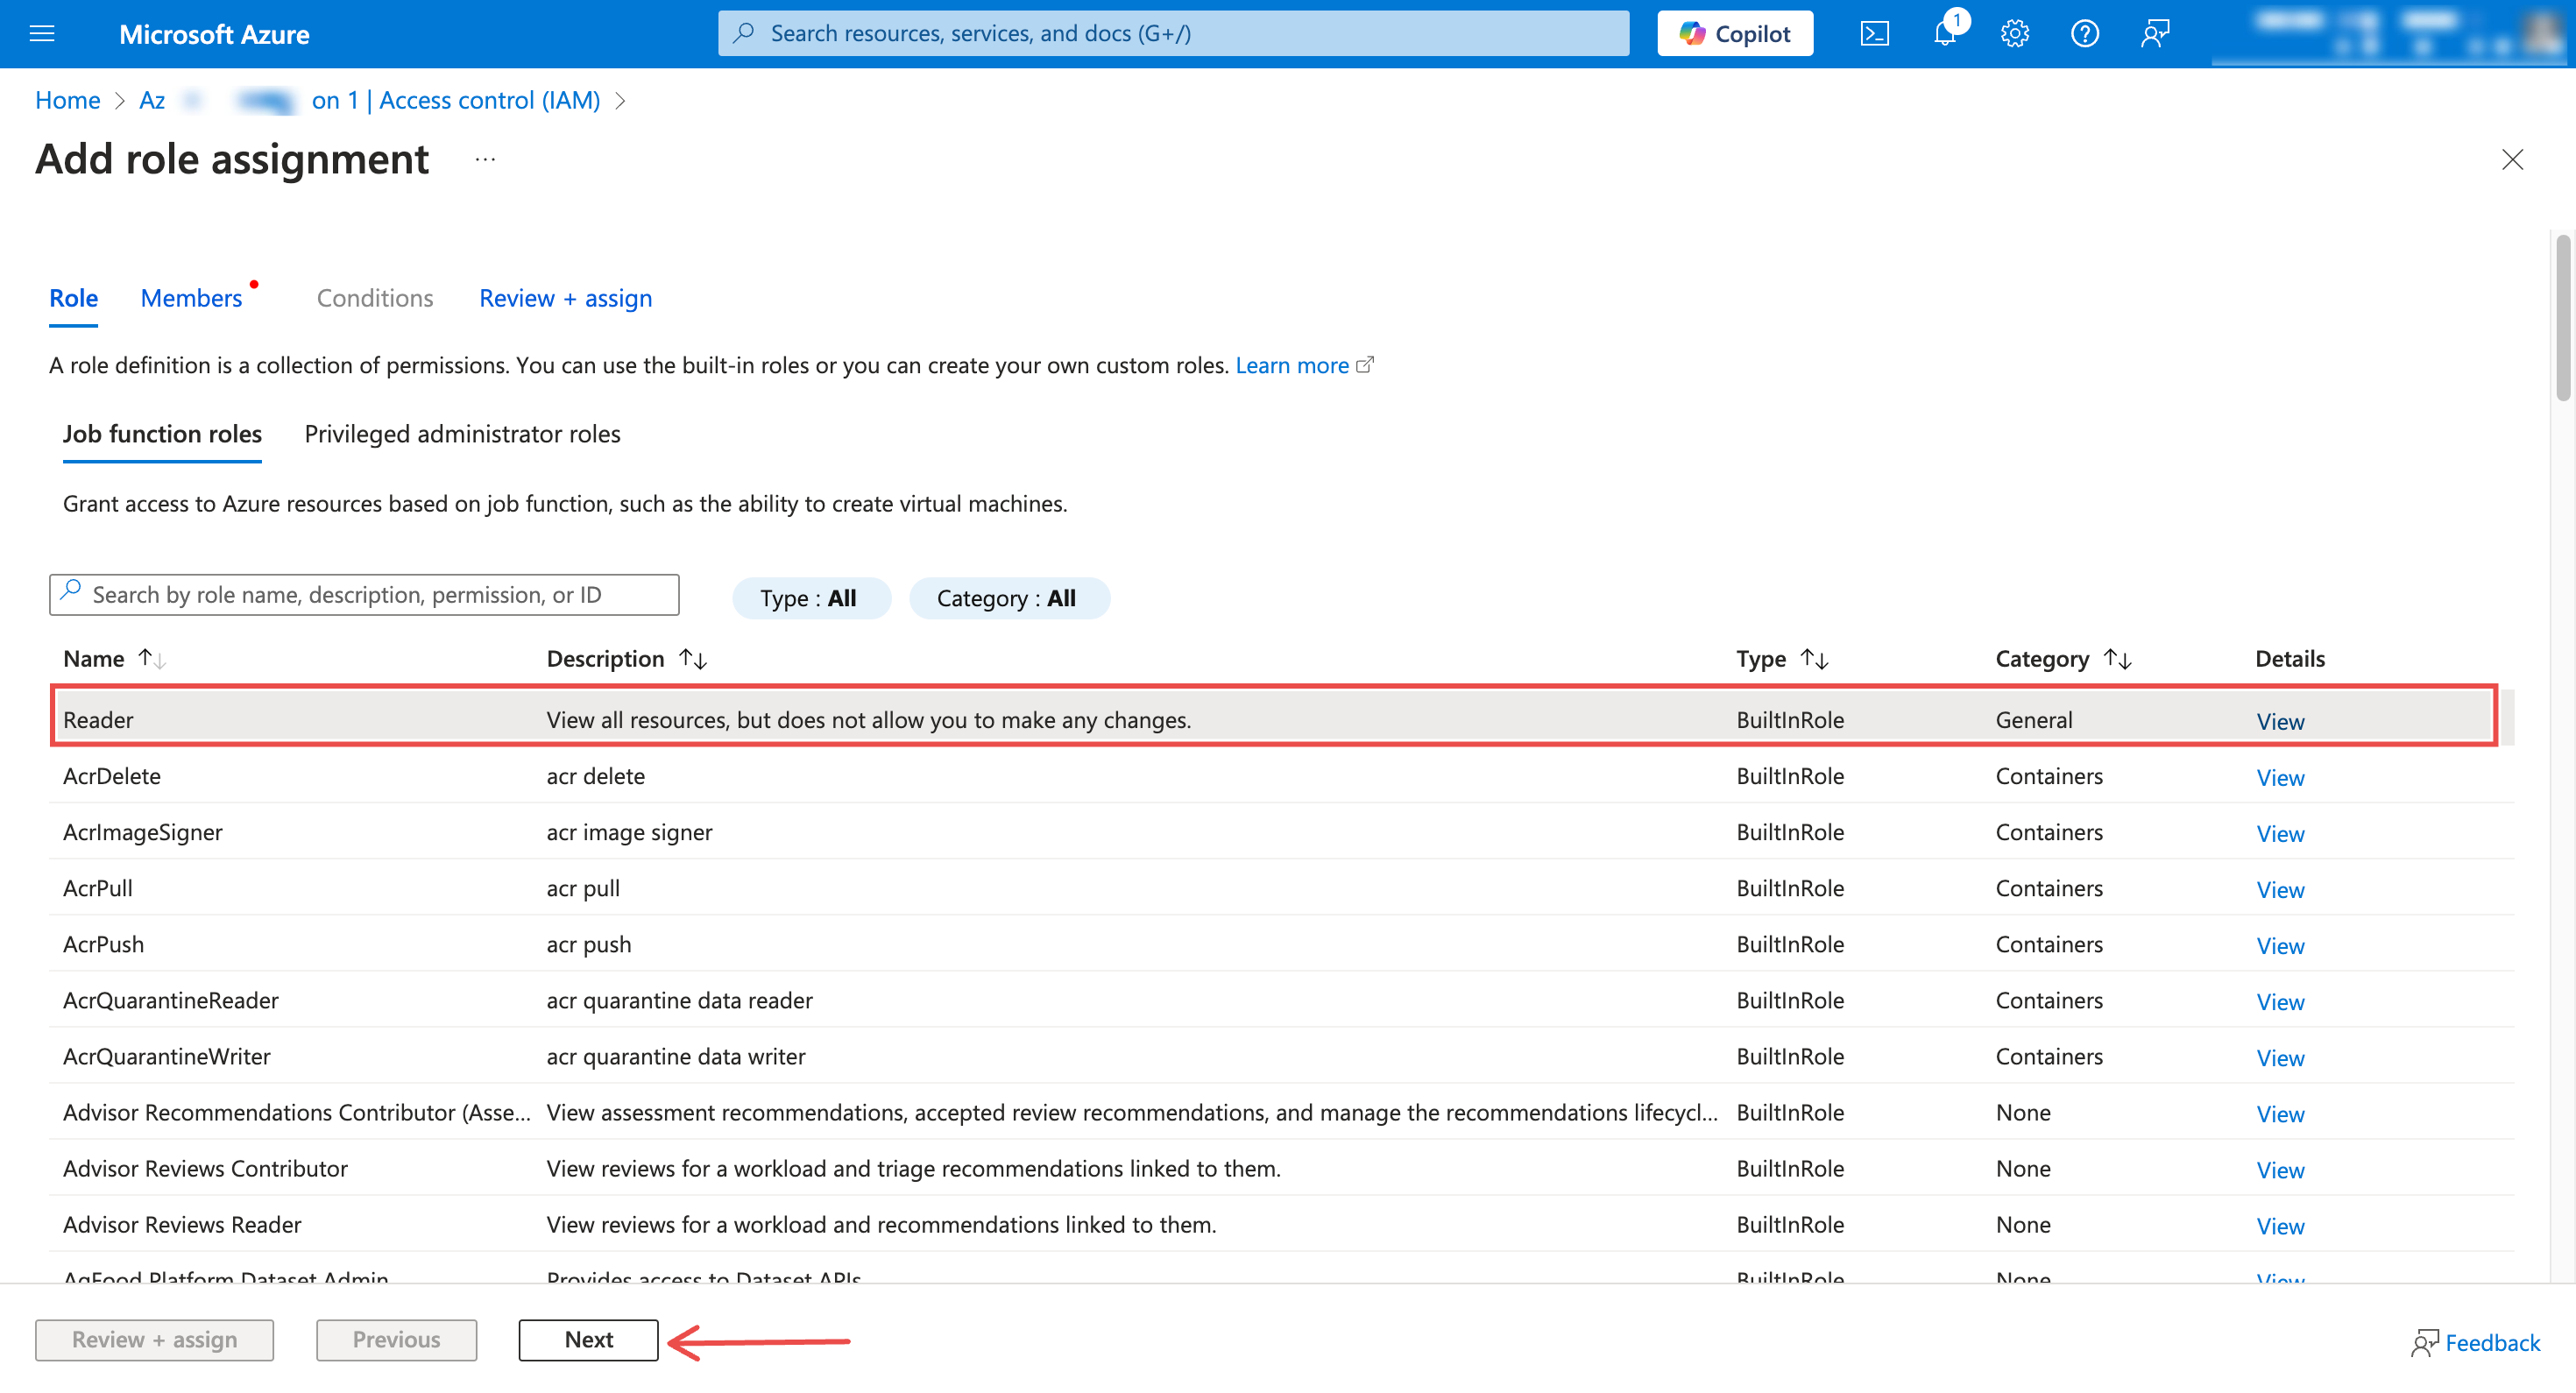
Fig.7 - Assign Reader role
-
Under Assign access to, choose User, group, or service principal. Then, click + Select members and search for your registered application
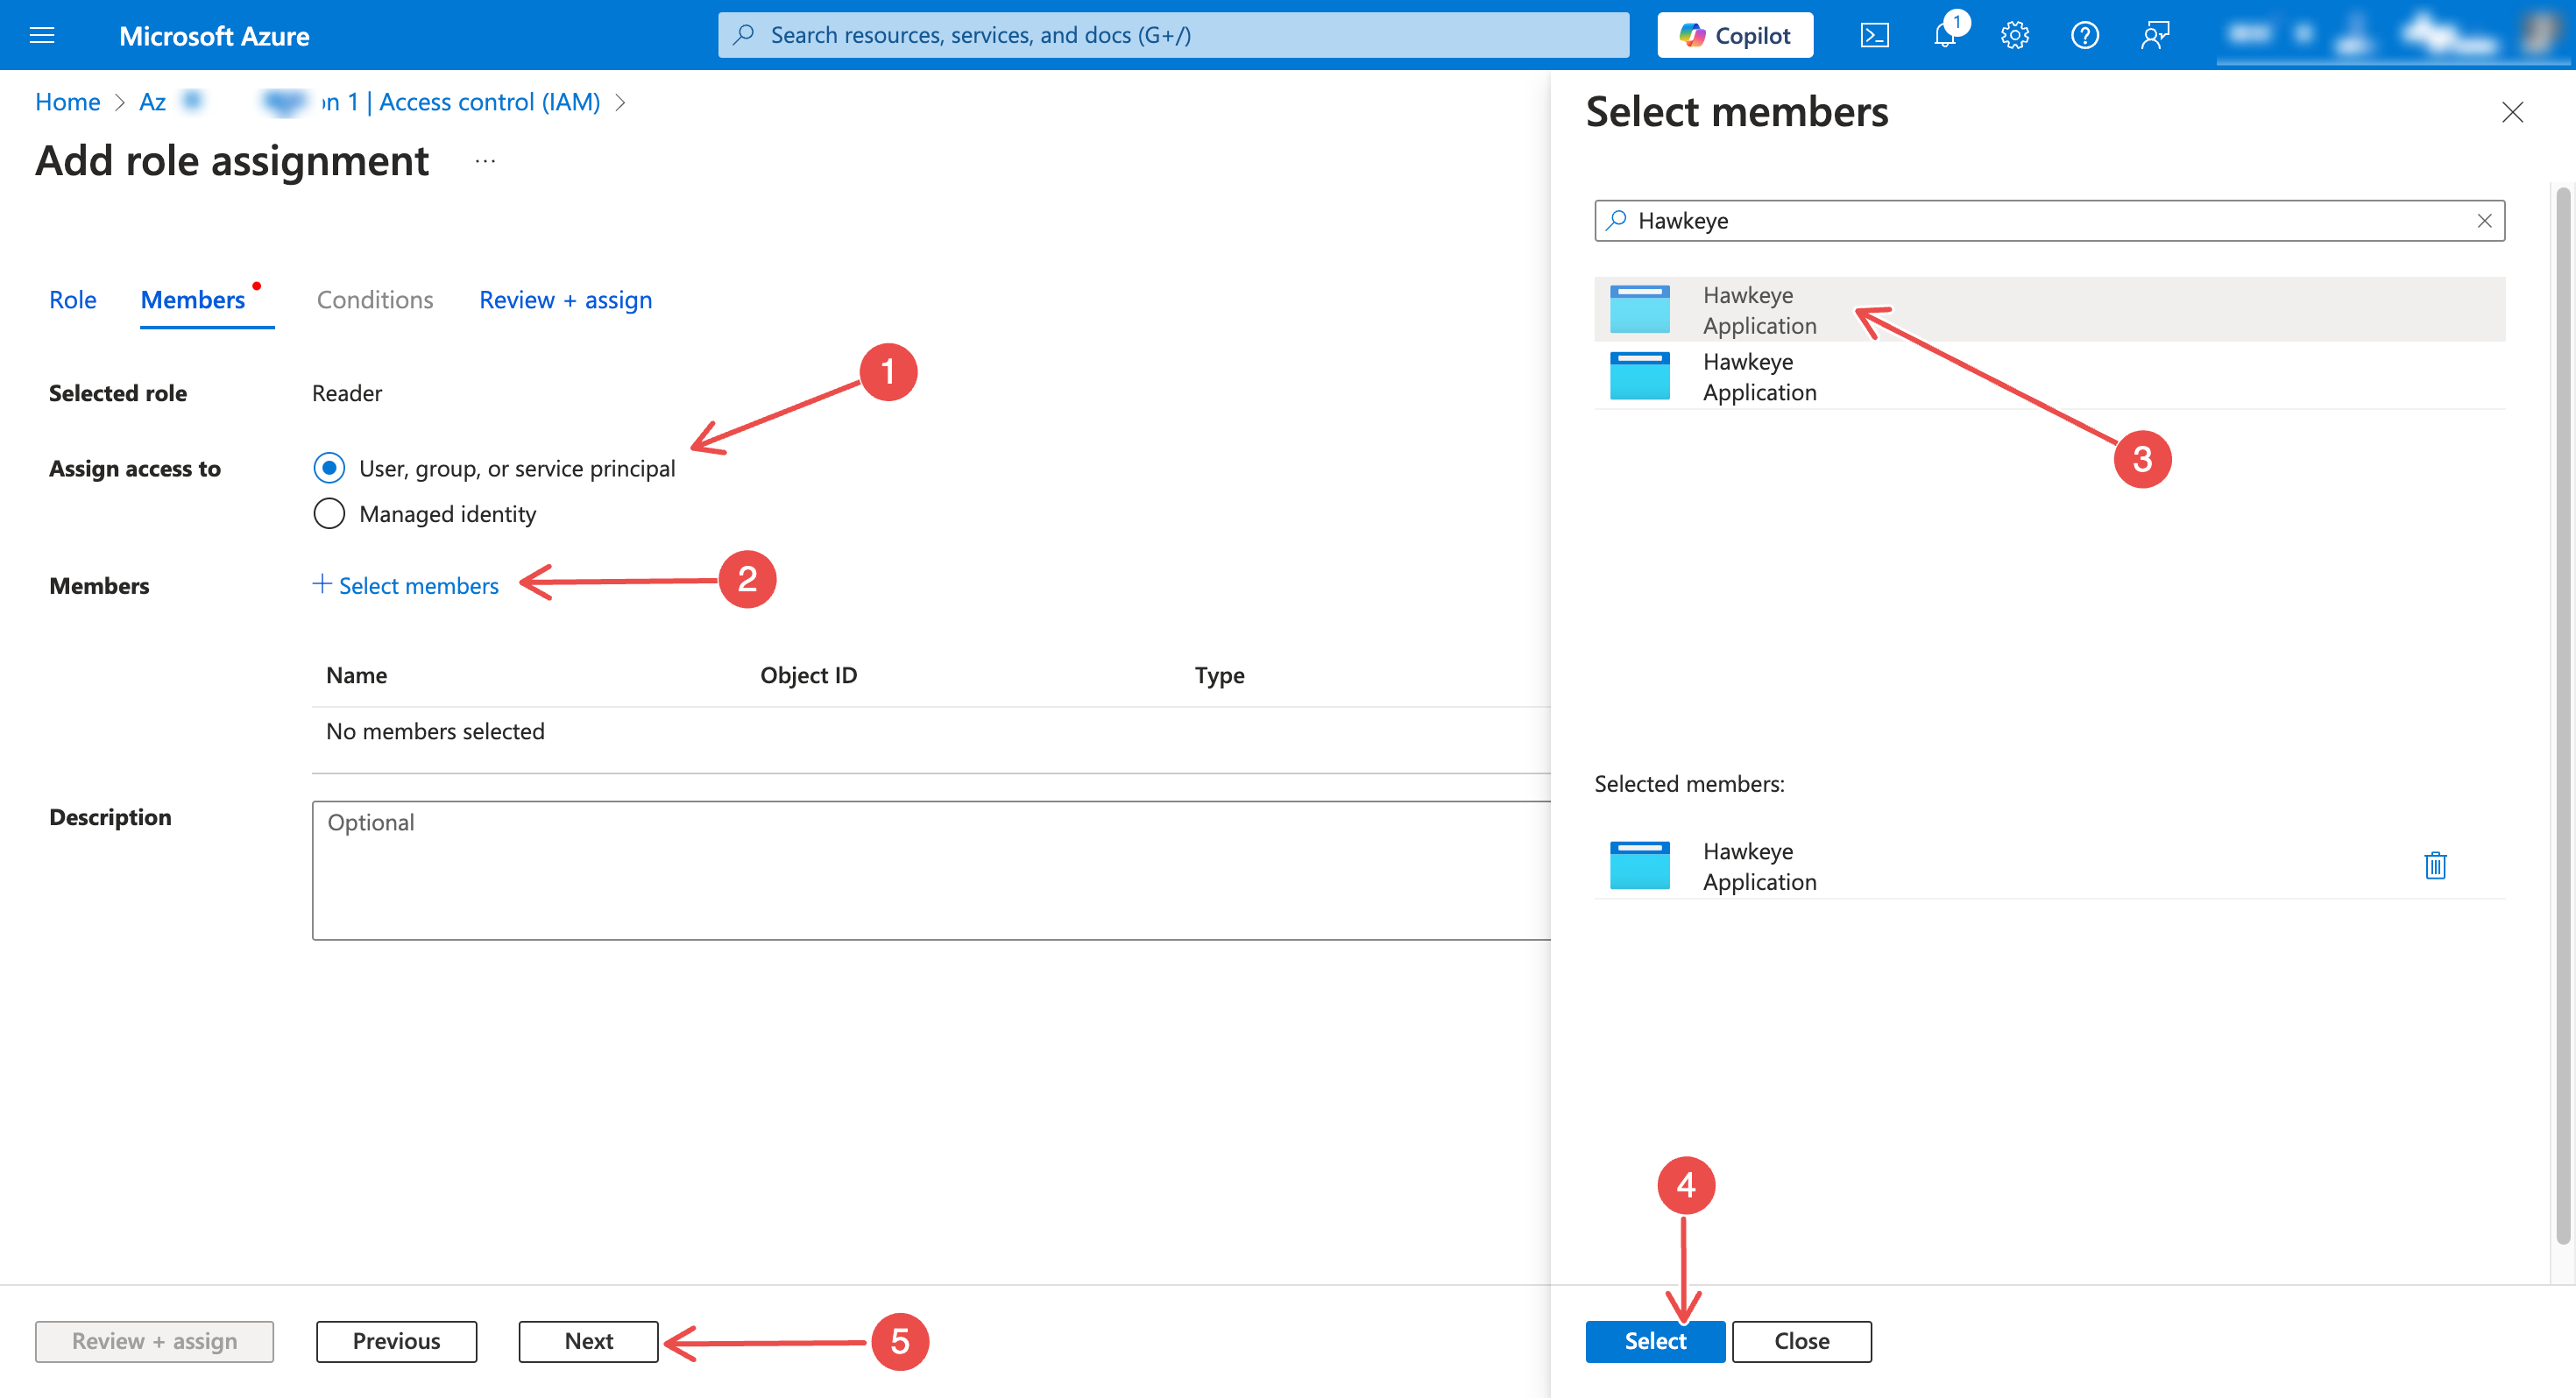
Fig.8 - Assign access to
-
Confirm selection and click Review + assign
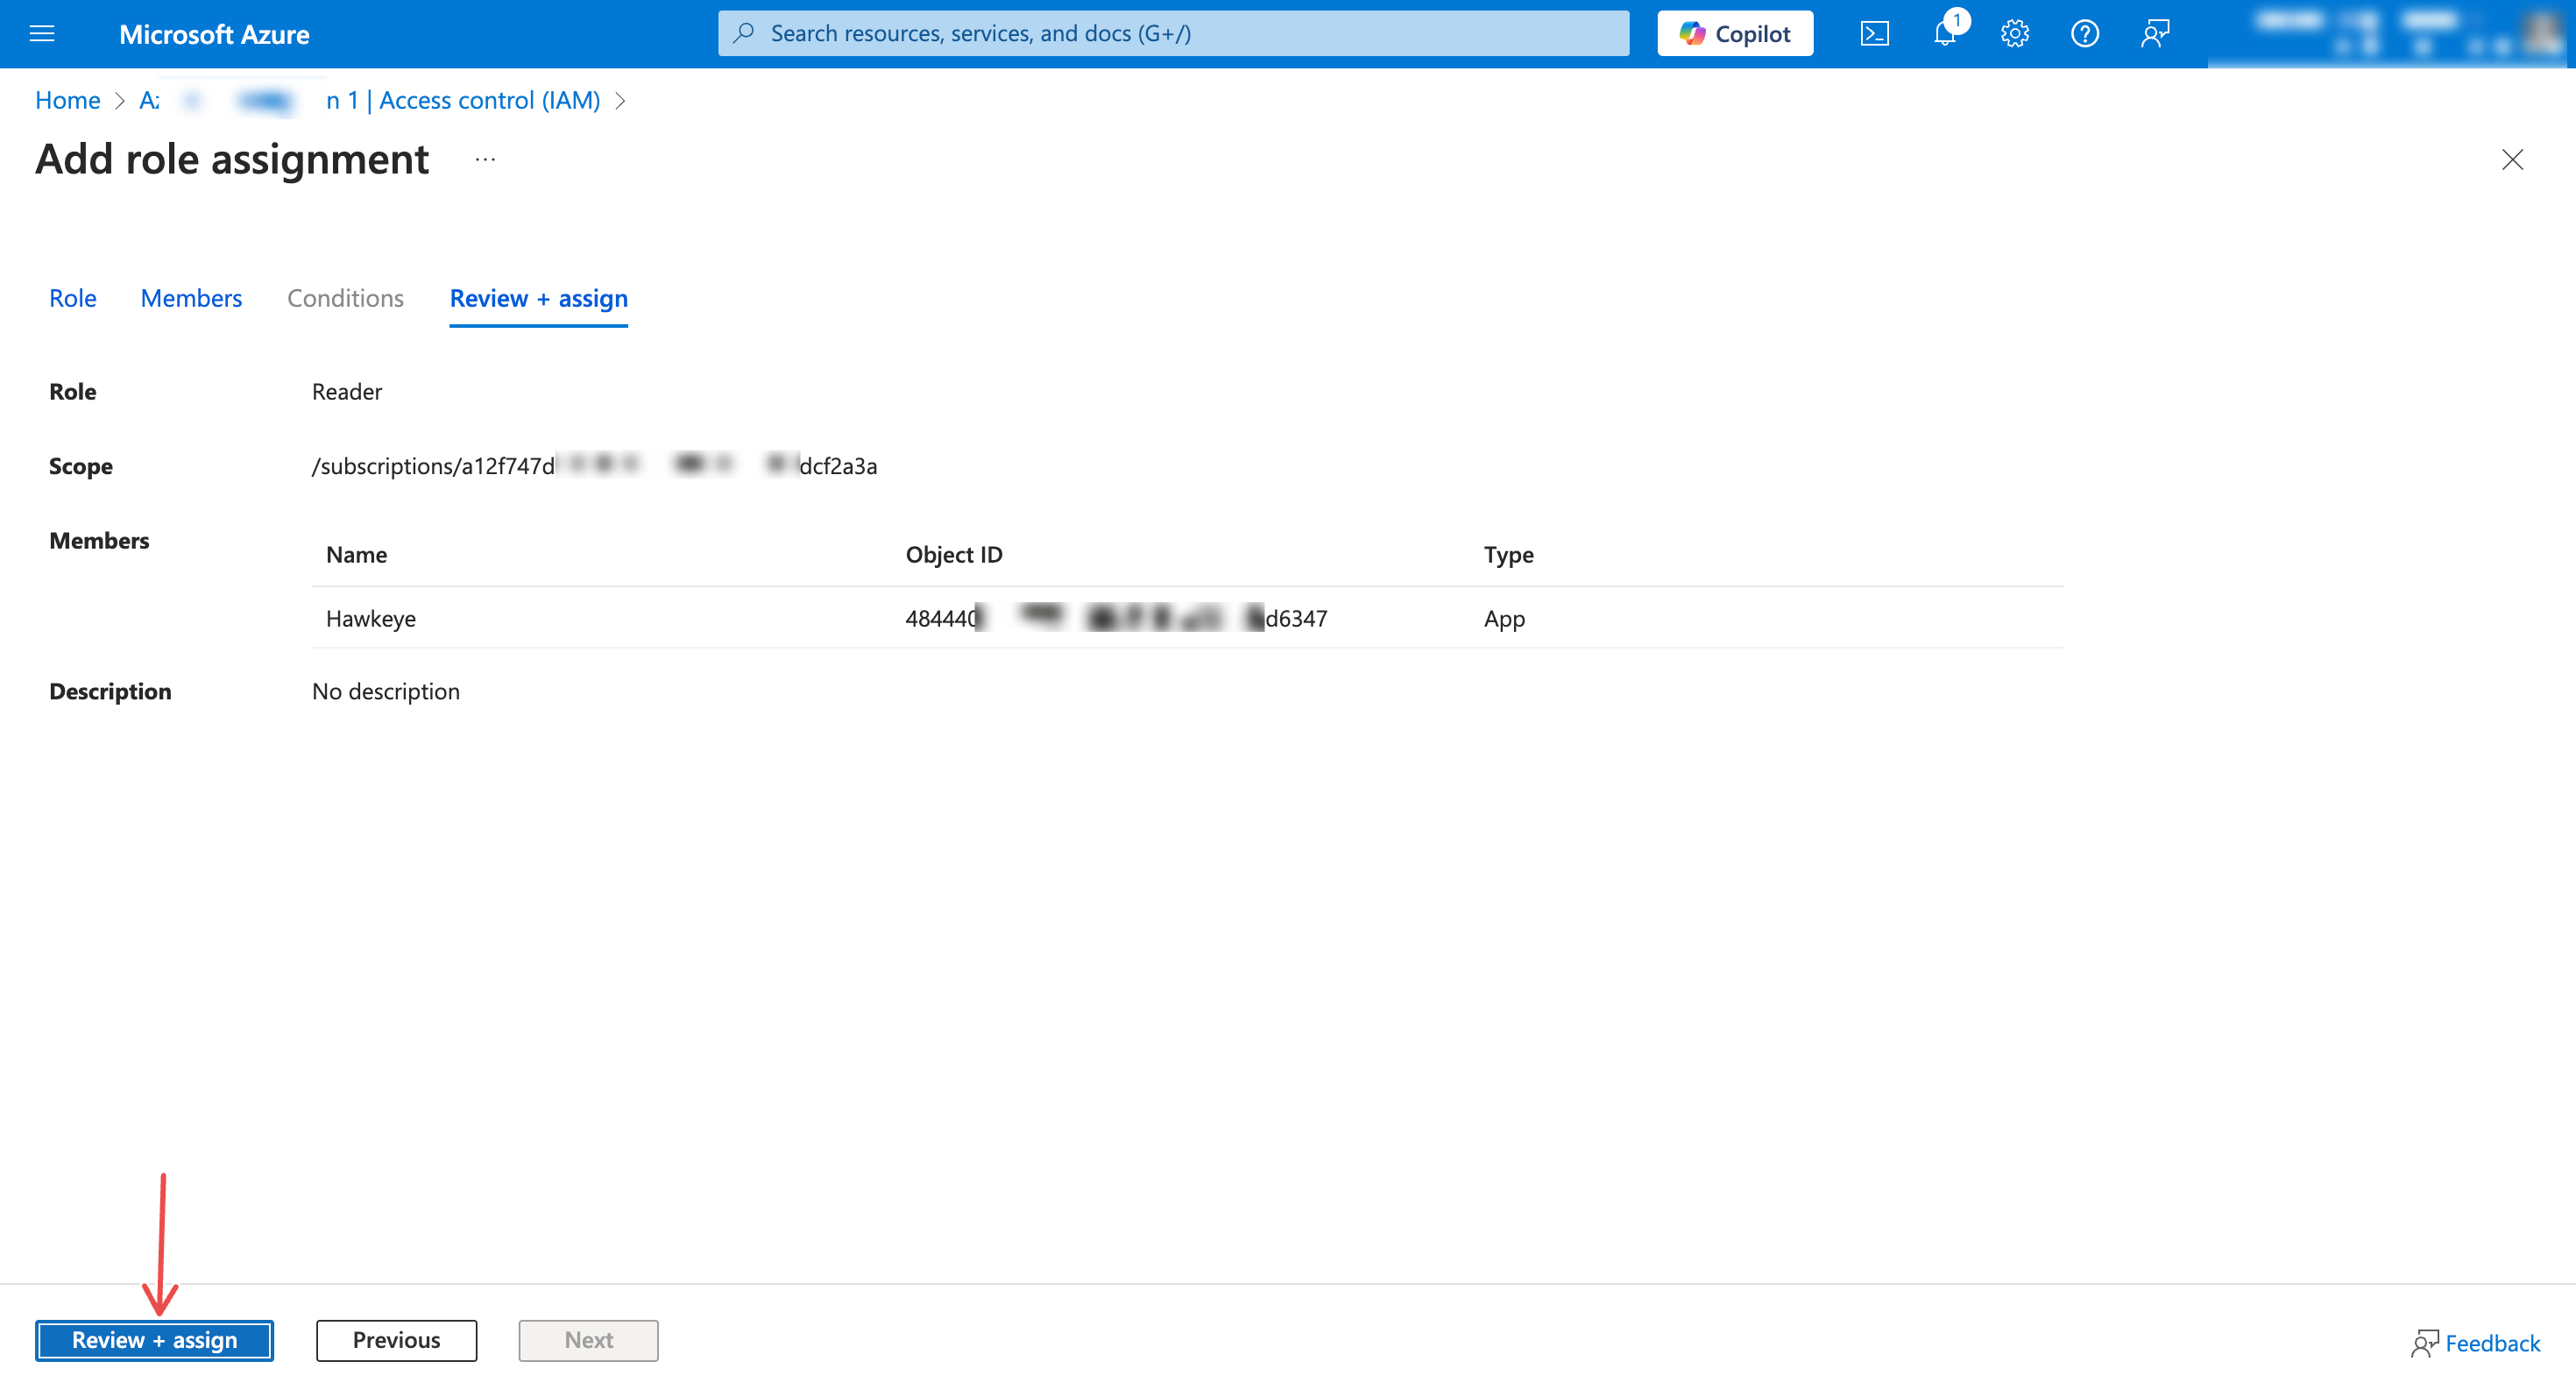
Fig.9 - Review + assign
-
- Add Azure Kubernetes Service RBAC Reader role:
-
Repeat the role assignment process
-
Select Azure Kubernetes Service RBAC Reader Role from the Role dropdown
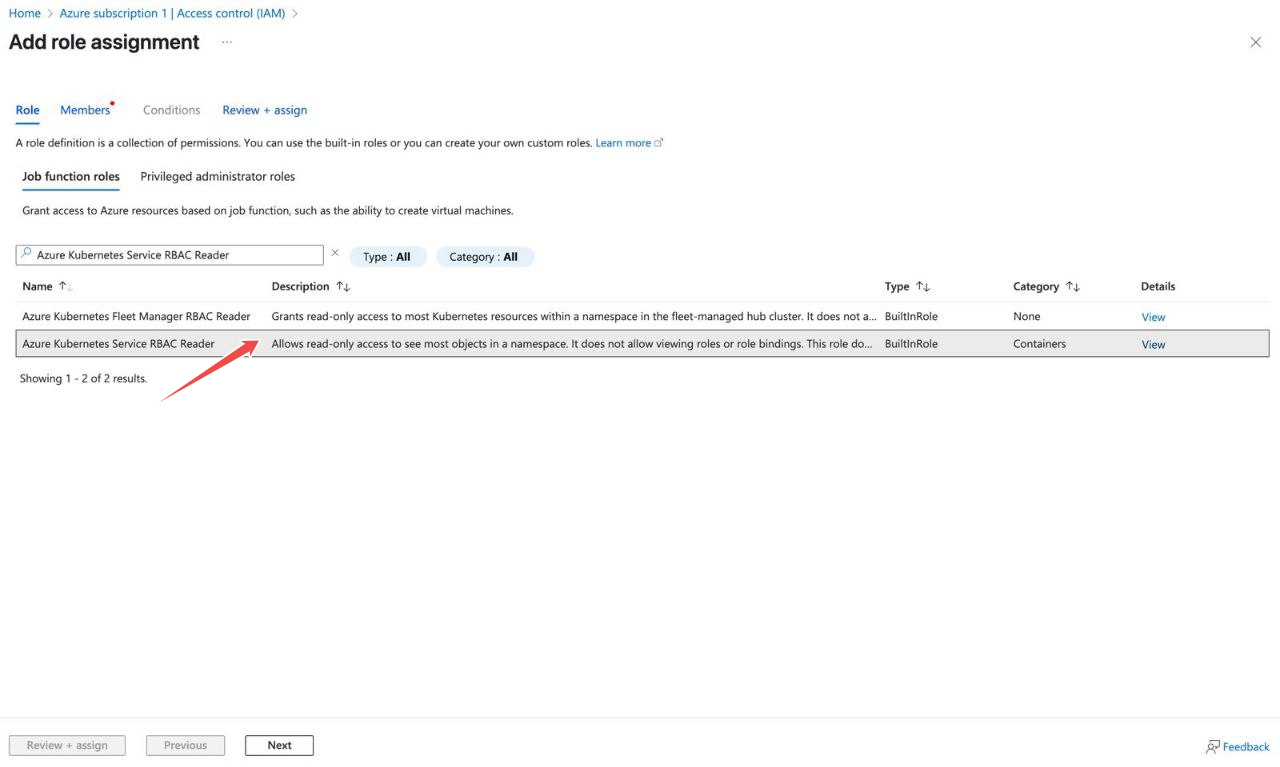
Fig.10 - Add Azure Kubernetes Service RBAC Reader role
-
Choose the same service principal (your registered application)
-
Complete the assignment with Review + assign

Fig.11 - Review + assign
-
Step 4: Configuring Kubernetes Access for Azure Kubernetes Service (AKS)
This section explains how to set up and verify permissions for an Azure Kubernetes Service (AKS) cluster using Role-Based Access Control (RBAC).
In AKS, access is managed through Azure role assignments. You assign an Azure service principal a role at the cluster level, and AKS propagates that permission into the Kubernetes cluster. This works in a similar way to Azure access policies, but the permissions are enforced through Kubernetes RBAC.
After the role is assigned, you can confirm that access is working by authenticating as the service principal and running Kubernetes commands using kubelogin.
For the official Microsoft guidance, see: Use a Service Principal with Azure Kubernetes Service (AKS)
Assign RBAC permissions in the Azure portal
- Sign in to the Azure portal.
- Navigate to Kubernetes services.
- Select the AKS cluster you want to manage.
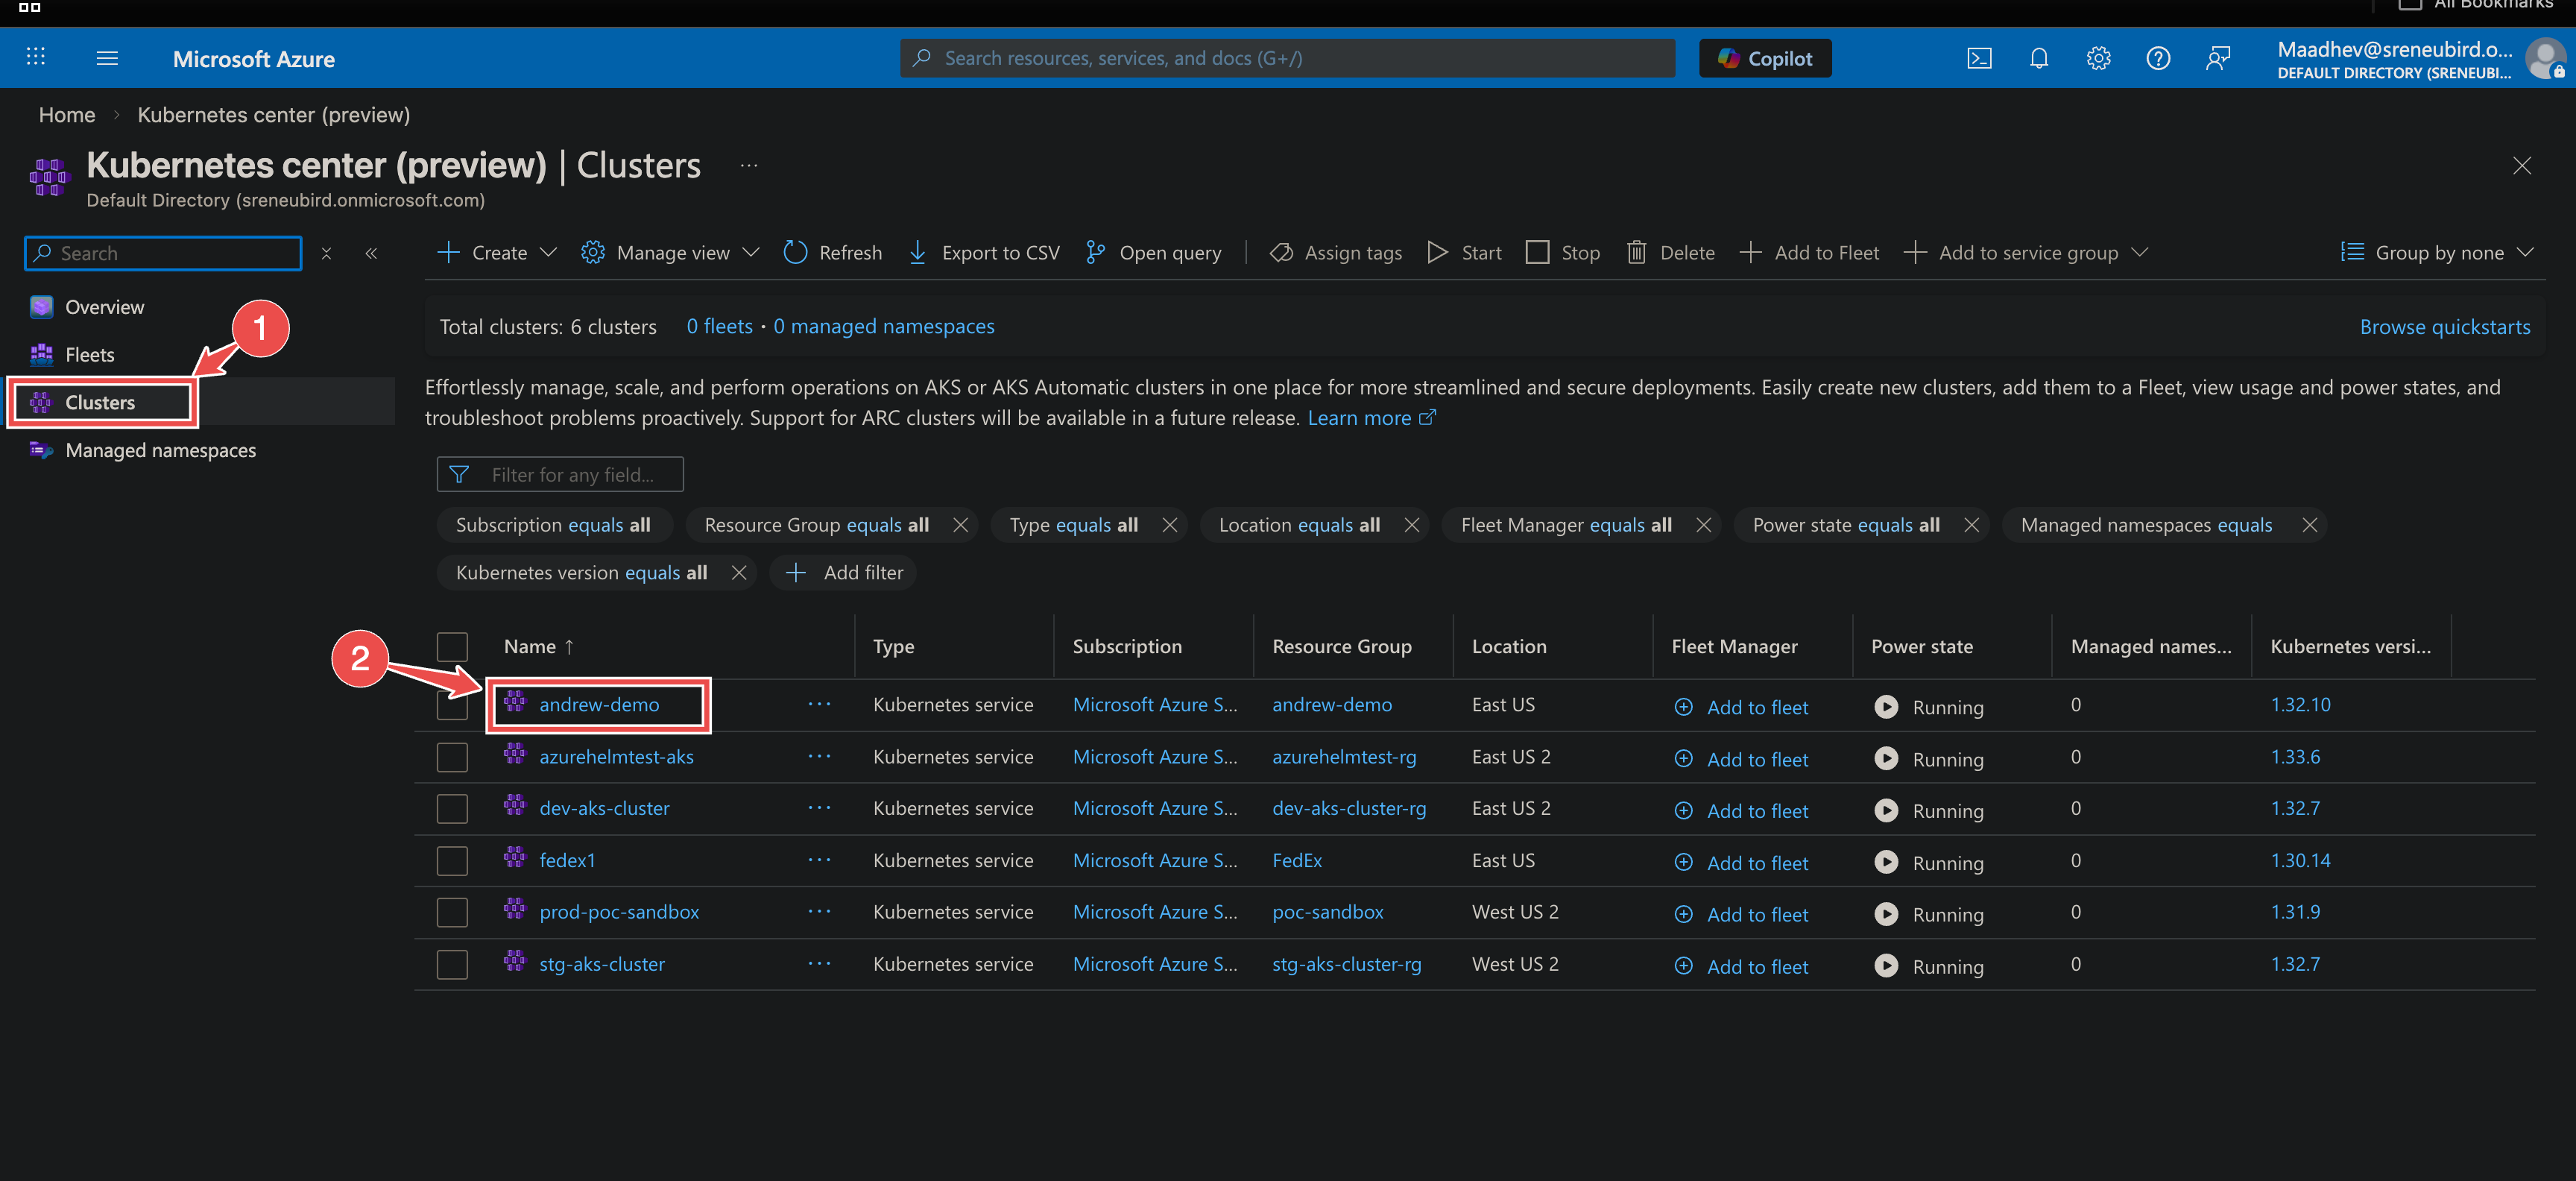
Fig.12 - Kubernetes Clusters
- In the left menu, select Access control (IAM).
- Click Add → Add role assignment.
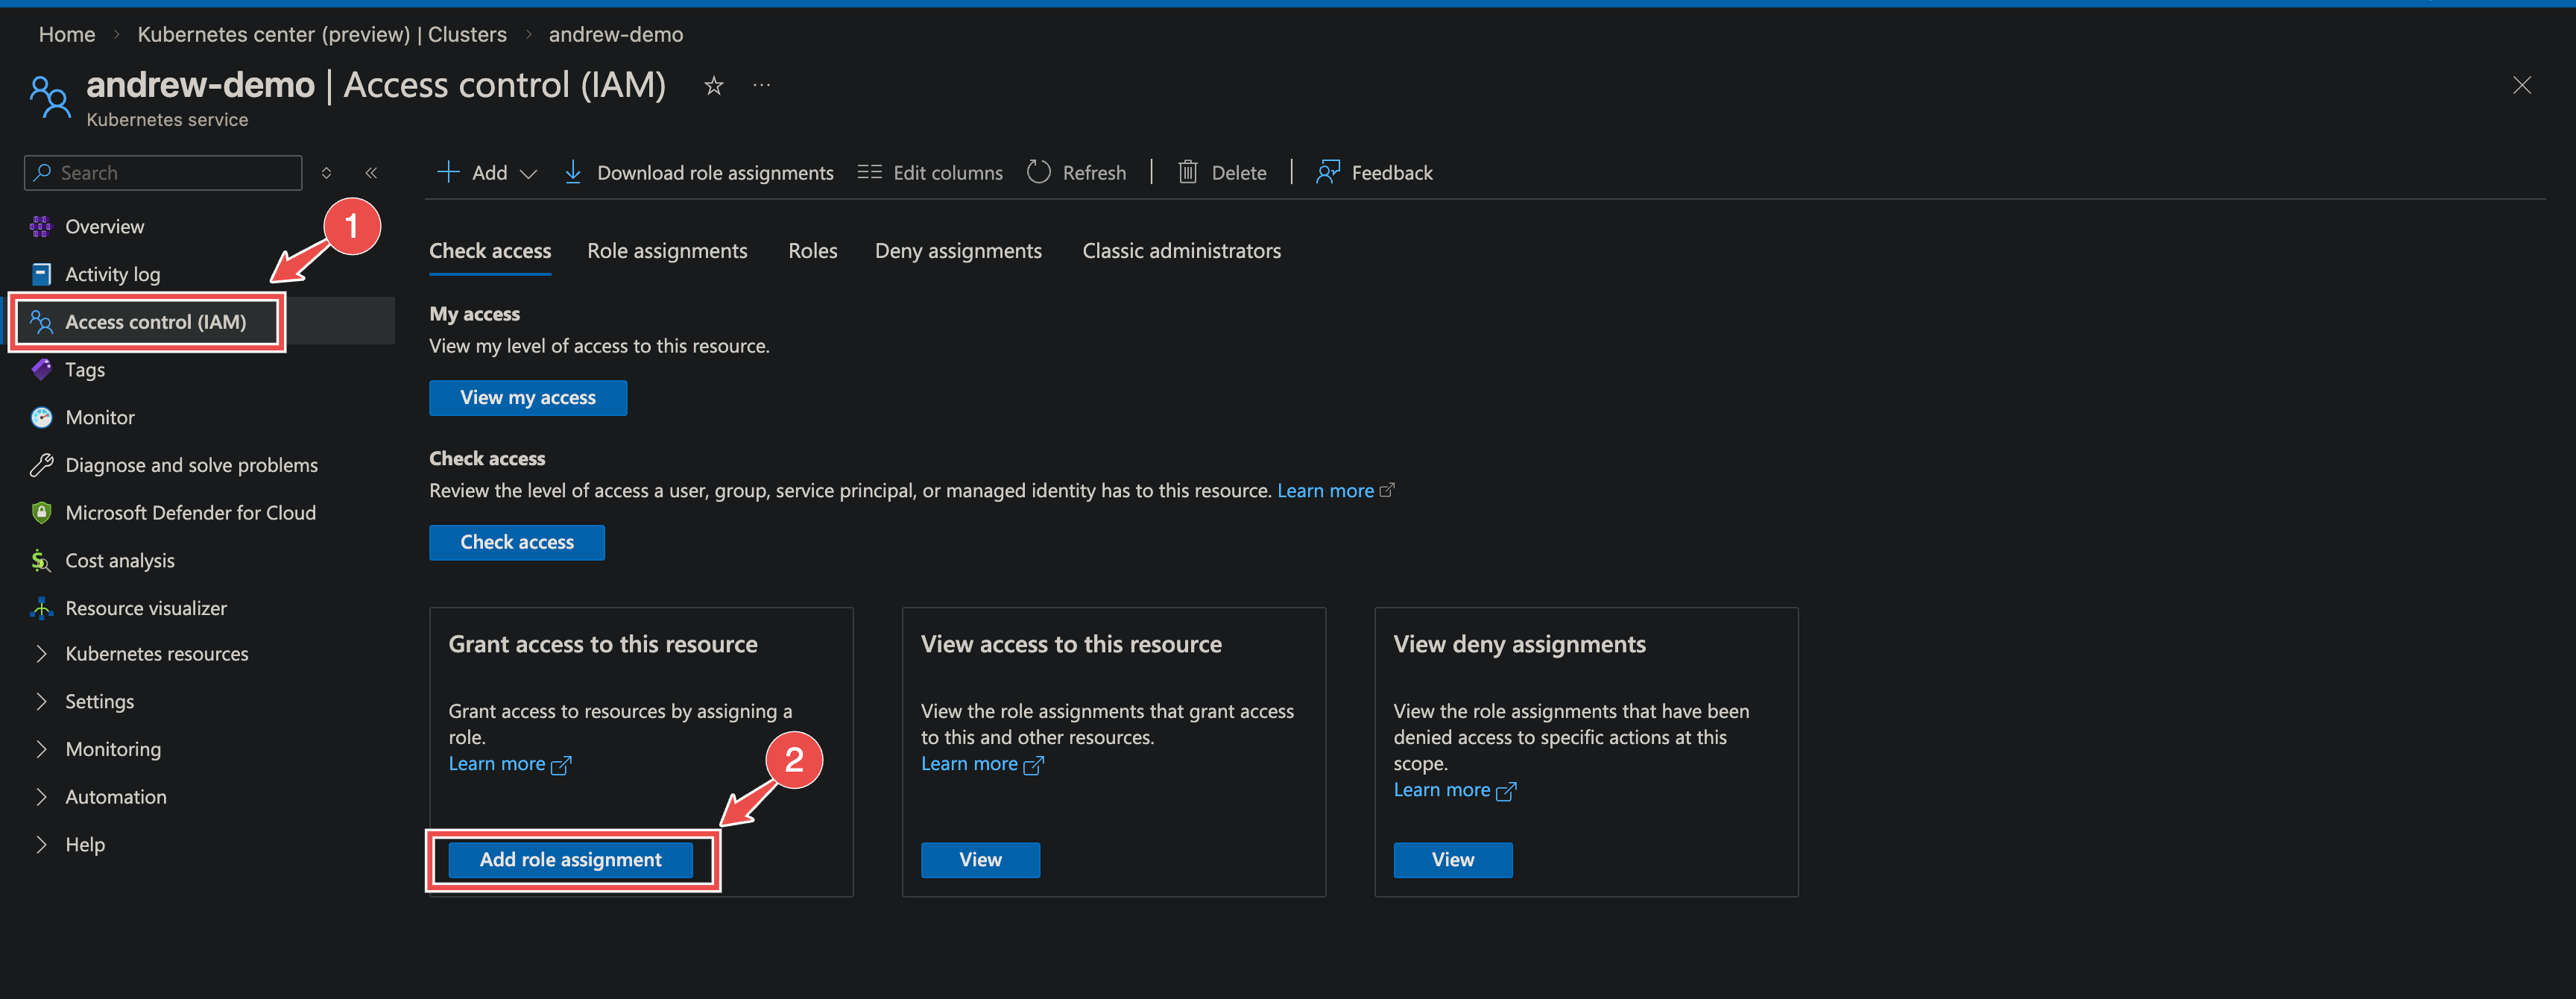
Fig.13 - Azure Access Control (IAM)
- Choose the appropriate role, for example Azure Kubernetes Service RBAC Cluster Admin or RBAC Reader, depending on the level of access required.
- Assign the role to the service principal.
- Save the role assignment.
Once this is complete, Azure will handle syncing the permissions to the Kubernetes cluster.
Verify access using kubelogin
Use the following commands to test that the service principal can authenticate and access the cluster.
# Log in with the service principalaz login \  --service-principal \  --username <sp_client_id> \  --password <sp_password> \  --tenant <tenant_id>
# Fetch AKS credentialsaz aks get-credentials \  --resource-group <resource_group> \  --name <aks_name>
# Convert kubeconfig to use service principal authenticationkubelogin convert-kubeconfig -l spn
# Export service principal credentialsexport AAD_SERVICE_PRINCIPAL_CLIENT_ID=<sp_client_id>export AAD_SERVICE_PRINCIPAL_CLIENT_SECRET=<sp_password>
# Run a kubectl command to confirm accesskubectl get pods
If the setup is correct, the command should run without triggering a device login or interactive authentication prompt.
Step 5: Configure your Azure connection in Hawkeye
Fig.14 - A walkthrough of how to configure Azure connection in Hawkeye
With your application registered, you can now configure the connection within Hawkeye.
-
Open Hawkeye dashboard: Navigate to the Connections section of the Hawkeye dashboard and click the New Connection card.

Fig.15 - Azure Connection
-
Select Azure as the Connection Type: Choose Microsoft Azure from the list of connection types.
Fig.16 - Select Azure as the Connection Type
-
Enter the required credentials:
In the New Connection interface:
-
Name: Assign a unique, descriptive identifier for this connection (e.g., Azure-Prod-Subscription-WestUS-Logs).
-
Description: Briefly outline the connection’s scope, environment, or purpose.
Select Telemetry Sources: You must choose at least one data type to stream from Azure. The selection dictates the required Service Principal permissions.
Source Description Alerts Real-time notifications for issues. Metrics Performance and usage data. Logs Application and system logs. Config Resource settings and inventory. - Tenant ID: Your Azure tenant ID.
- Client ID: The client ID from your registered application.
- Client Secret: The secret you created earlier. Once you’ve entered all the details, click Save to create the connection.
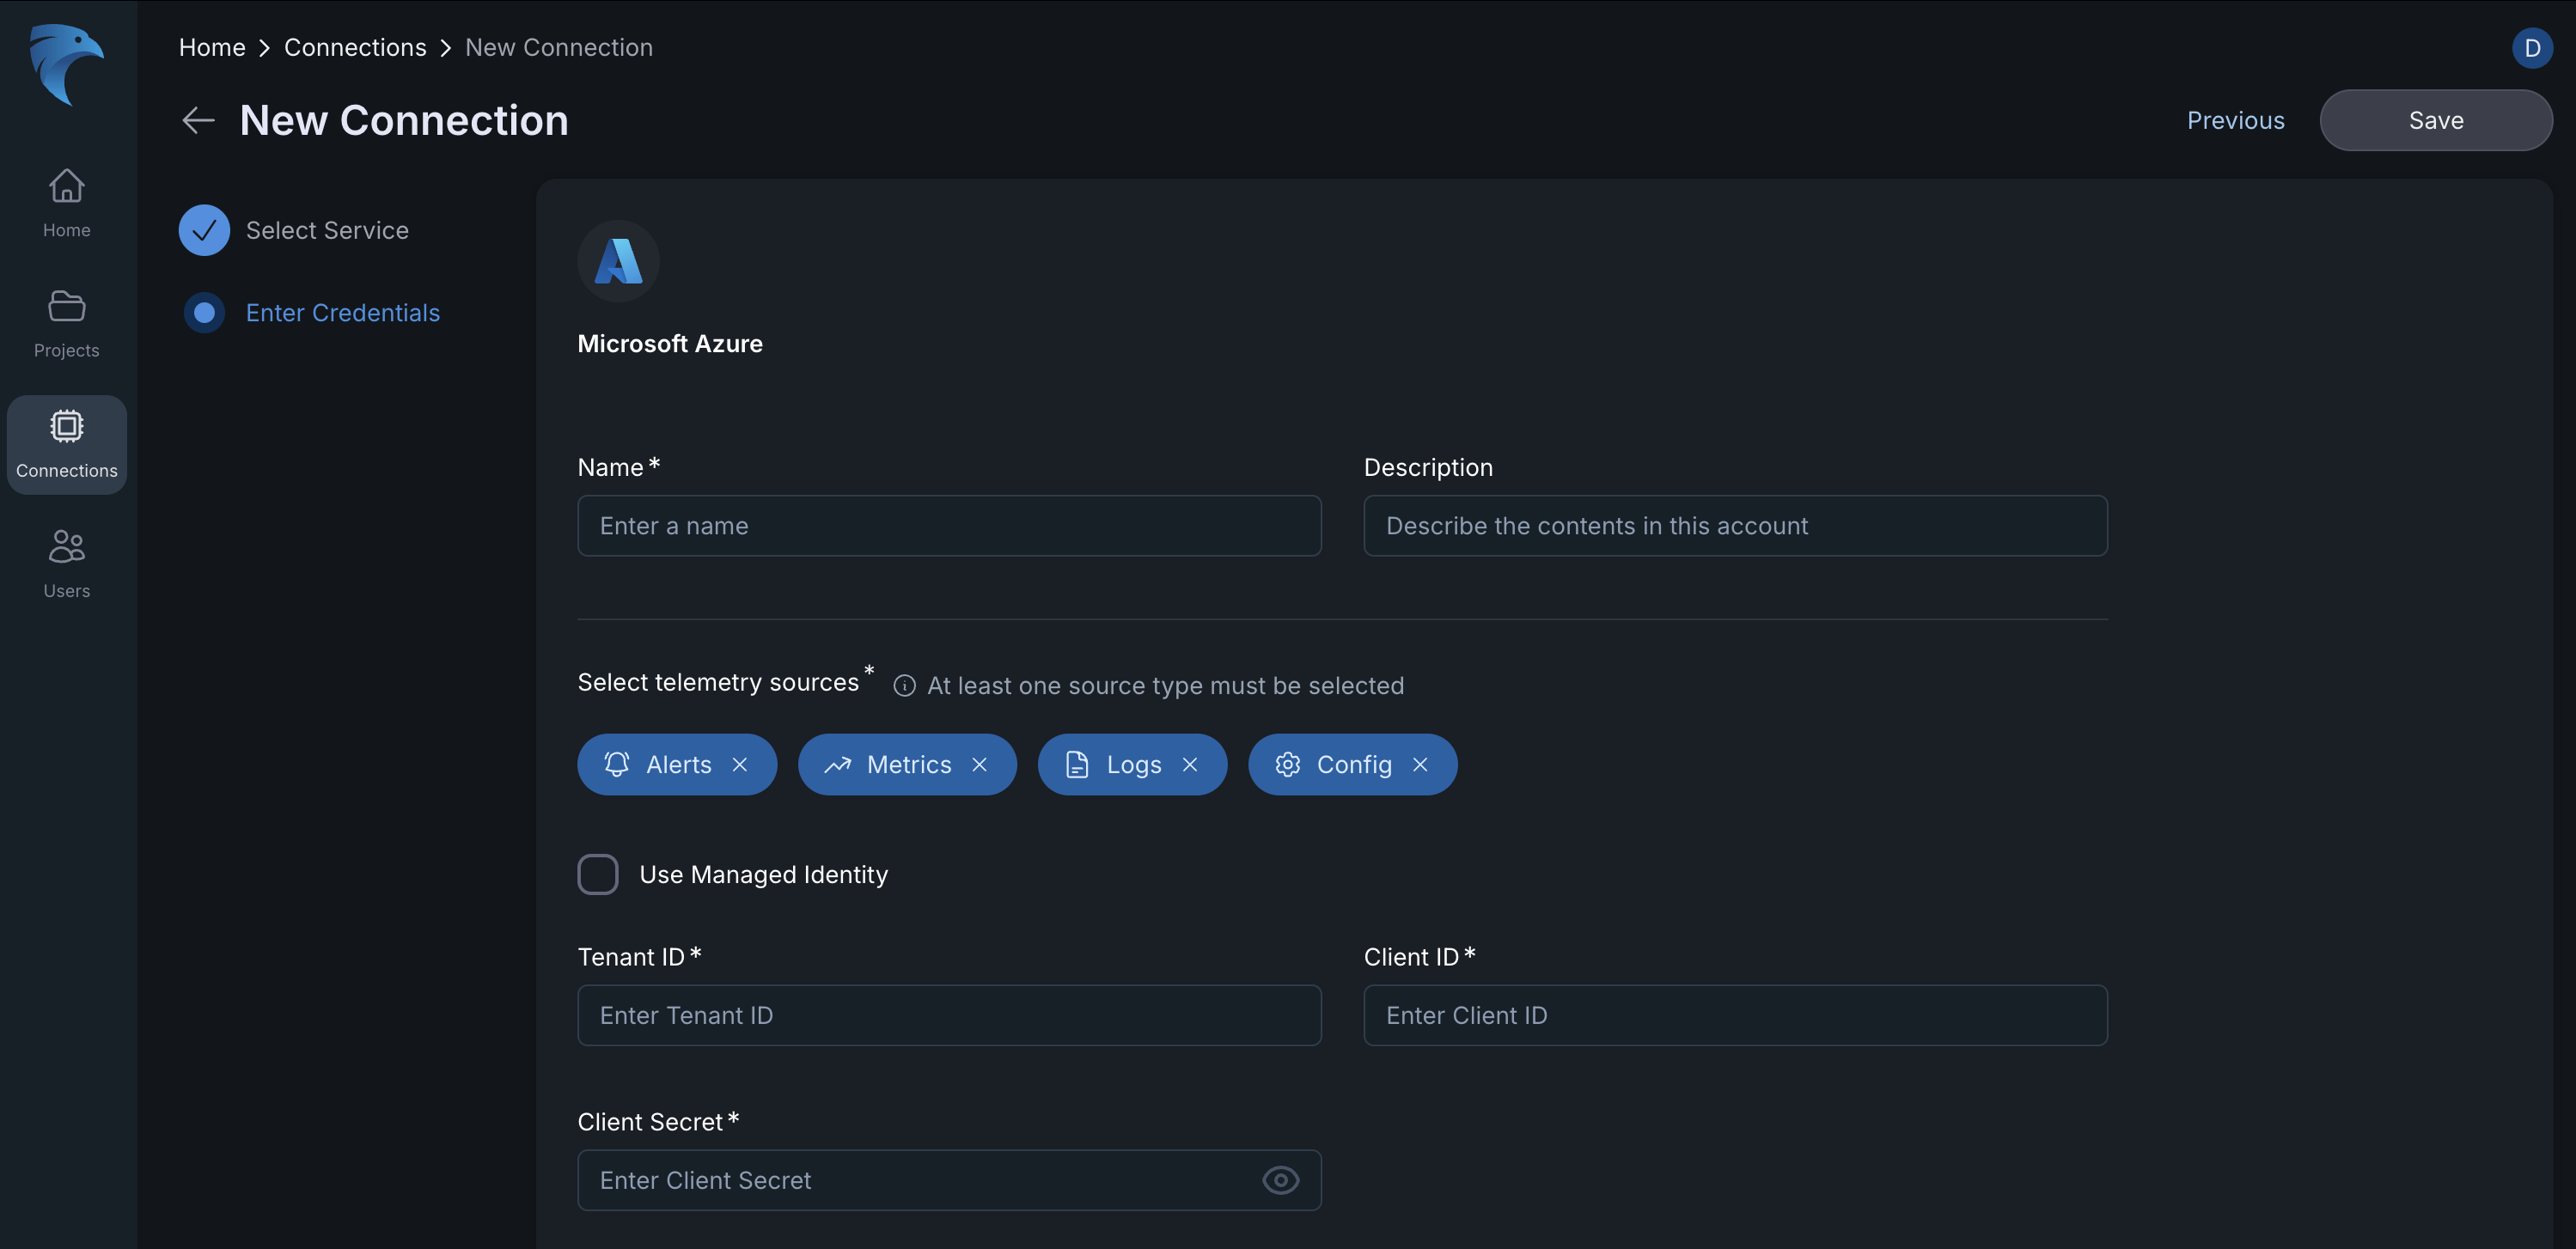
Fig.17 - Add Azure as the Connection
-
-
Confirm connection: To confirm that your connection was successfully created, navigate to the Connections tab and you should see a card like this:
Configuring Prometheus Metrics for Azure Kubernetes (K8s)
When setting up a new project and integrating an Azure connection, you need to ensure you select the appropriate Prometheus Workspace to collect metrics for your Azure Kubernetes Service (AKS) clusters. This step is critical for gaining visibility into the performance and health of your AKS environment using Prometheus metrics.
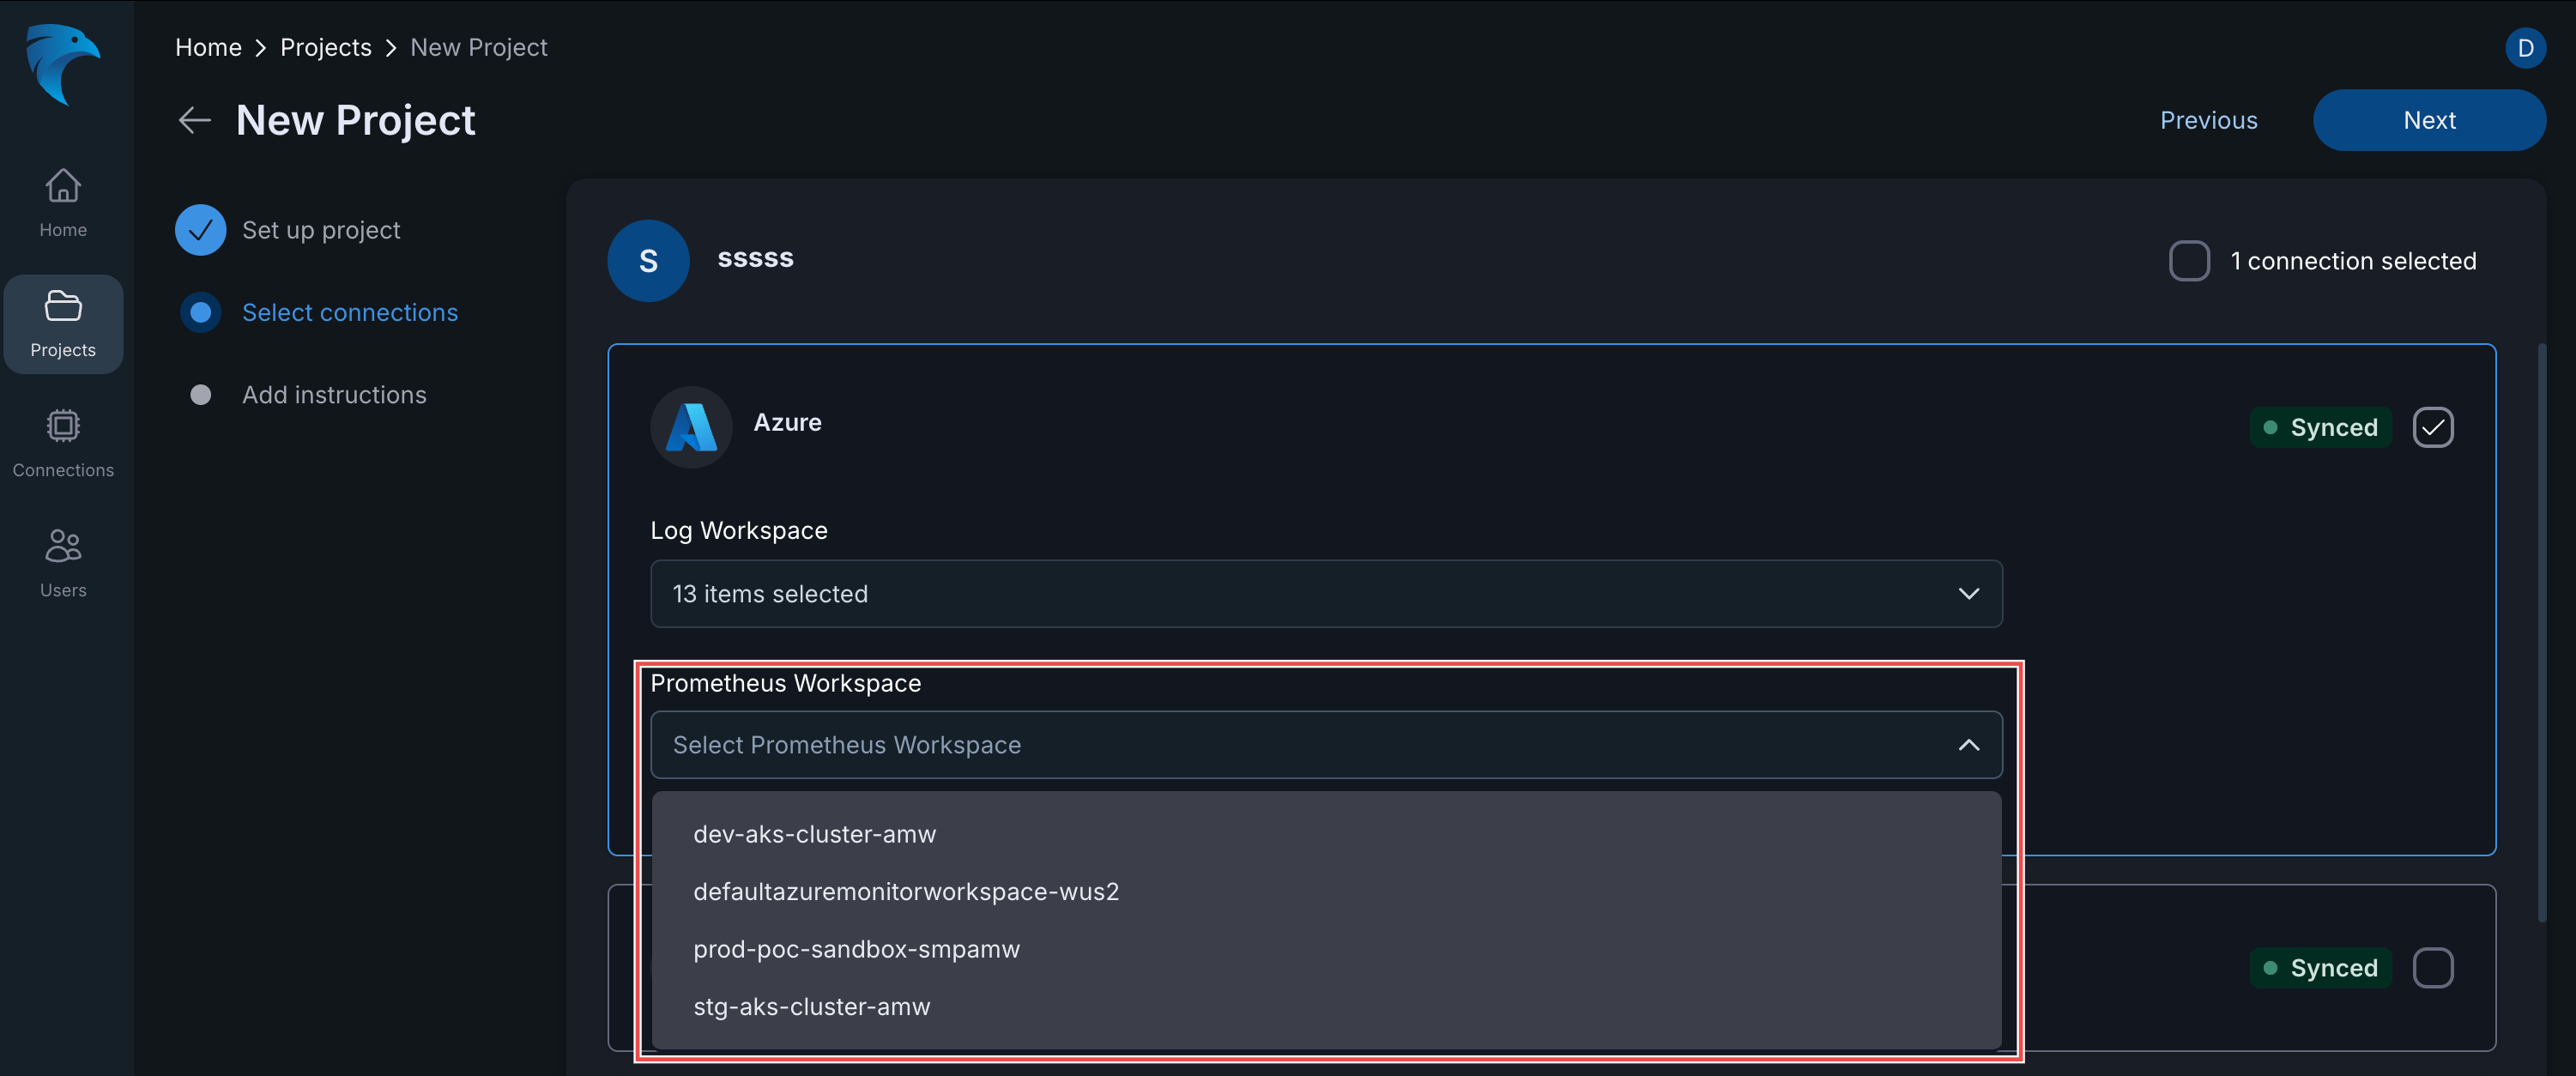
Fig.18 Configuring Prometheus Metrics for Azure Kubernetes
Step-by-Step
- Set Up Project: Complete the initial “Set up project” stage.
- Select Connections: In the “Select connections” stage, choose your existing Azure connection.
- Log Workspace: Confirm the required log workspaces are selected.
- Prometheus Workspace: Under the Prometheus Workspace section, use the dropdown menu to select the specific workspace that is monitoring your Azure K8s environment (e.g.,
dev-aks-cluster-amw,prod-poc-sandbox-smpamw, etc.).