AWS
Connecting Hawkeye to your AWS environment allows us to collect key telemetry data from various services on your AWS console. These services include resource configurations, Cloudtrail change events, Cloudwatch metrics, logs, and alarms.
The scope of data that we can access depends on the permissions assigned to the AWS role and the configuration of your AWS services.
To ensure a smooth integration, we follow AWS’s best practices by utilizing an assumed role and external ID for secure access.
Step 1: Create an IAM Role
Fig.1 - A walkthrough of how to create an IAM role
Sign in to the AWS management console with the appropriate permissions to create an IAM role. After that, follow the instructions below:
-
Access IAM: Navigate to the IAM service in the AWS console.
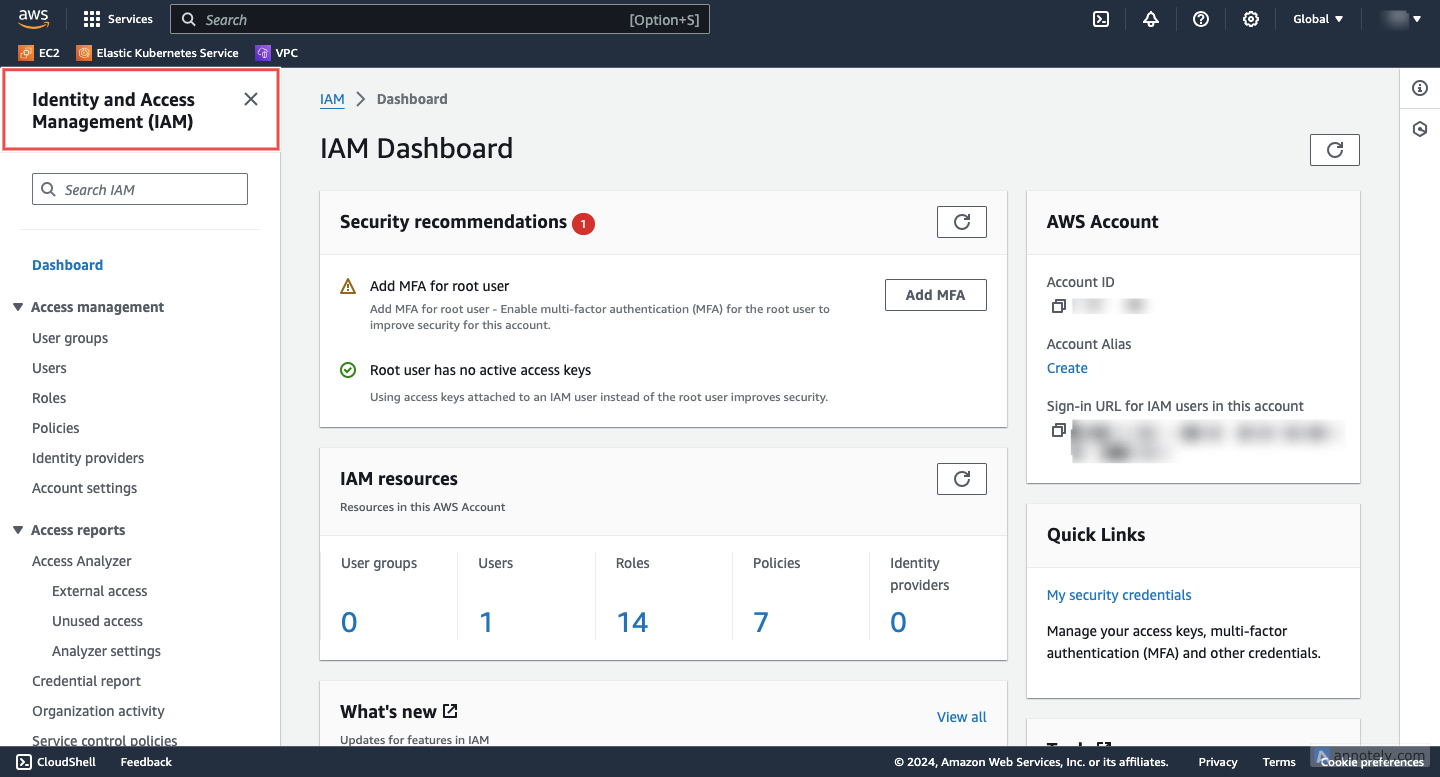
Fig.2 - Access IAM
-
Create a new role: In the navigation pane on the left, choose Roles > Create role.
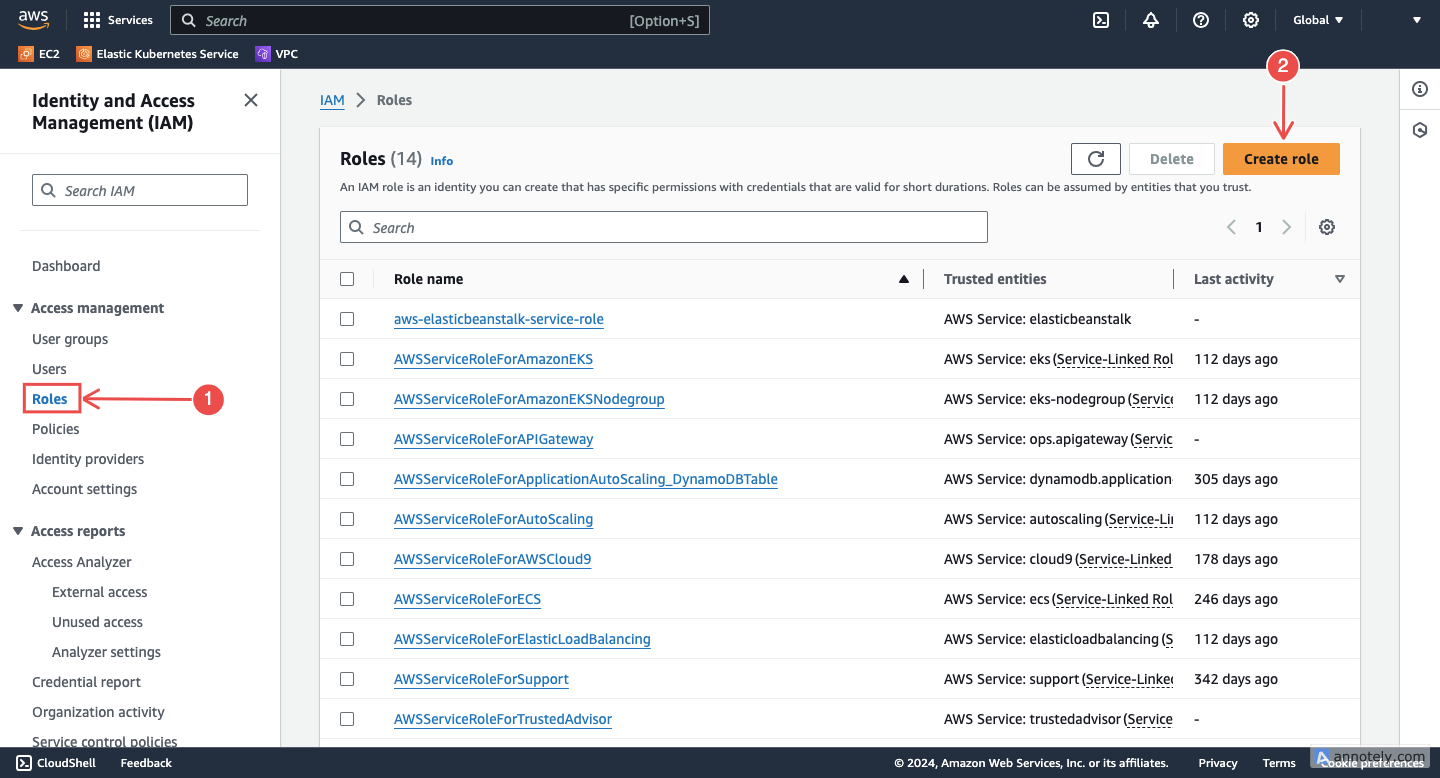
Fig.3 - Create a new role
-
Choose a trusted entity: Select Another AWS account as the type of trusted entity.
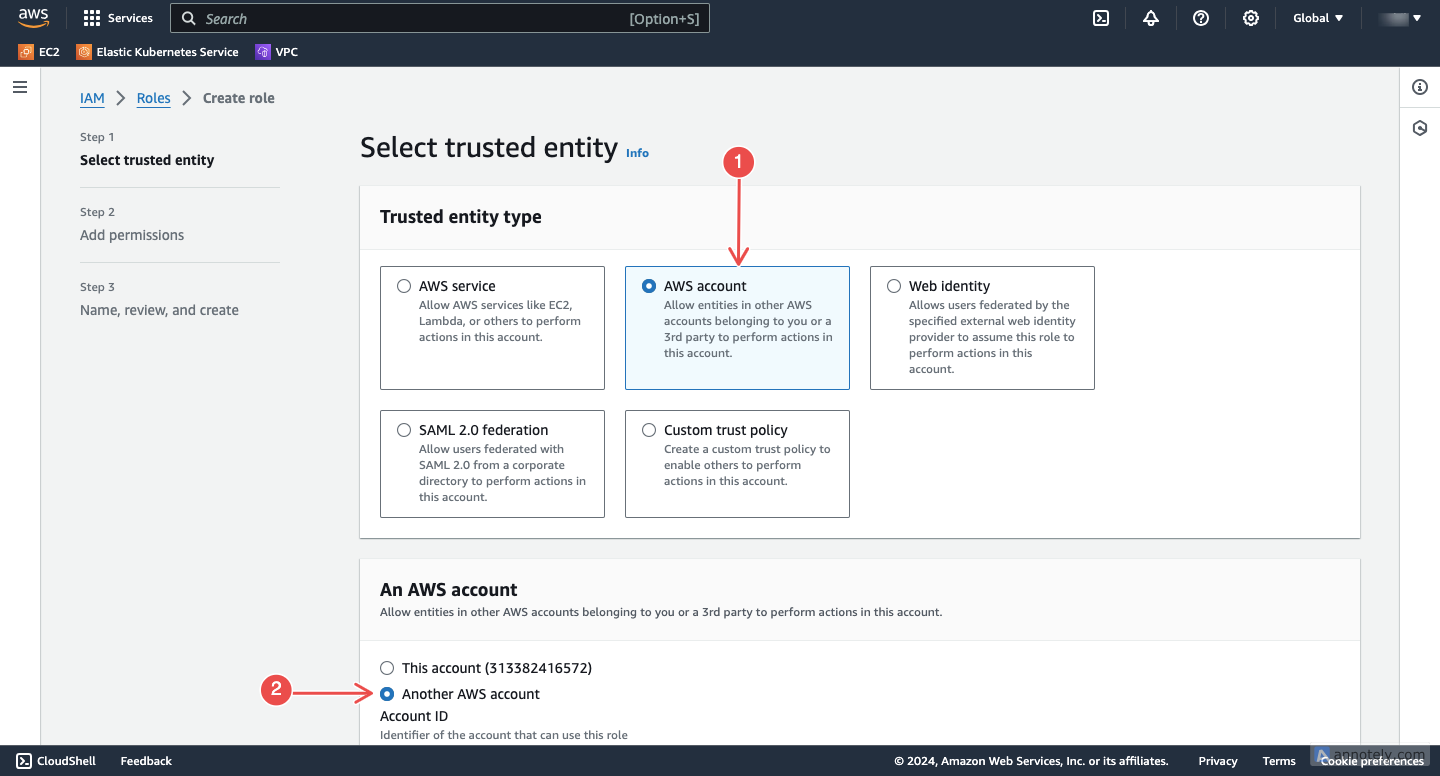
Fig.4 - Choose a trusted entity
-
Enter credentials:
-
Add Neubird’s Account ID: In the Account ID input box, paste the Neubird AWS Account ID:
810918113647. This will give us access to the IAM role. -
Add an External ID: Under Options, enter an external ID. For this, you’ll need to navigate to your AWS connection on the Hawkeye dashboard, and copy the External ID.
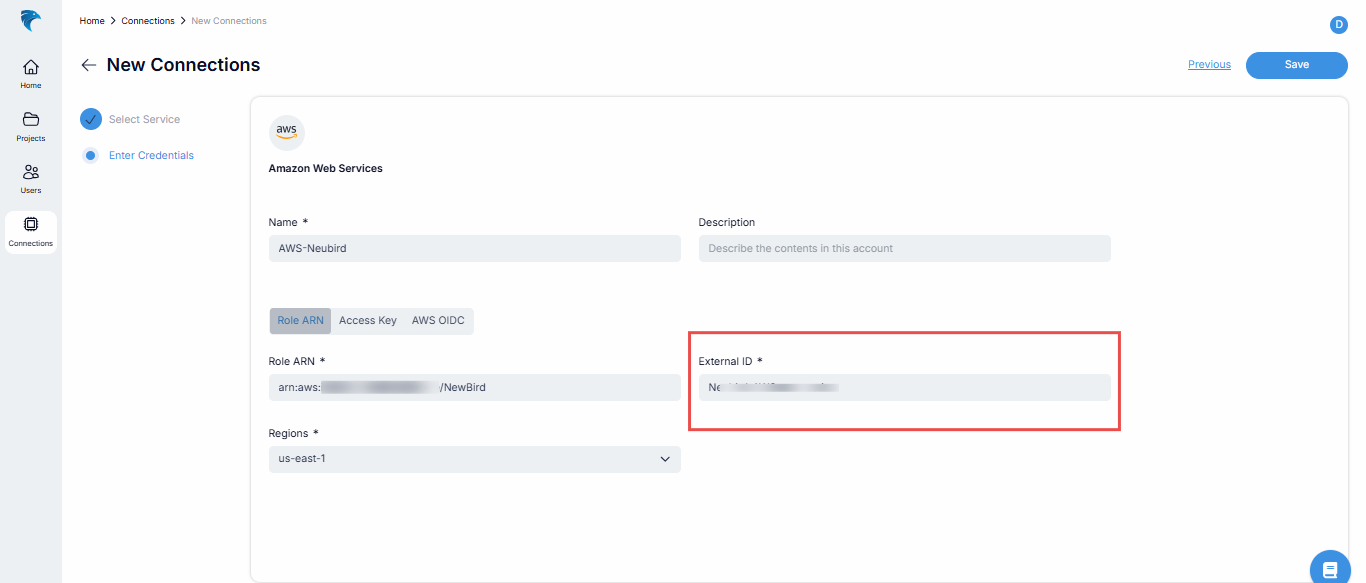
Fig.5 - Enter external ID
Once you have the External ID, paste it in the External ID input box.
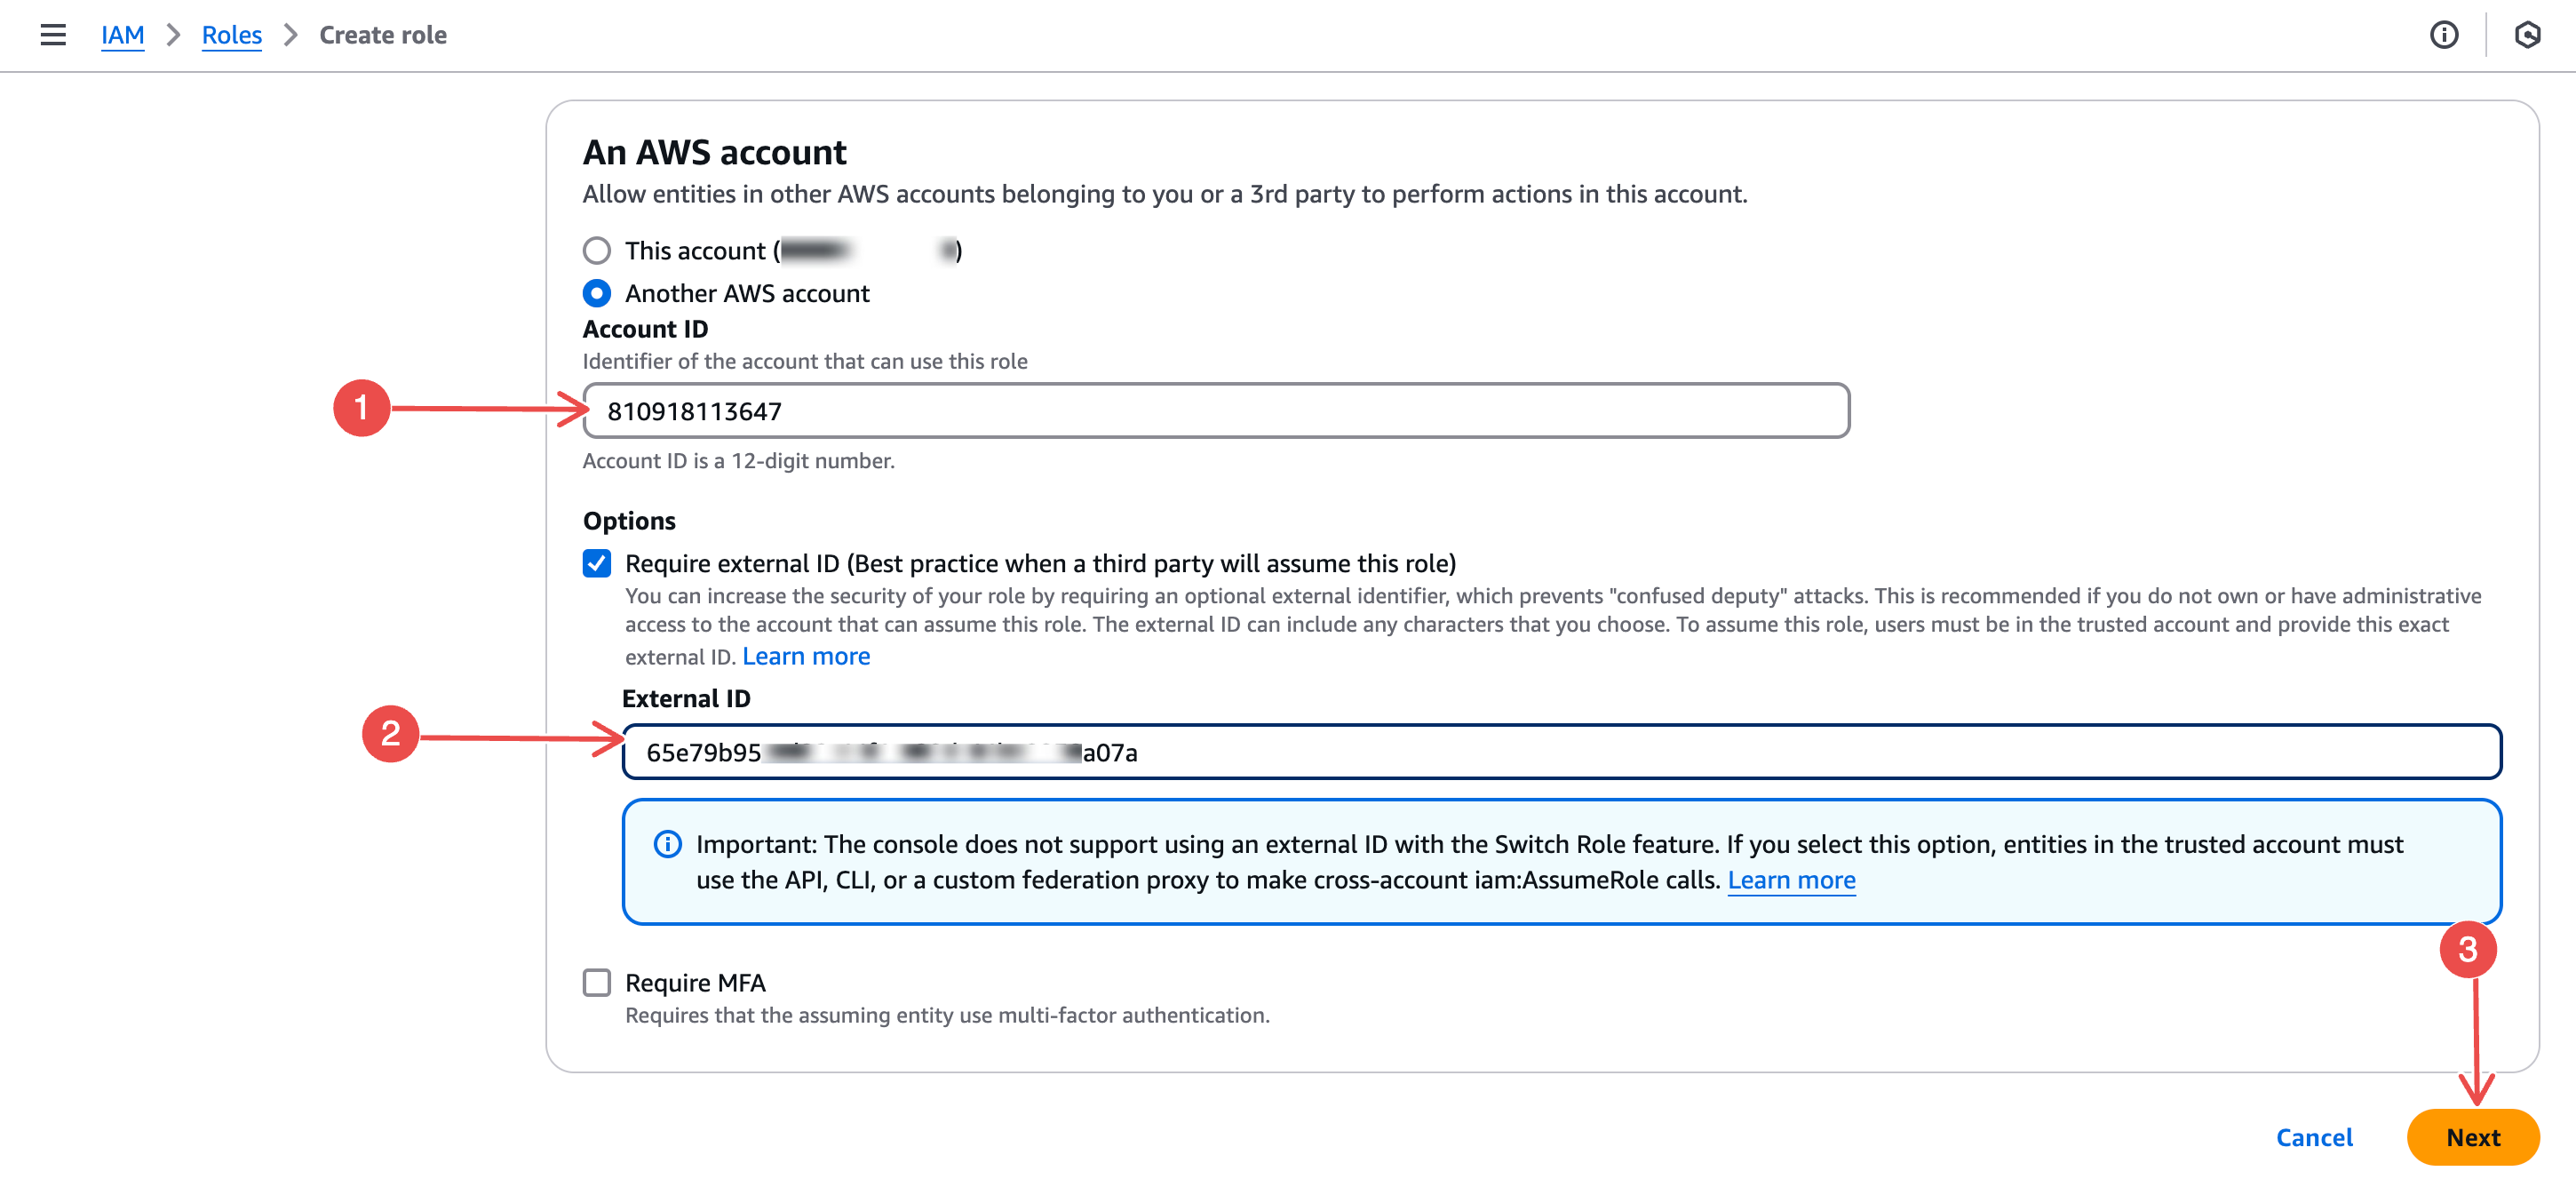
Fig.6 - Paste external ID
After this, click on the Next button at the bottom right corner.
-
-
Assign permissions: On the permissions console, use the Filter and select AWS managed - job function > ReadOnlyAccess.
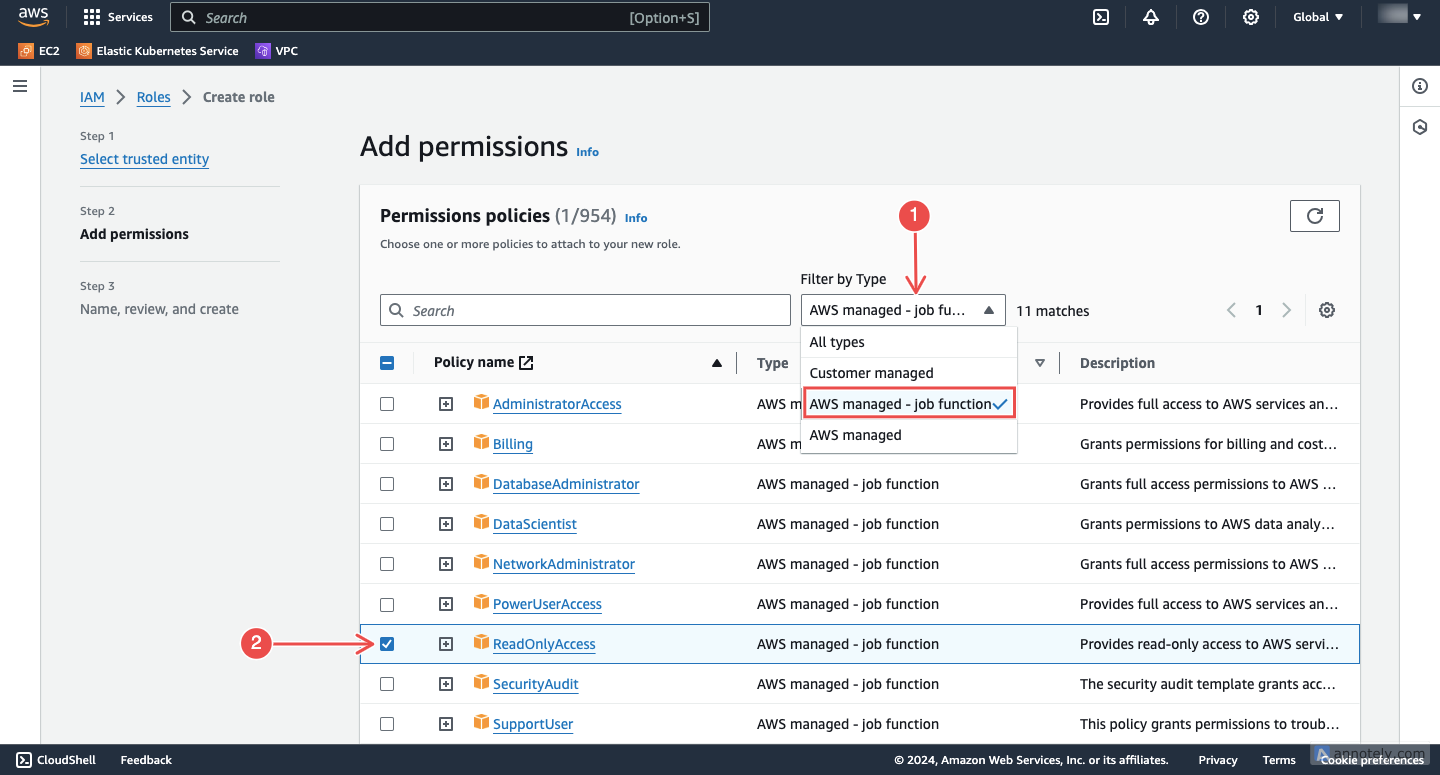
Fig.7 - Assign permissions
This grants Hawkeye the necessary permissions to view logs, metrics, and events from your AWS account without making changes to your resources.
After this, click on the Next button at the bottom right corner.
-
Finalize and review: Create a name and description for the IAM role, and then review the configurations.
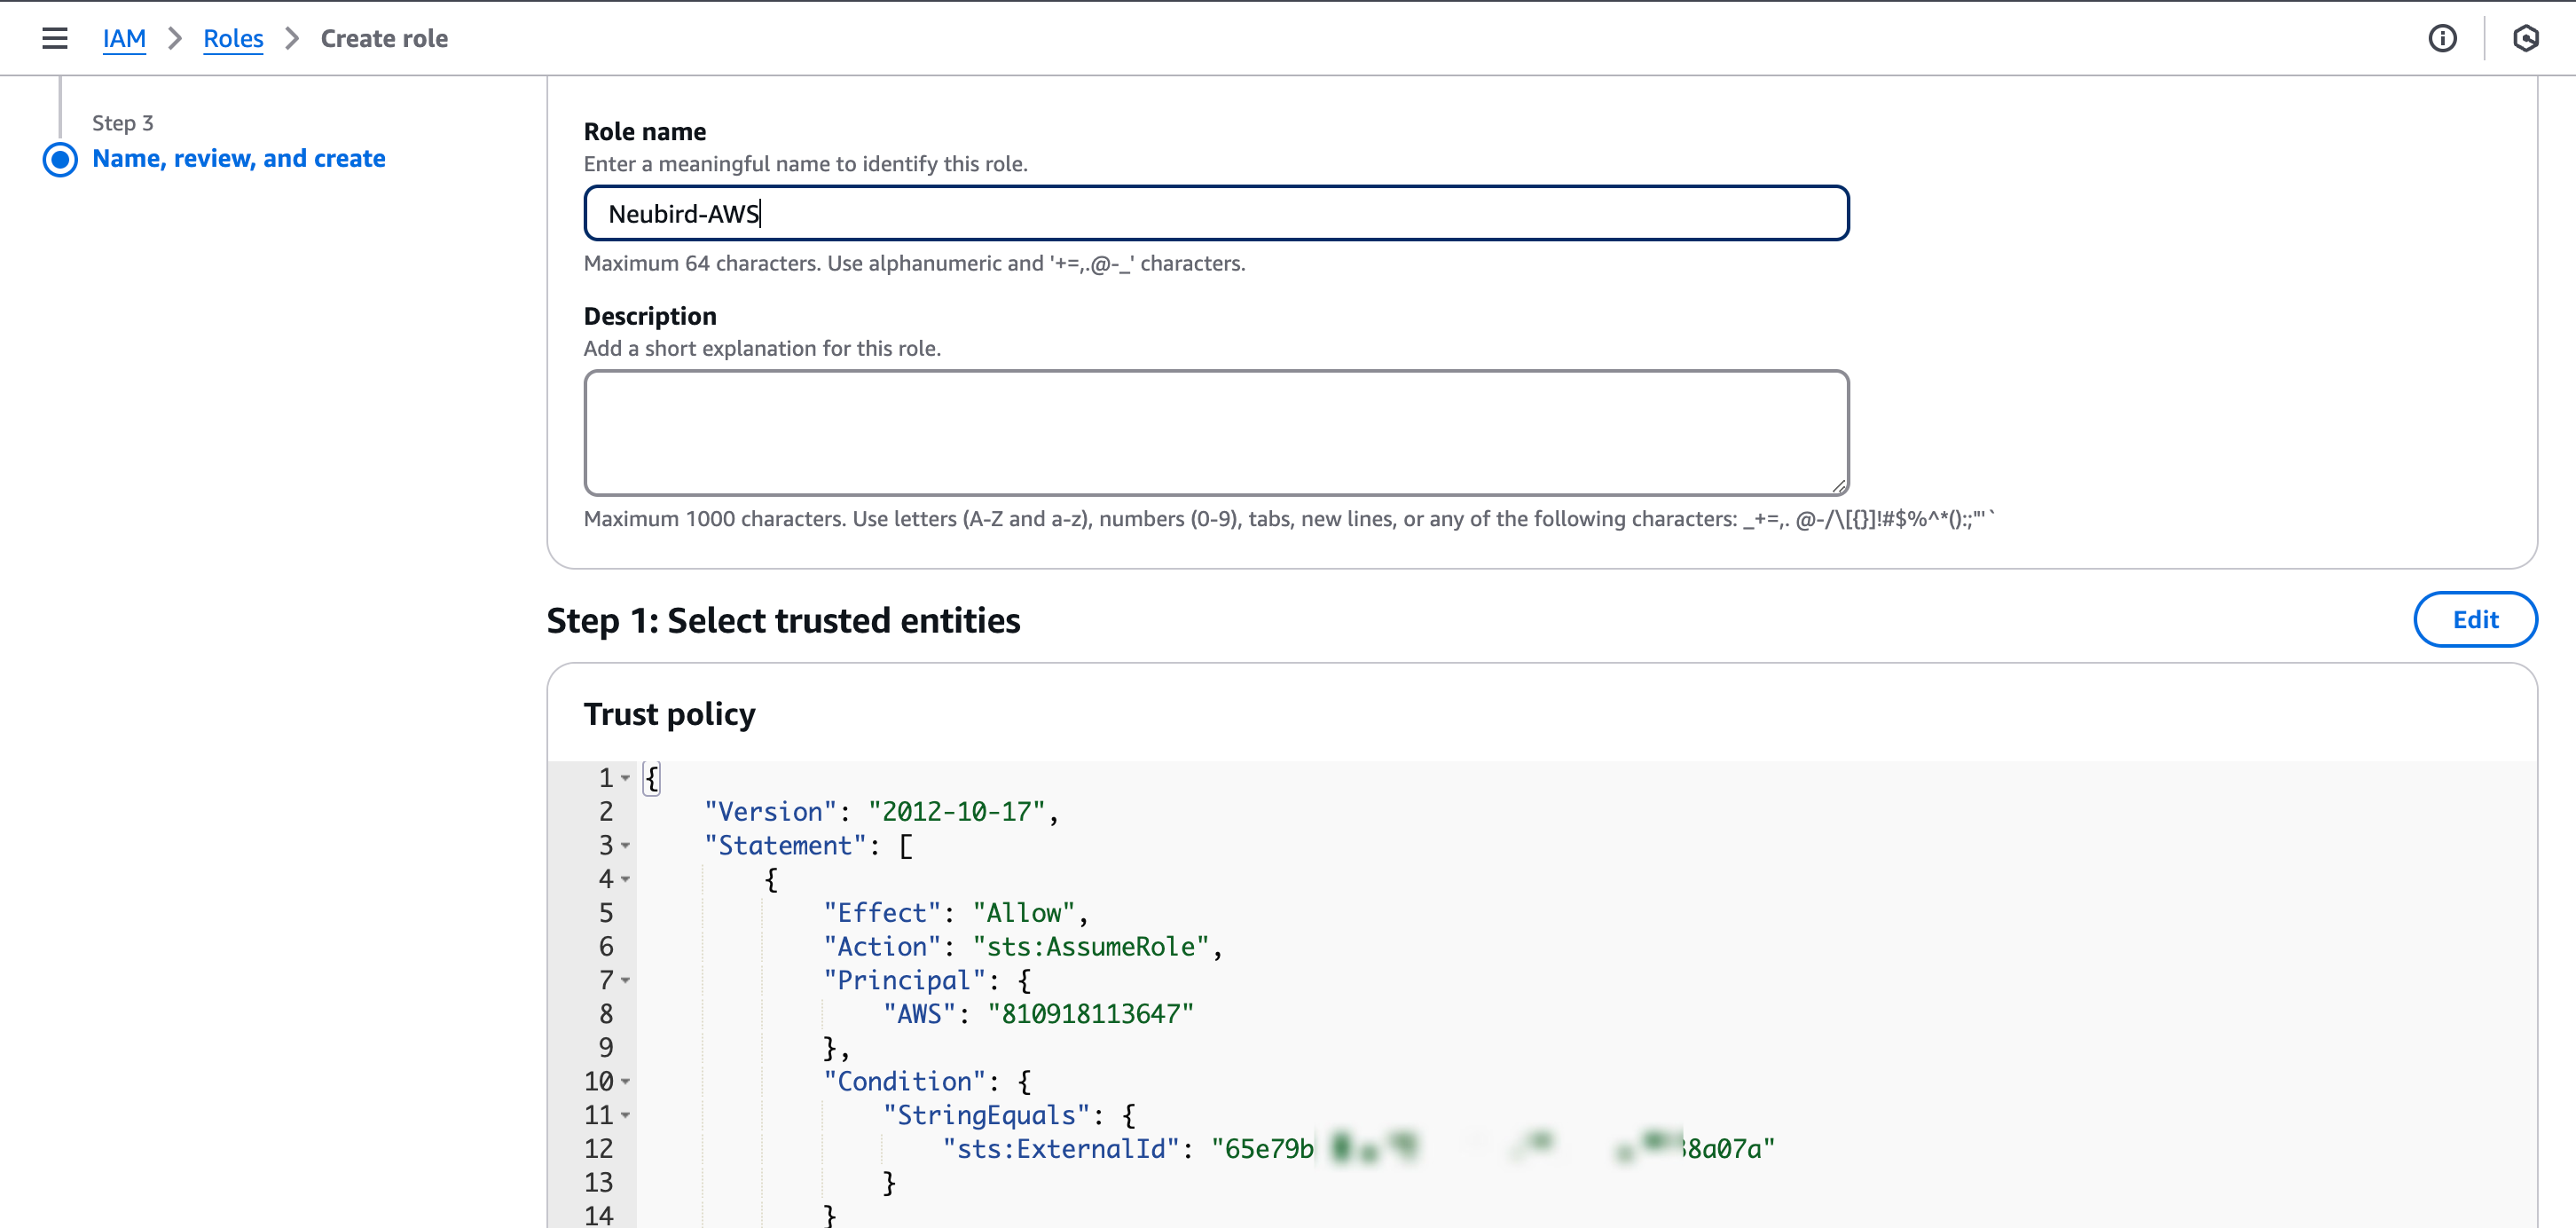
Fig.8 - Create a name and description
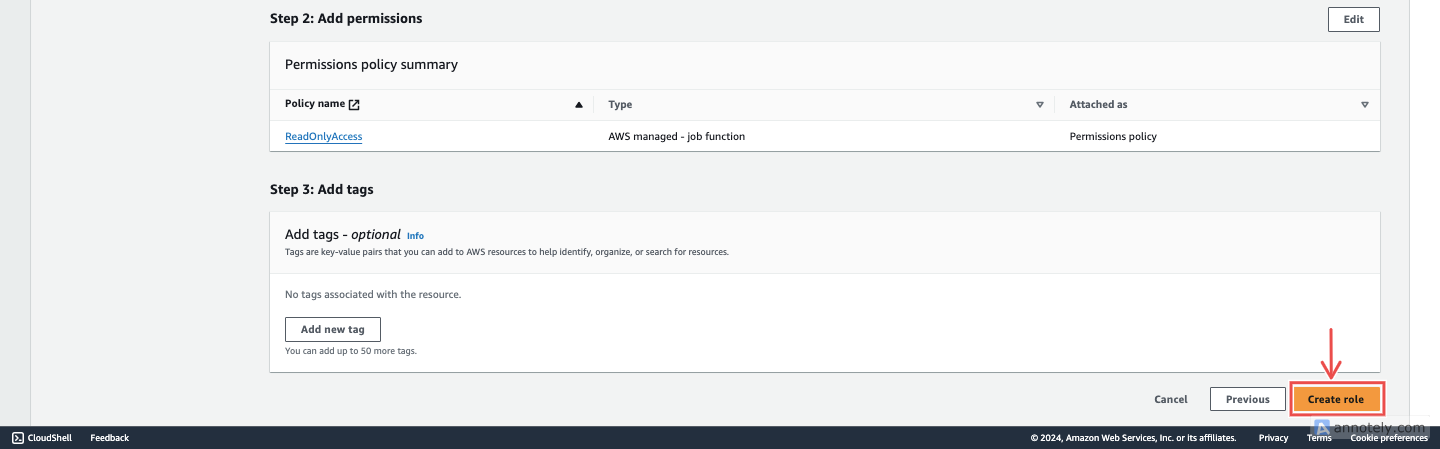
Fig.9 - Create role
If you’re satisfied with all these configurations, click the Create role button at the bottom right corner.
-
Copy the Role ARN: Once the role is created, navigate to it and copy the role ARN. You’ll need this to complete the connection setup on the Hawkeye dashboard.
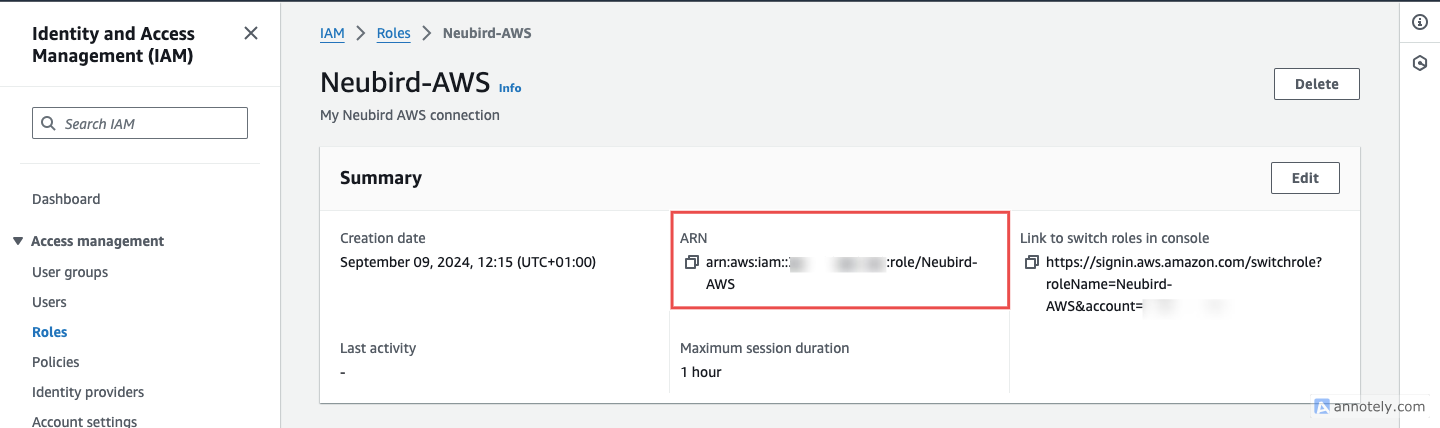
Fig.10 - Copy the role ARN
Step 2: Add AWS connection to Hawkeye
There are 3 ways to add AWS to Hawkeye and each have their respective requirements. The 3 ways include:
1. Role ARN: Here, the required credentials include:
- Name: This is the name of the connection you’re about to create.
- Description (Optional): This gives an overview of the connection.
- Role ARN: The ARN of the role you created in Step 1.
- Regions: The region where you want Hawkeye to collect telemetry data.
see demo below:
Fig.11 - A walkthrough of how to add AWS connection to Hawkeye
With your IAM role ready, navigate to the Hawkeye dashboard and follow these next steps:
-
Navigate to the connections tab: On the dashboard, navigate to the Connections section and select the New Connection card.
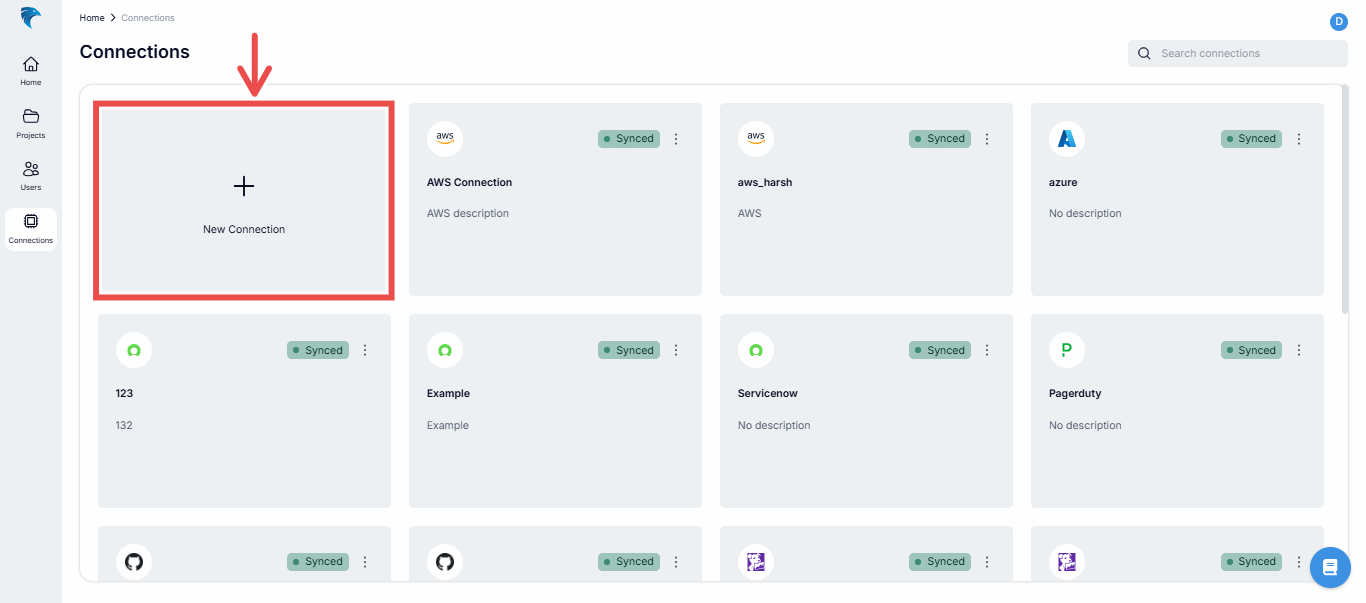
Fig.12 - Create new AWS connection dashboard
-
Select AWS connection: Select Amazon Web Services from the list of available connections.

Fig.13 - Select AWS connection
After this, click on the Next button in the top right corner.
-
Enter credentials: Provide the following credentials:
-
Name: This is the name of the connection you’re about to create.
-
Description (Optional): This gives an overview of the connection.
-
Role ARN: The ARN of the role you created in Step 1.
-
Regions: The region where you want Hawkeye to collect telemetry data.

Fig.14 - Enter credentials
Verify all the credentials are correct and click the Save button at the top right corner.
-
-
Confirm that the AWS connection was successfully created.
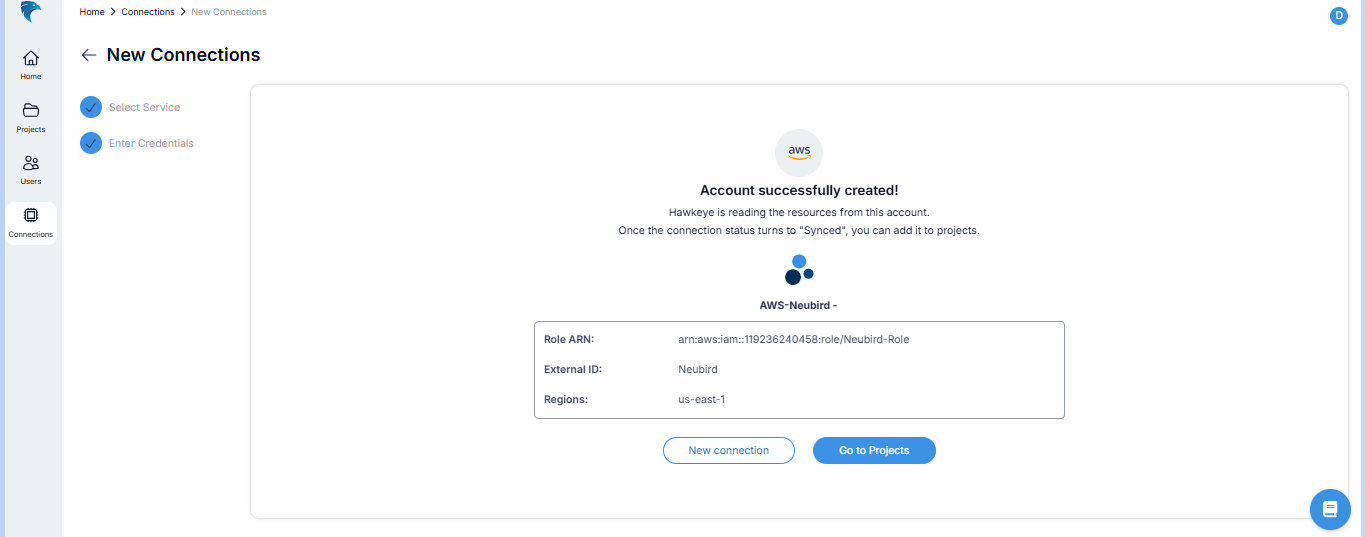
Fig.15 - Confirm AWS connection was successfully created
-
On the list of connections, you should see the new connection card display like this:
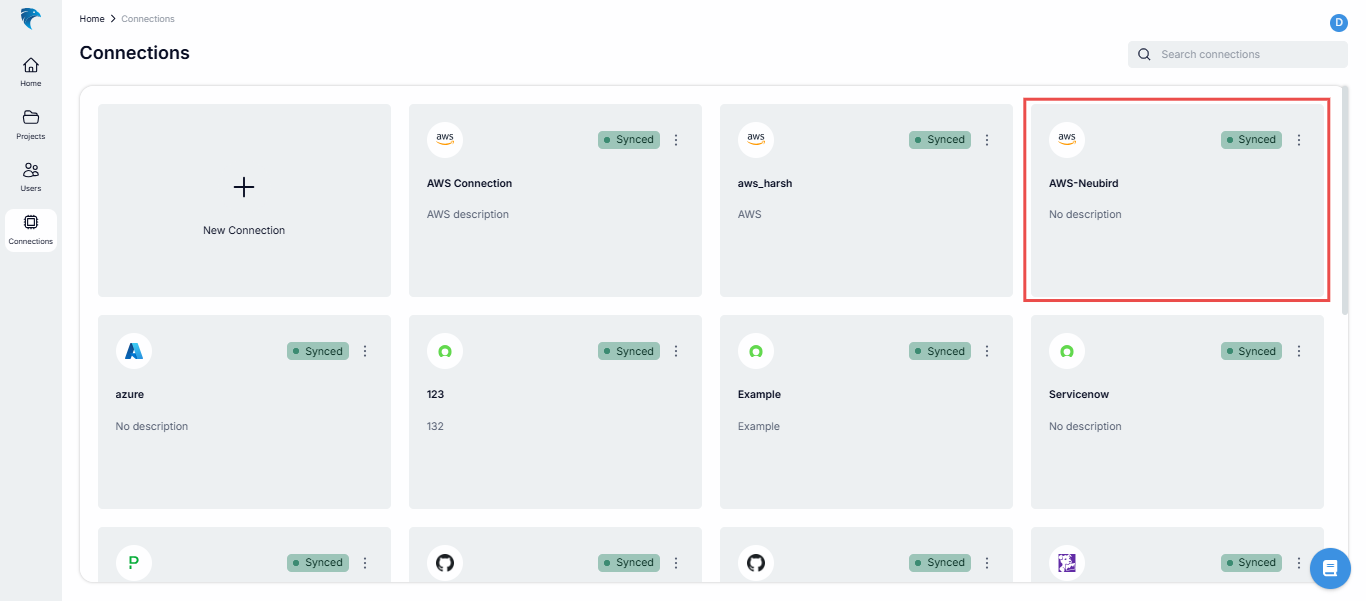
Fig.16 - New connection created
2. Access key: This option requires:
- Name: This is the name of the connection you’re about to create.
- Description (Optional): This gives an overview of the connection.
- Access Key ID: Access key ID from your AWS account
- Access Key Secret: Access key secret from your AWS account
- Regions: The region where you want Hawkeye to collect telemetry data.
see demo below:
Fig.17 - A walkthrough of how to add connection key with access key
3. AWS OIDC: The AWS OIDC option requires:
- Name: This is the name of the connection you’re about to create.
- Description (Optional): This gives an overview of the connection.
- Regions: The region where you want Hawkeye to collect telemetry data.
- To complete this step, you’ll be required to log connect you AWS account. see demo below:
Fig.18 - A walkthrough of how to add connection with AWS OIDC
Step 3: Enable Configuration Change Telemetry
Fig.19 - A walkthrough of how to enable configuration change Telemetry
To keep an eye on the changes happening in your AWS environment, Hawkeye collects Configuration Change Telemetry using AWS CloudTrail.
This data helps monitor detailed configuration changes across your resources, clearly showing what’s been modified and when.
If you haven’t set up CloudTrail yet, no worries! Follow these steps to get it configured and ensure that the logs are delivered to a CloudWatch Log Group.
-
Create a CloudWatch Log Group:
-
Sign in to the AWS Management Console and navigate to the CloudWatch service.
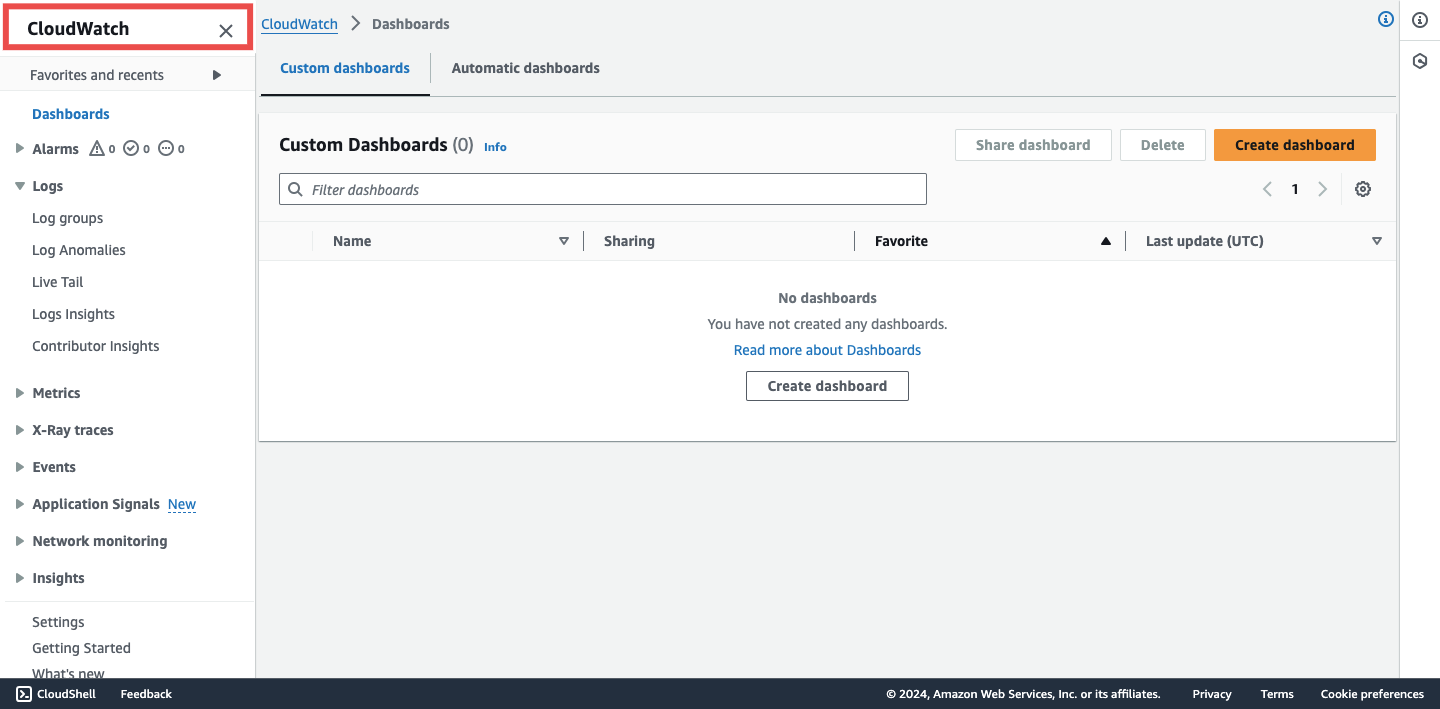
Fig.20 - Create a cloudwatch log group
-
In the left navigation pane, choose Logs > Log groups > Create log group.
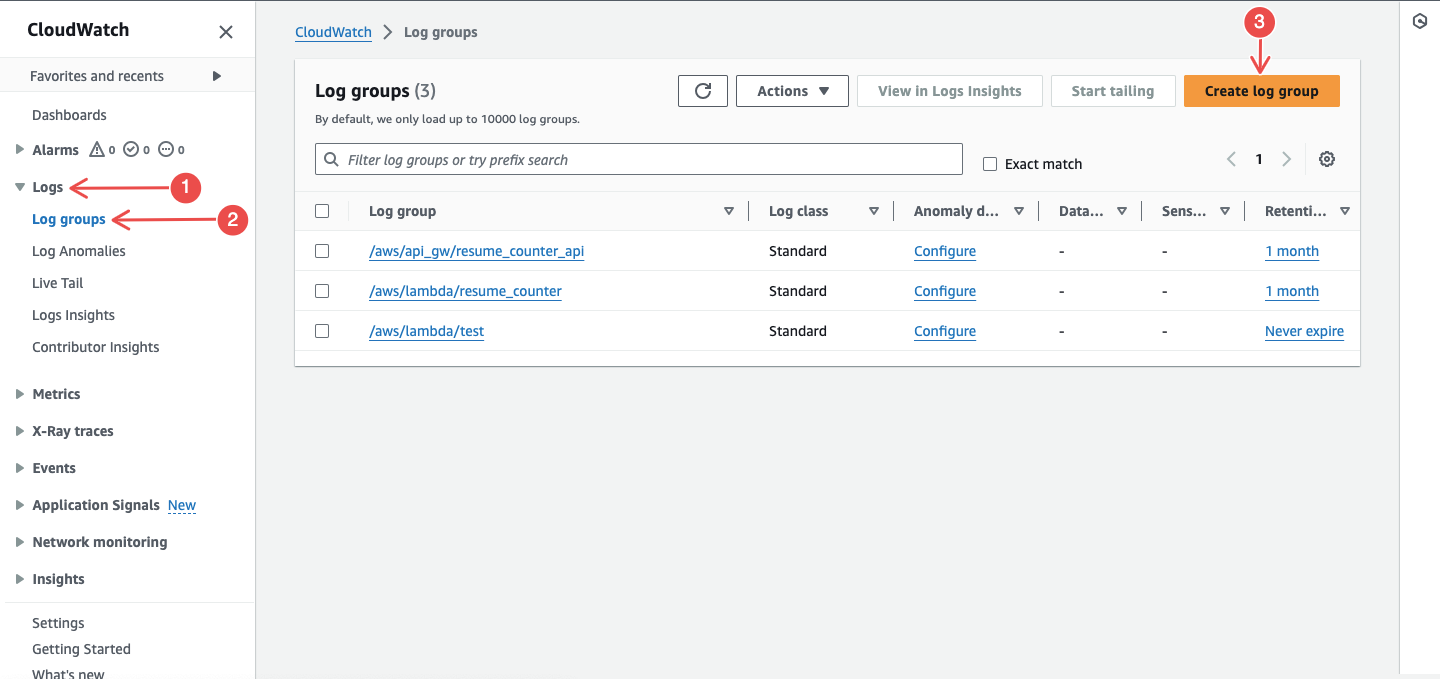
Fig.21 - Create log group
-
Enter a Log group name and then click Create.
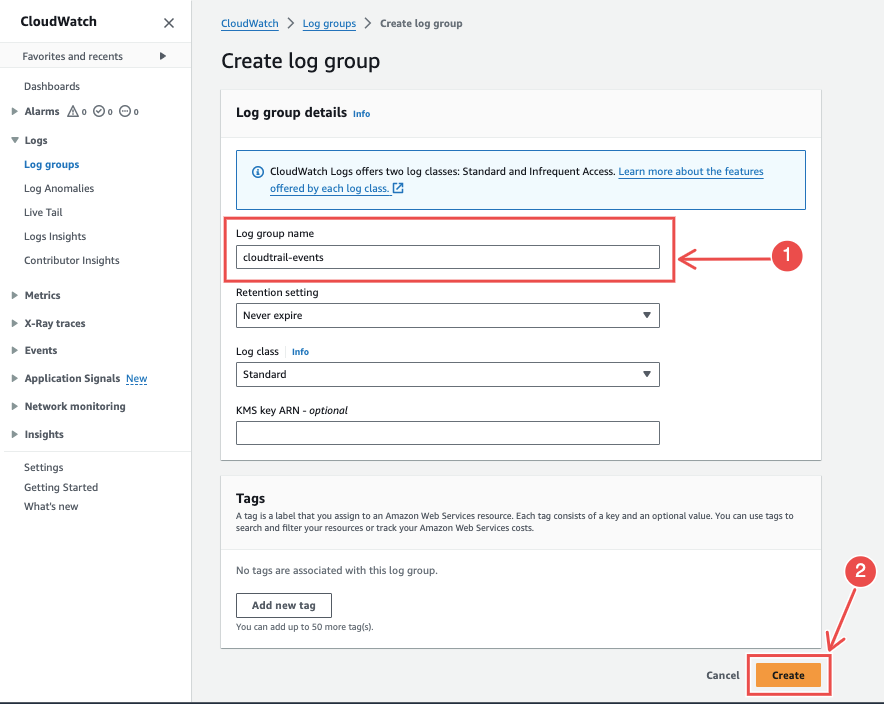
Fig.22 - Enter a log group name
-
-
Create a Trail in CloudTrail:
-
Navigate to the CloudTrail service and click on Create a trail.

Fig.23 - Navigate to CloudTrail and click create trail
-
In the left navigation pane, choose Trails > Create trail.
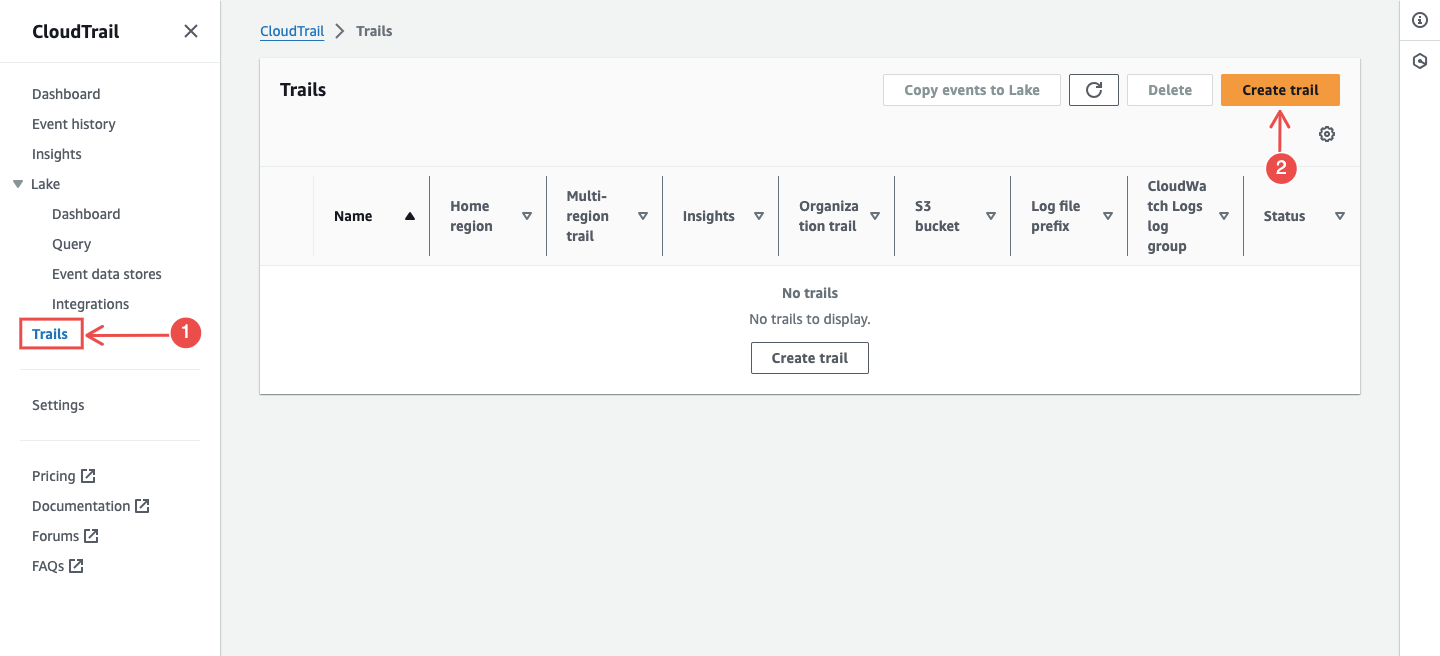
Fig.24 - Choose Trails
-
Enter a trail name, and for storage location, choose Create new S3 bucket.
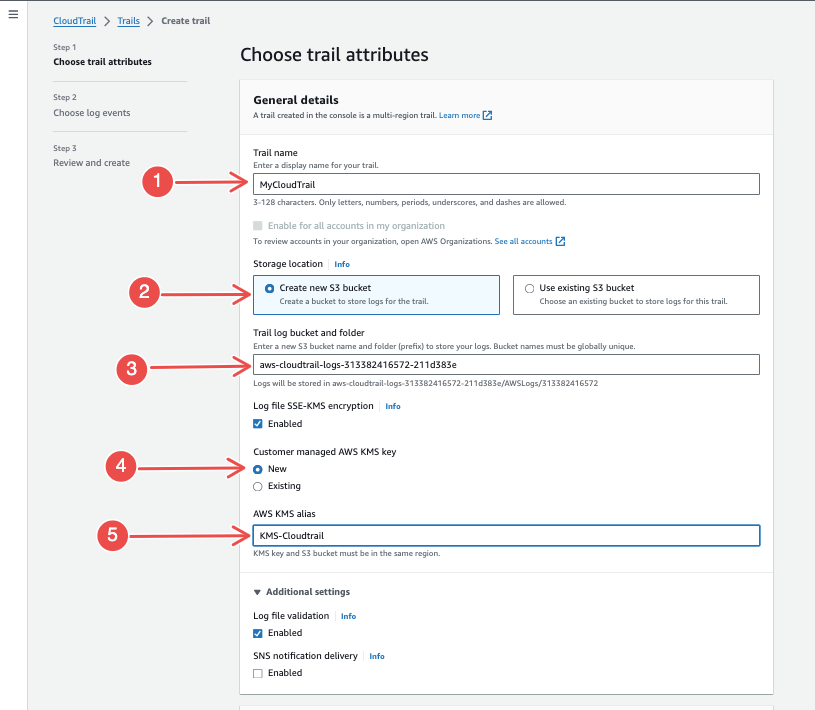
Fig.25 - Create new S3 bucket
-
Enable CloudWatch Logs, then enter the log group you just created.
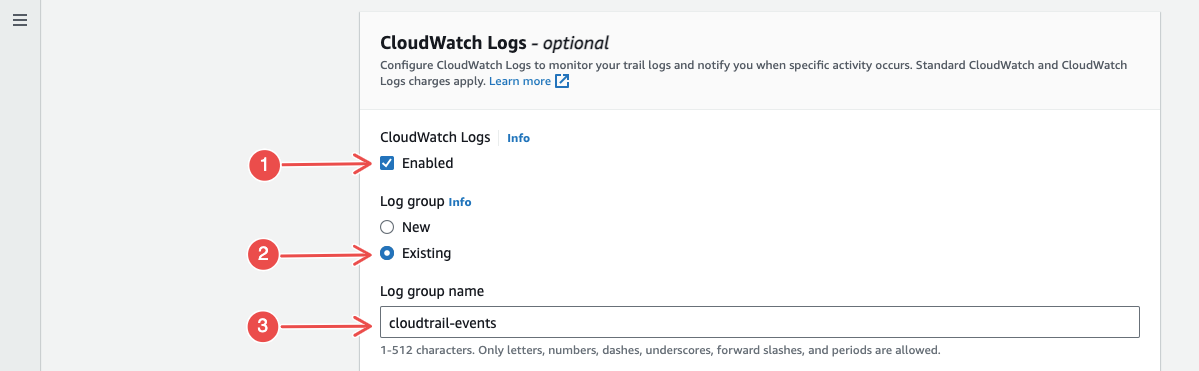
Fig.26 - Enable cloud watch
-
For IAM Role, choose New to create a new role, or select Existing to use a role.
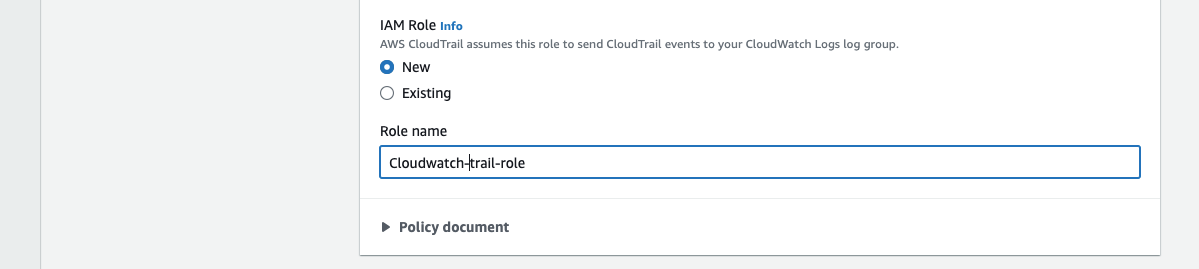
Fig.27 - Create new or select existing role
After this, click on the Next button at the bottom right corner.
-
For the event types, select all the options available and followed through with the configuration as displayed in the images below:
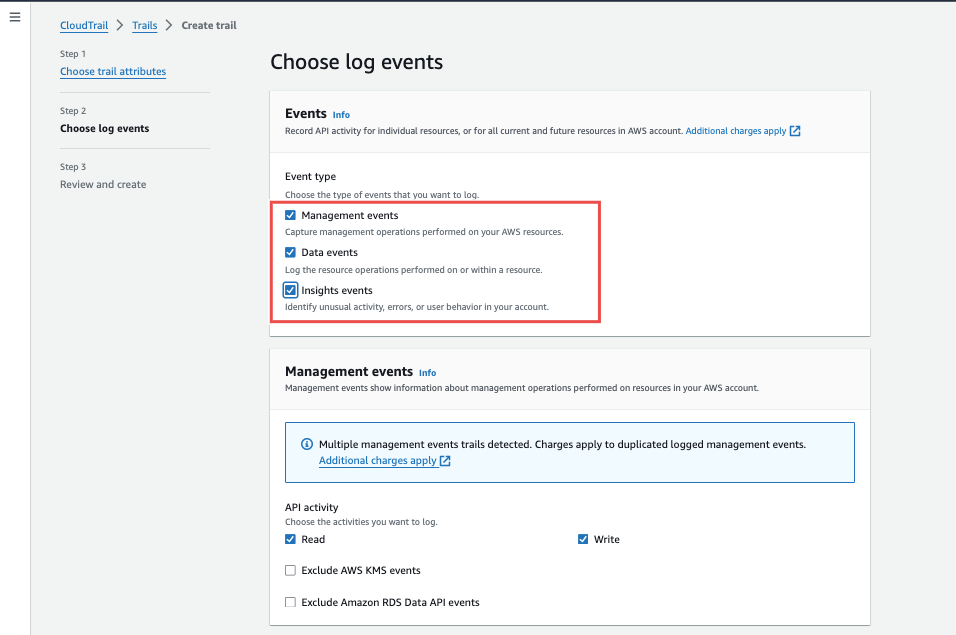
Fig.28 - Select all events type
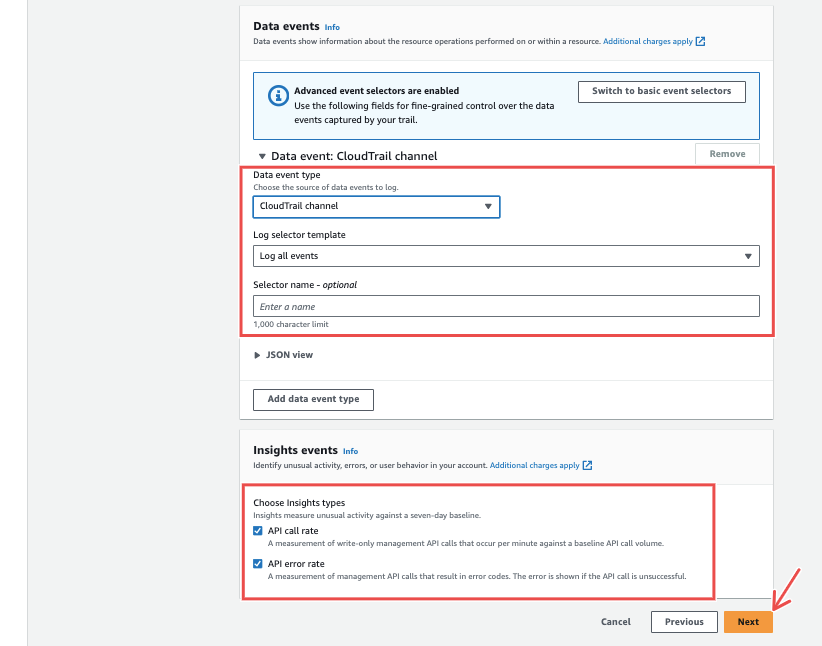
Fig.29 - Click next
After this, click on the Next button at the bottom right corner.
-
Review your configurations and click on the Create trail button.
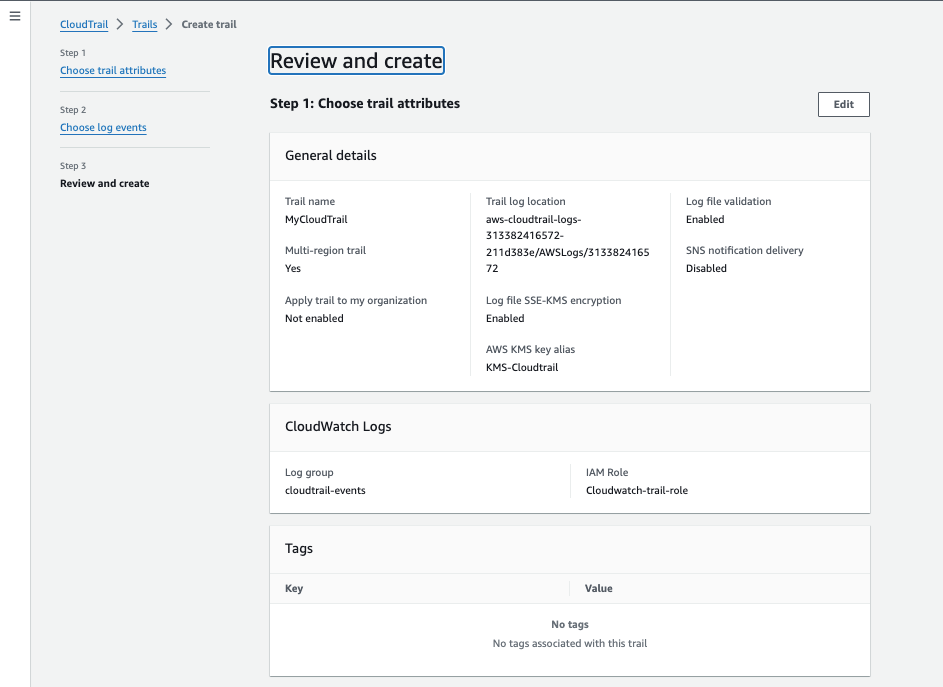
Fig.30 - Review configuration
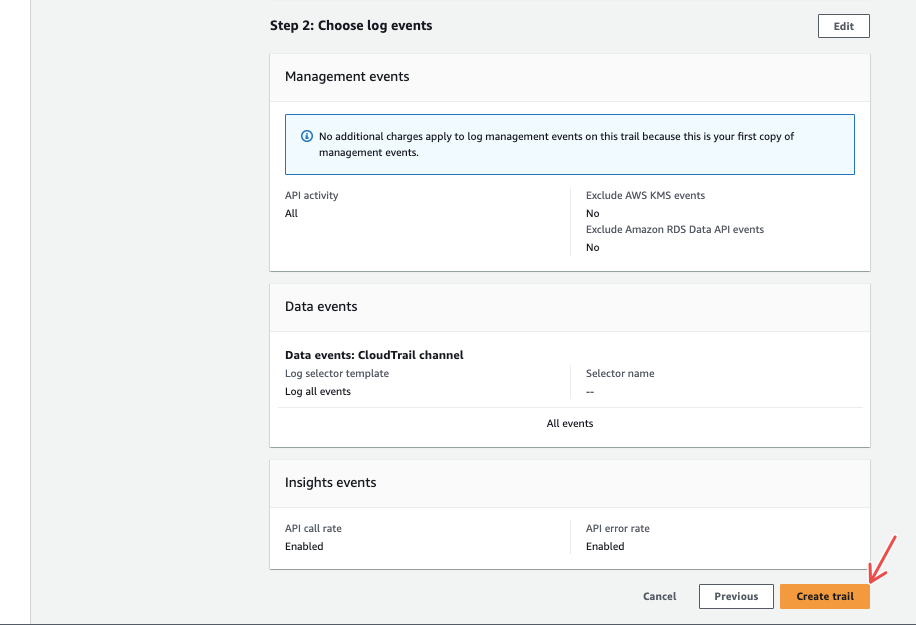
Fig.31 - Create trail
-
-
Configure Permissions for CloudTrail:
-
On the IAM console, navigate to Roles, and find the role attached to the CloudTrail service created above.
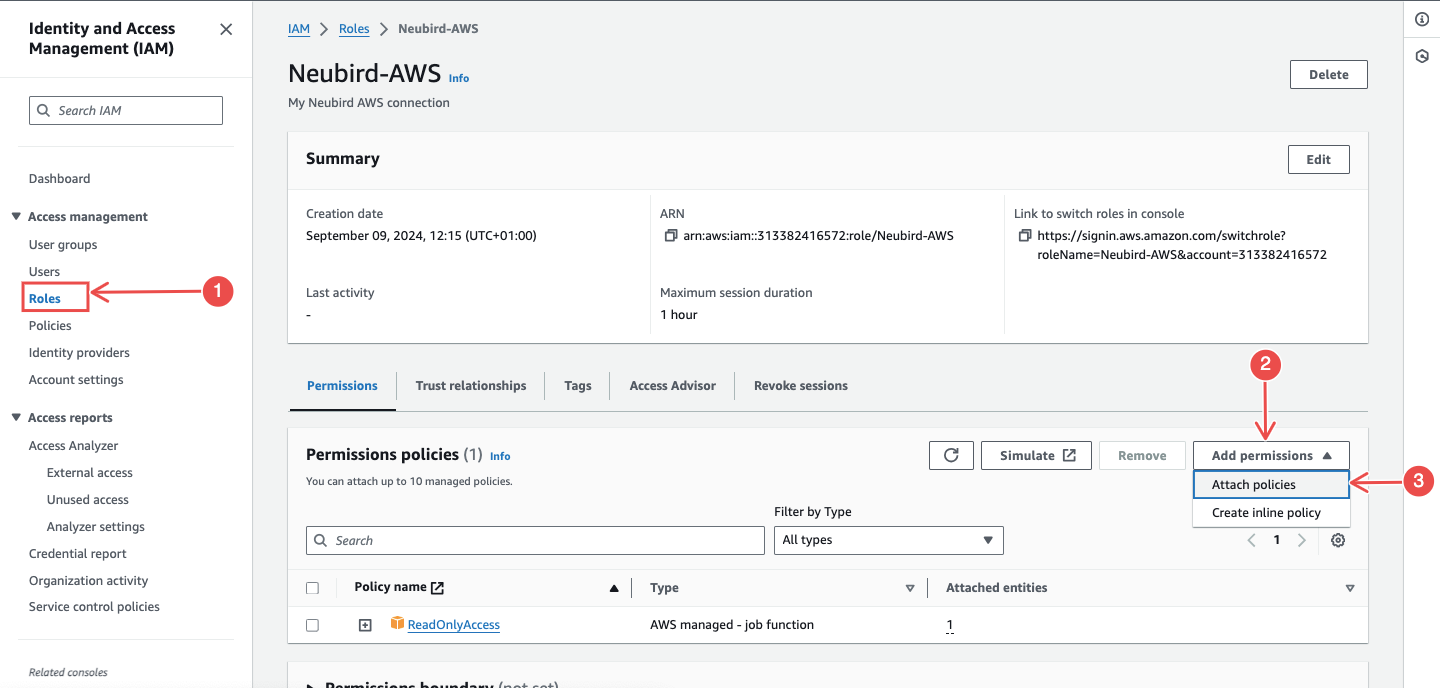
Fig.32 - Navigate to roles
-
Attach the following policies:
- AWSCloudTrail_FullAccess
- CloudWatchLogsFullAccess
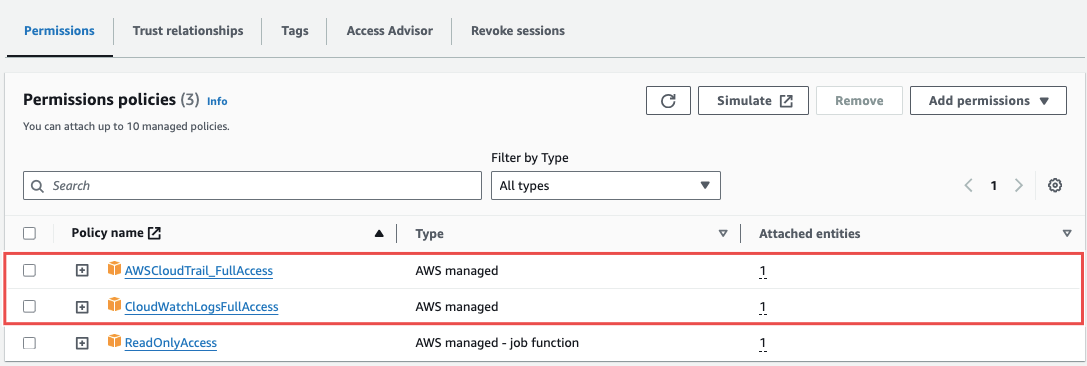
Fig.33 - Attach policies
-
-
Verify Log Delivery:
-
Go back to CloudWatch and check your created log group.
-
Ensure logs from CloudTrail are being delivered and new log streams are visible.
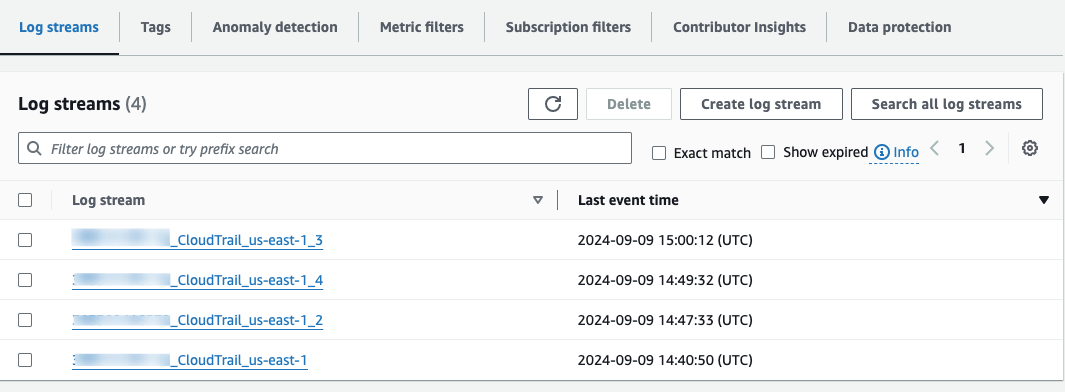
Fig.34 - Verify log delivery
-
-
Create CloudWatch Alarms (Optional but recommended):
-
In CloudWatch, navigate to Alarms > In alarm > Create alarm.

Fig.35 - Create CloudWatch alarm
-
Choose metrics related to CloudTrail logs, and click on Select metrics to follow through with the rest of the configuration process.
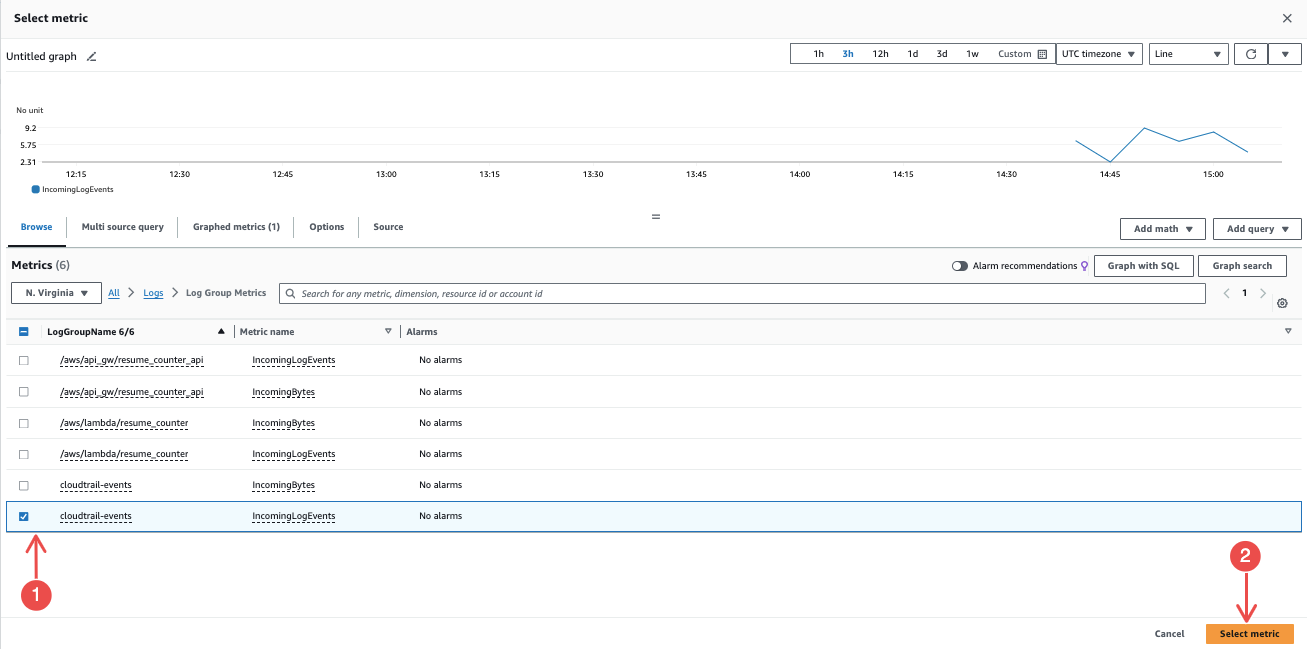
Fig.36 - Select metrics
-
Step 4: Add AWS connection to Project.
Fig.37 - A walkthrough on how to add AWS connection to Project
The following steps will guide you on how to add ysour AWS connection to projects.
-
Navigate to the Projects Tab: In the Hawkeye dashboard, go to the Projects section and click on New project.
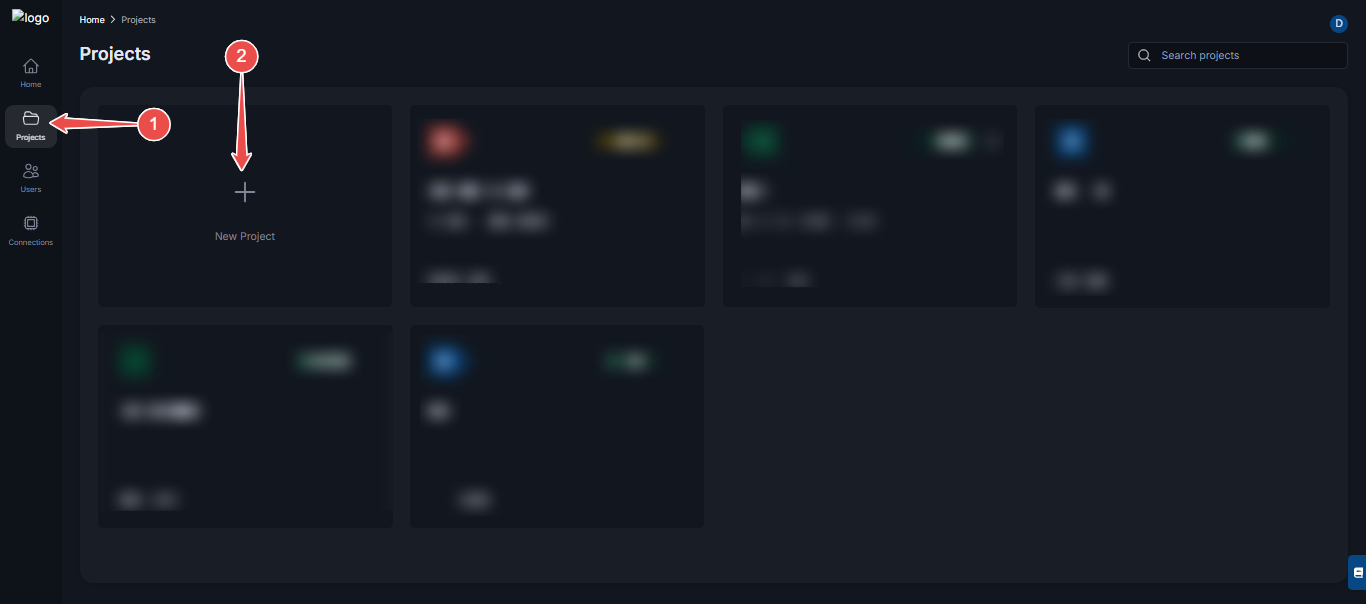
Fig.38 - AWS new project
-
Enter project details: In the new project page, enter the following details:
- Project name: Give your project a descriptive name.
- Project description: Enter a detailed description for your project.
- Color: Select a color you want to identify your project with.
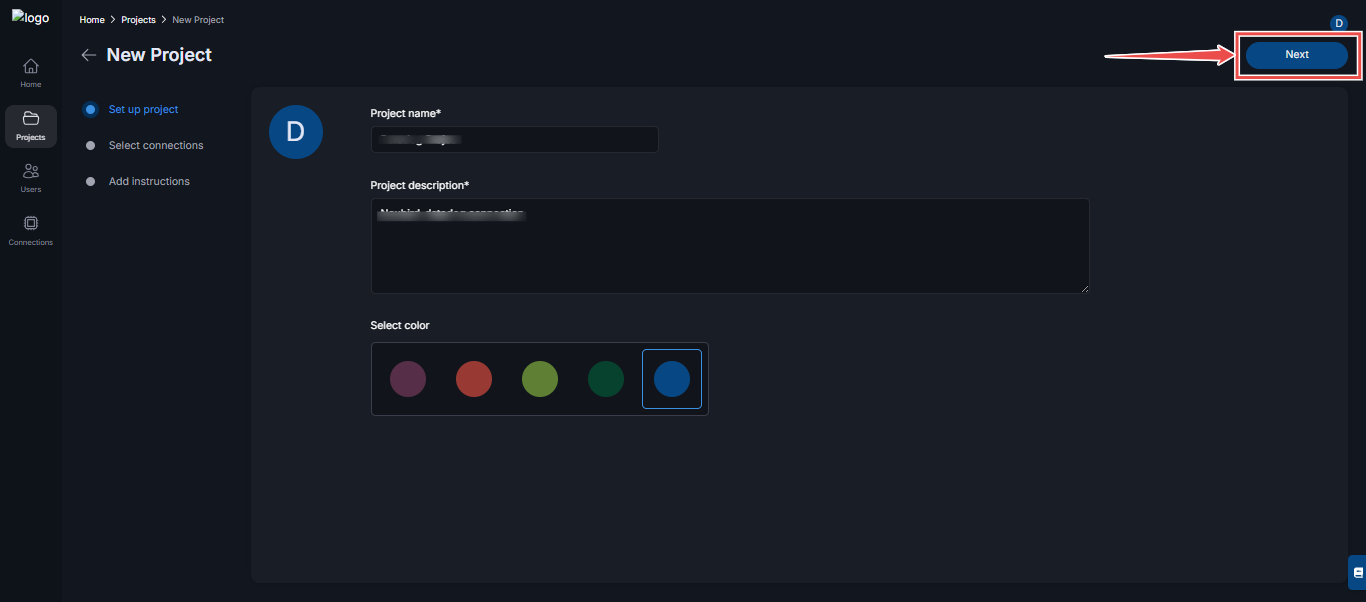
Fig.39 - AWS project details
-
Select connection: From the list of connections that appear, select AWS. In the AWS accordion;
- Check the Create automated session box to enable automated session
- Select An Alert from the Alerts options.
Click Next when done.
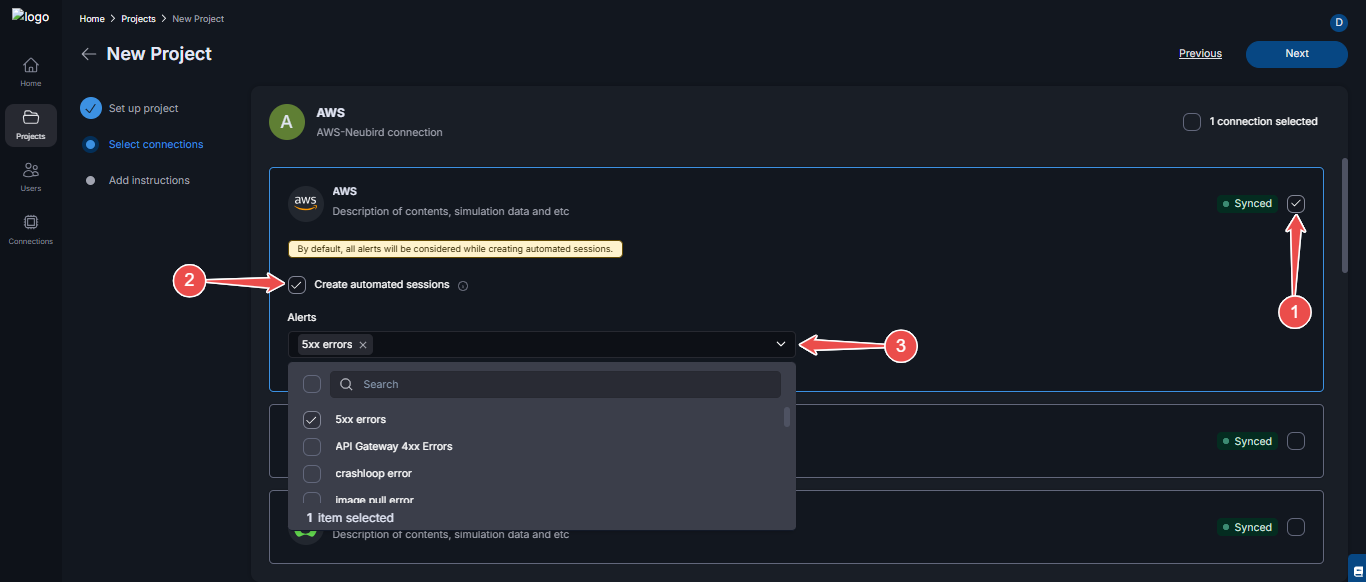
Fig.40 - AWS connection
-
Enter project Instructions: State precisely, the details of your project, and what resources you expect to monitor or ignore. (This helps Hawkeye understand the context of your project and to deliver better and more relevant analysis).
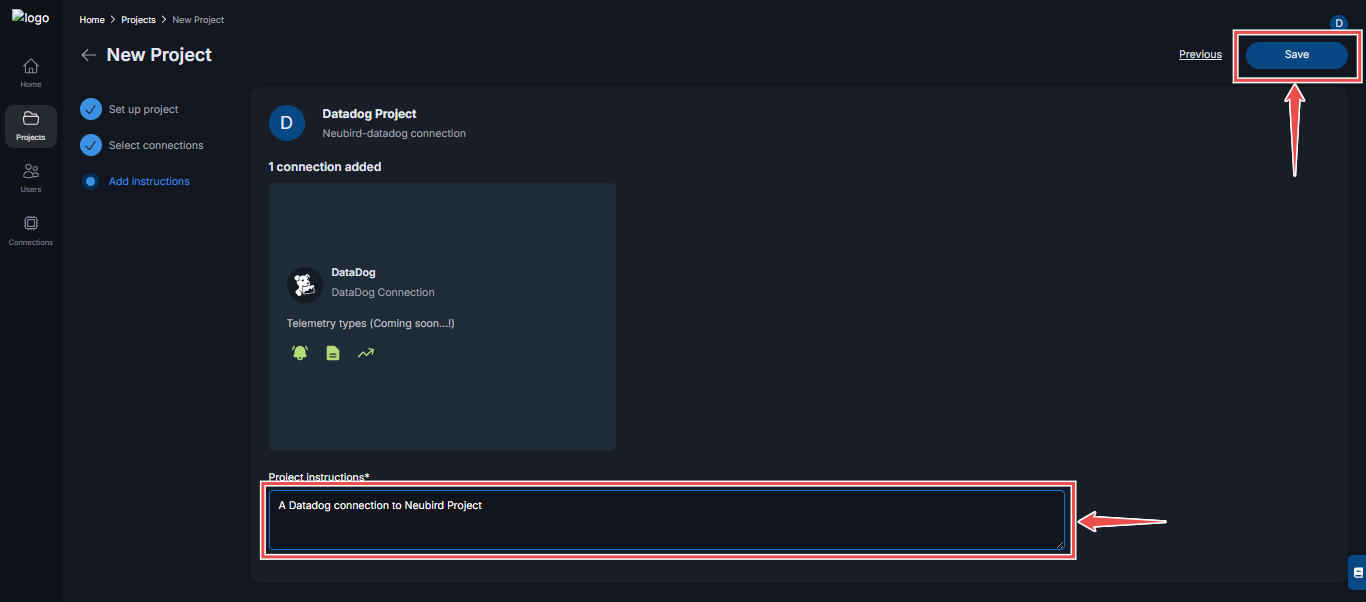
Fig.41 - AWS project instructions
-
Navigate back to Project: After your Project has been created successfully, navigate back to Projects page.
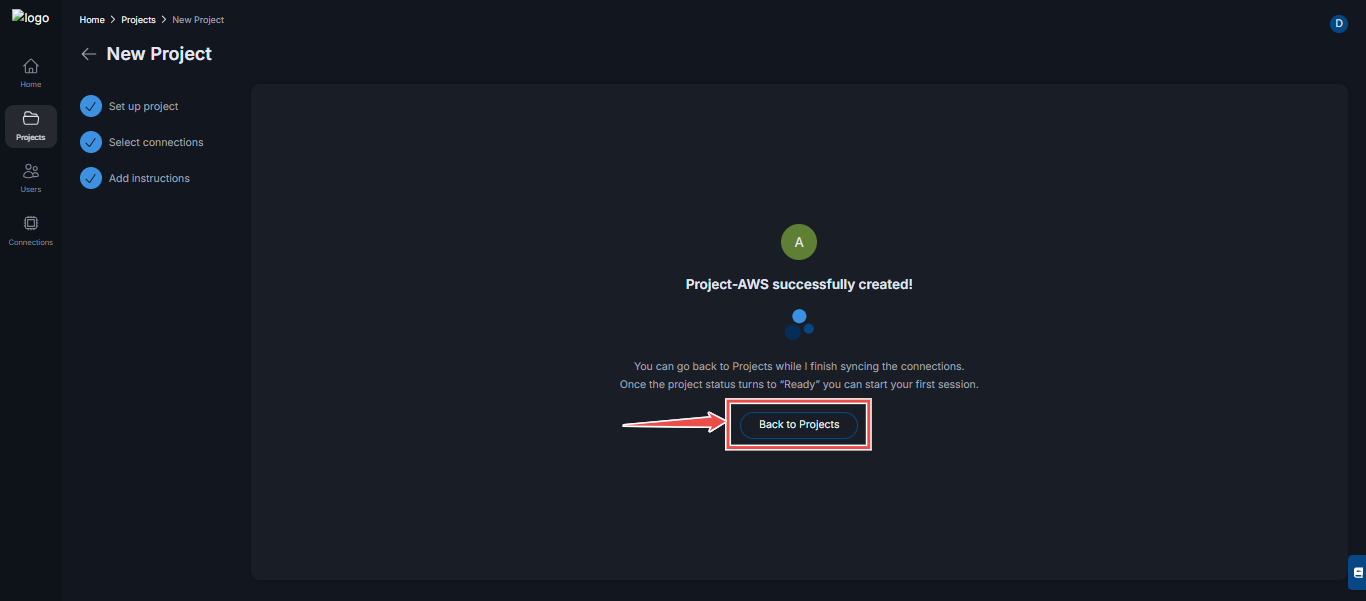
Fig.42 - AWS back to project
-
View new project: In the list of Projects in the Projects page, you’ll find your newly created Project with AWS connection.
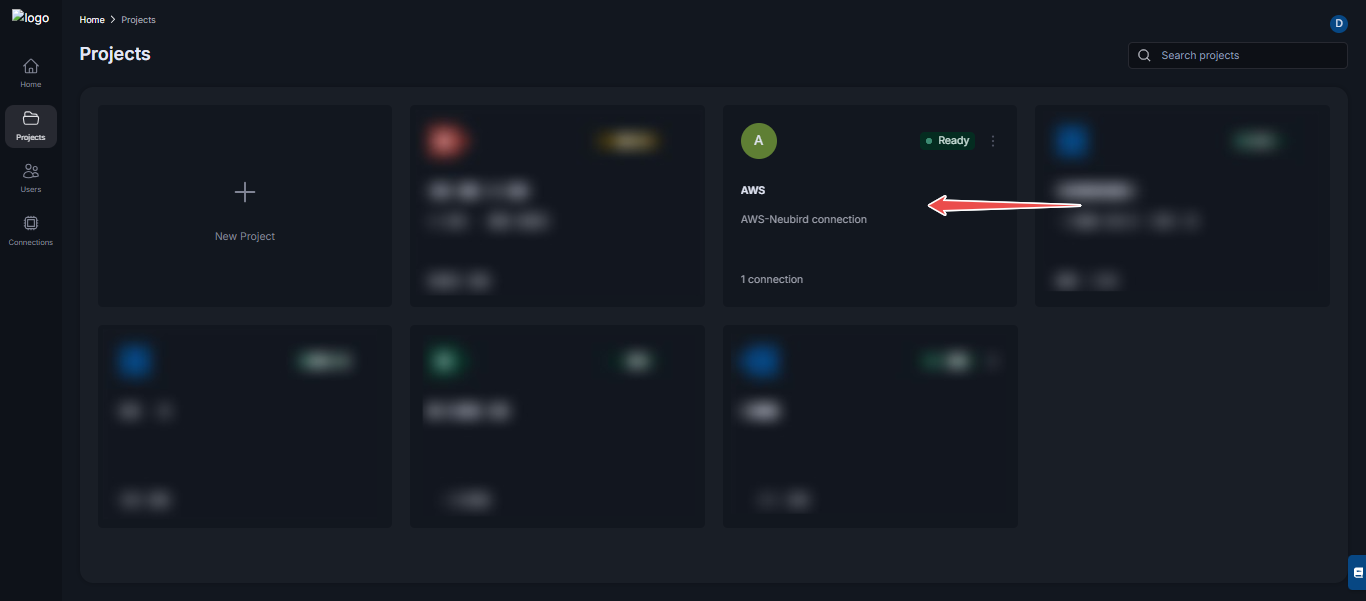
Fig.43 - AWS project ready
-
Start Session: If project status is Ready, click to start a new session.
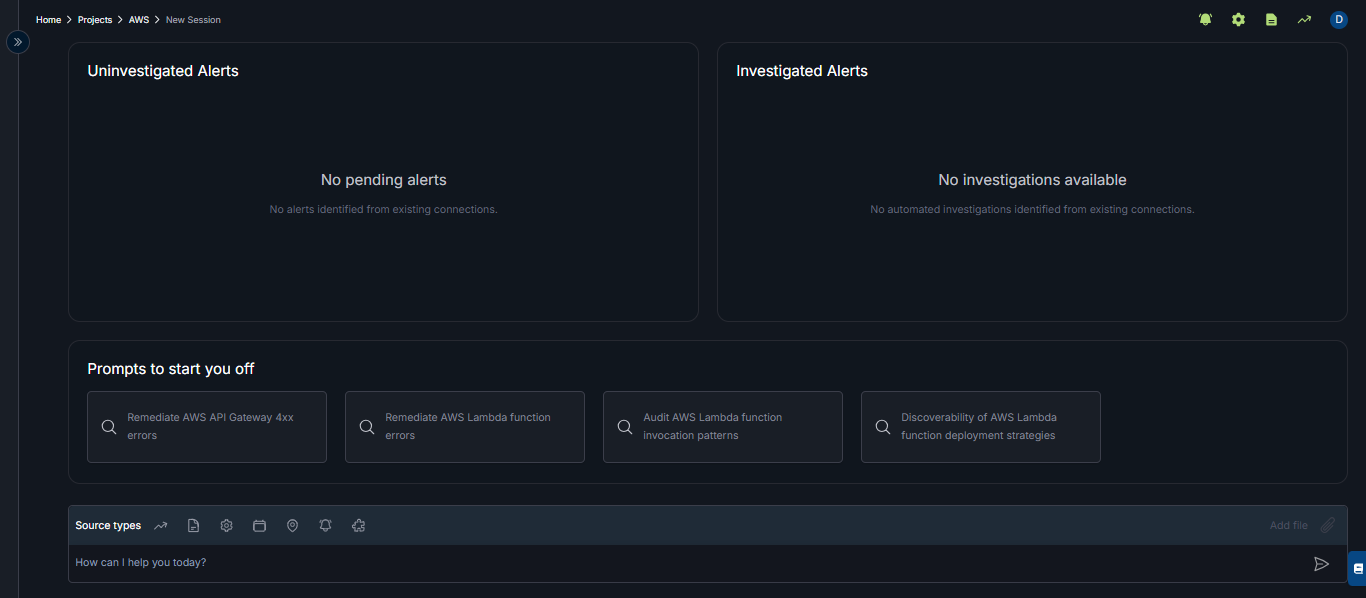
Fig.44 - AWS start new session
-
Enter a prompt: Select from the list of prompts on the session page or enter a prompt manually to start a session.
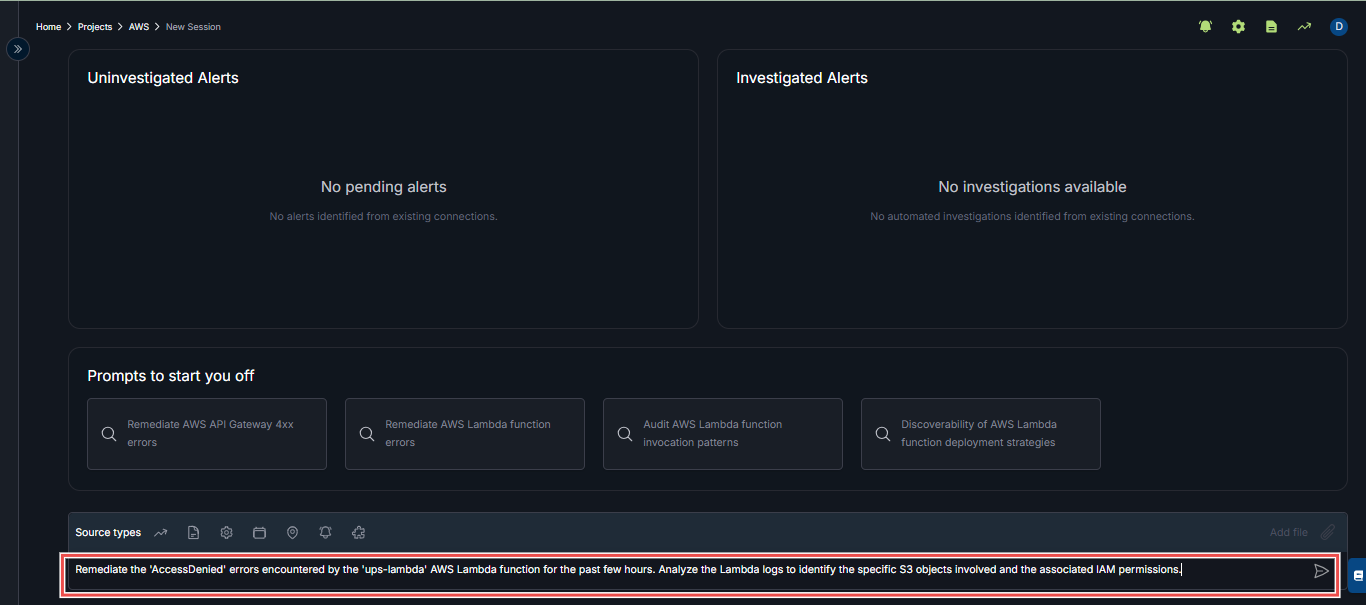
Fig.45 - AWS session prompt
-
Your automated session is begins: This page displays your session analytics. You can click the input box below to ask further questions.
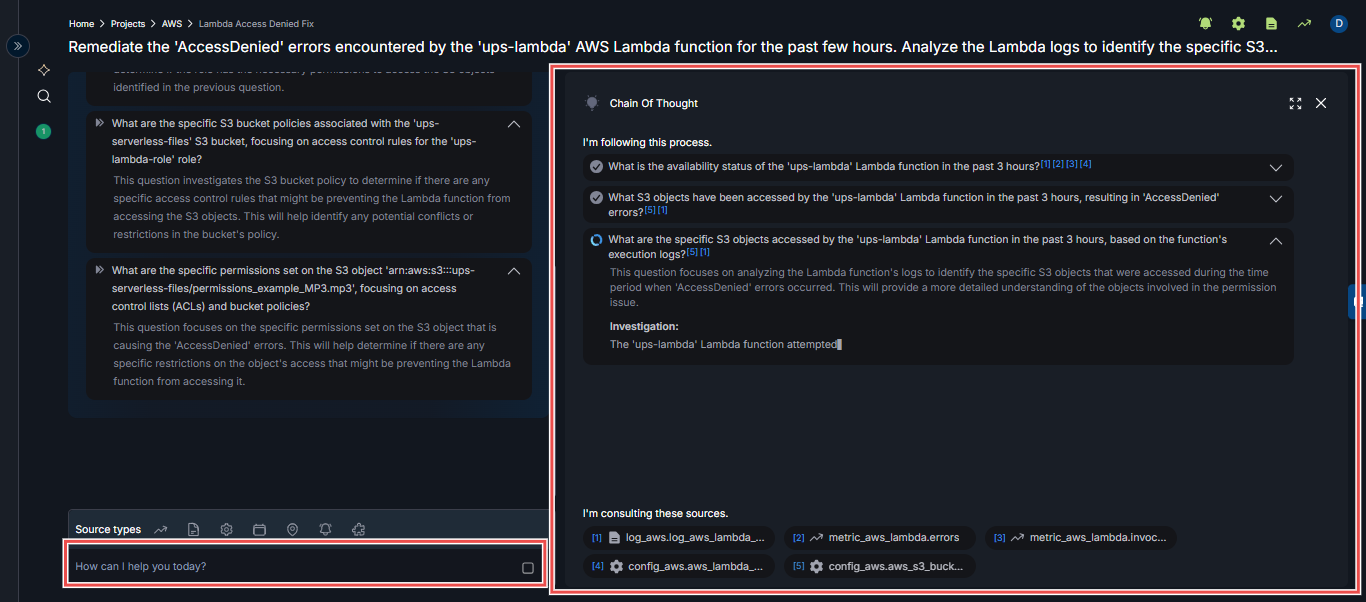
Fig.46 - AWS session questions