Configuring permissions and access in Hawkeye
Setting up permissions is a key part of connecting Hawkeye with your tools and platforms. By following the principle of least privilege, Hawkeye only requests the minimal permissions needed to gather the data it needs.
In this tutorial, we’ll walk through the general approach to permissions in Hawkeye. We’ll explain some basic principles and best practices and use AWS and GitHub as examples to highlight how we handle permissions differently depending on the integration.
What are permissions?
A permission is a rule that grants or restricts access to specific resources, actions, or data. They control what a user, application, or service can and cannot do within a system.
These permissions are essential for security because they ensure that only authorized parties can access sensitive data or perform critical actions. For example, in an AWS environment, permissions define which resources a user or service role can view, modify, or manage which helps prevent unauthorized access and unintended modifications.
Permissions are typically managed using policies, roles, or specific settings, depending on the platform. They follow a “least privilege” principle, meaning users or applications are given the minimum permissions needed to complete their tasks.
This principle helps limit the impact of any security breach by restricting what unauthorized users or compromised accounts can access.
For instance, an application like Hawkeye might request “read-only” permissions to monitor metrics and events in a cloud environment. This permission allows it to collect data without the ability to modify resources.
Why the least privilege principle?
Hawkeye encourages the principle of least privilege, which means only requesting access to the data needed for the integration and nothing more.
This helps secure your connections by limiting potential risks. When setting up a connection, we focus on assigning read-only permissions wherever possible, so Hawkeye can monitor your data without altering it.
Configuring permissions for a connection
In the following examples, we’ll go through two specific connections that have varying access control methods. For each of these connections, you’ll get to see how Hawkeye manages permissions:
Example 1: AWS
Connecting Hawkeye to AWS enables it to pull in telemetry data such as logs, metrics, and events. The following is how to set up permissions for AWS in a secure and manageable way.
Step 1: Create an IAM role
In AWS, permissions are managed through roles. To allow Hawkeye access, we’ll create an IAM (Identity and Access Management) role that Hawkeye can assume temporarily to gather the data it needs.
-
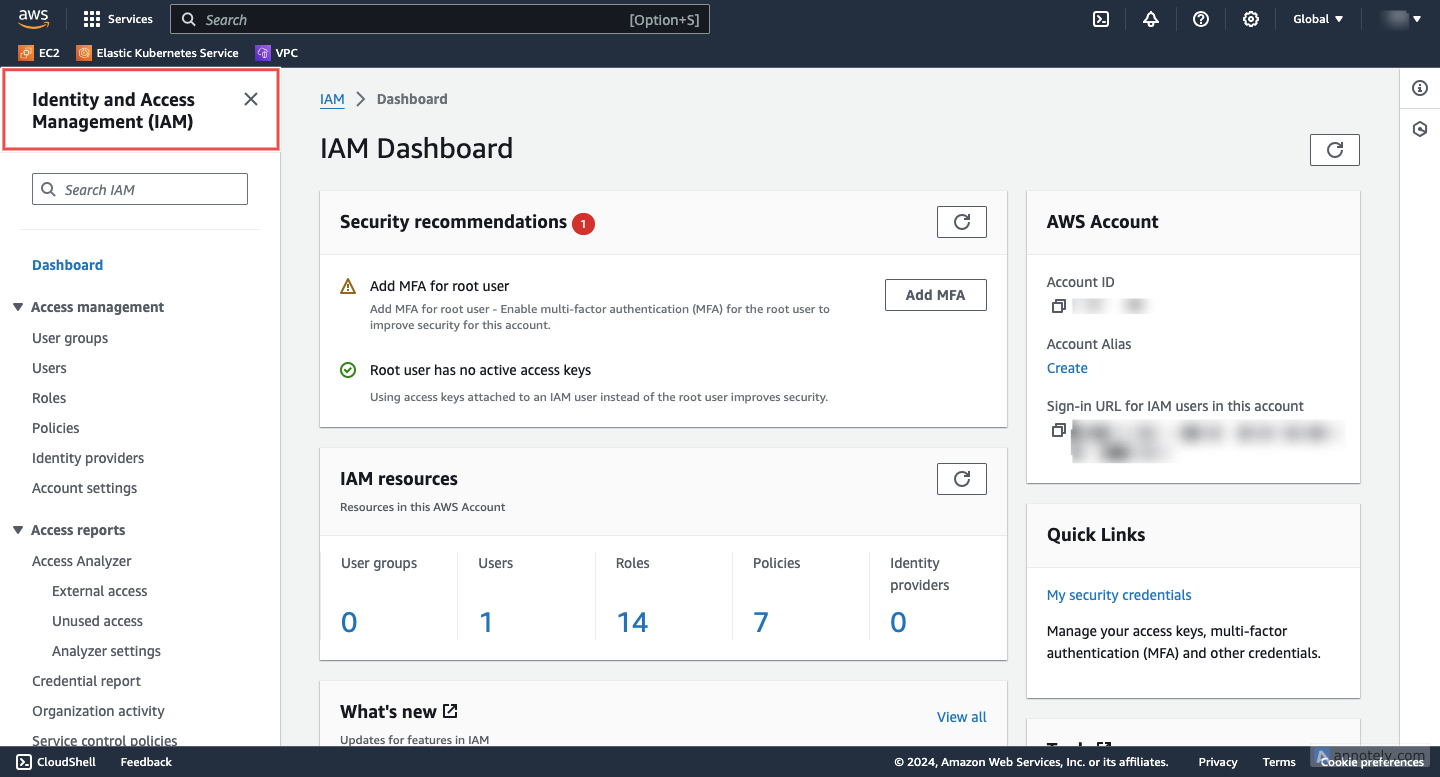
Access IAM: Log into your AWS Management Console and navigate to the IAM service.

Fig.1 - Access IAM
-
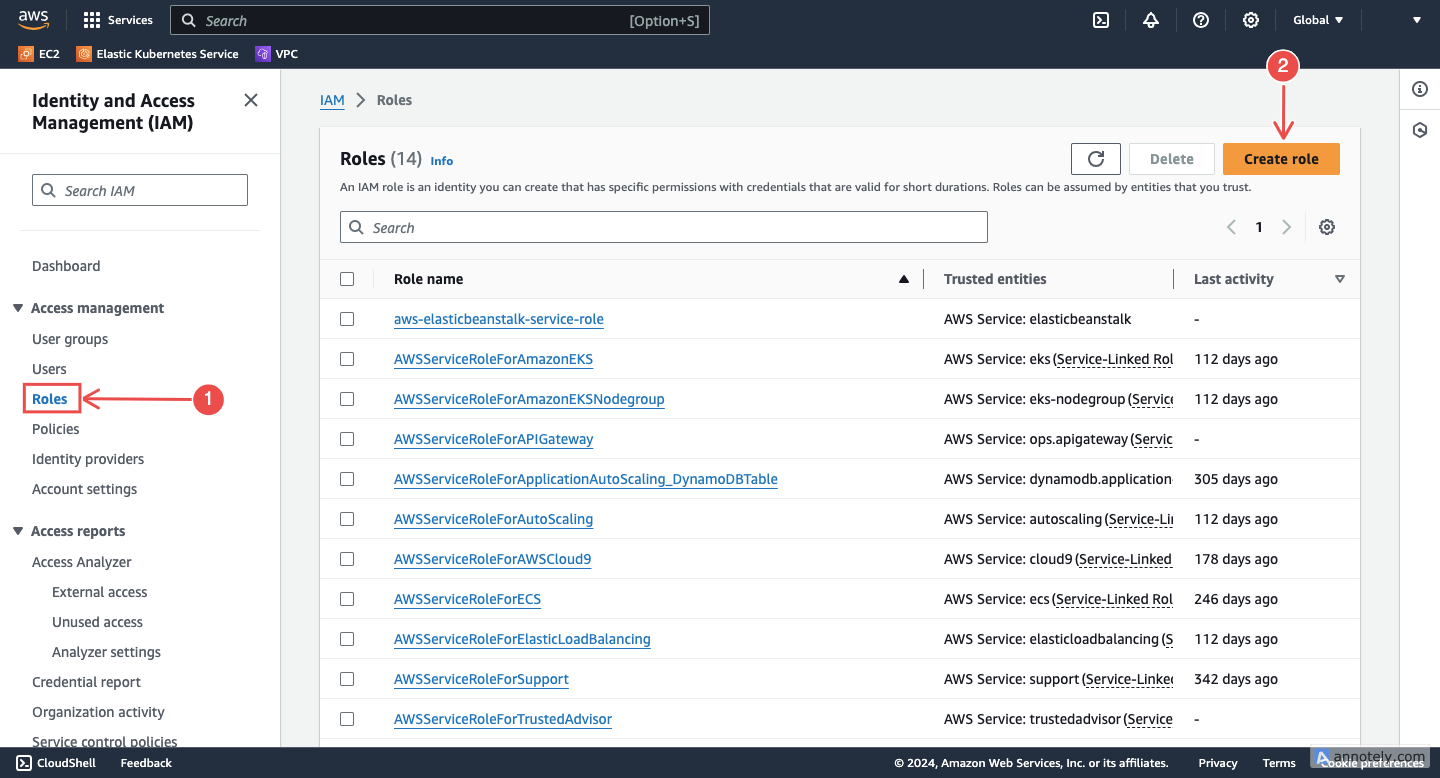
Create a new role: Select Roles and click on Create role. Here, you’ll set up permissions specific to Hawkeye’s access requirements.

Fig.2 - Create new role
-
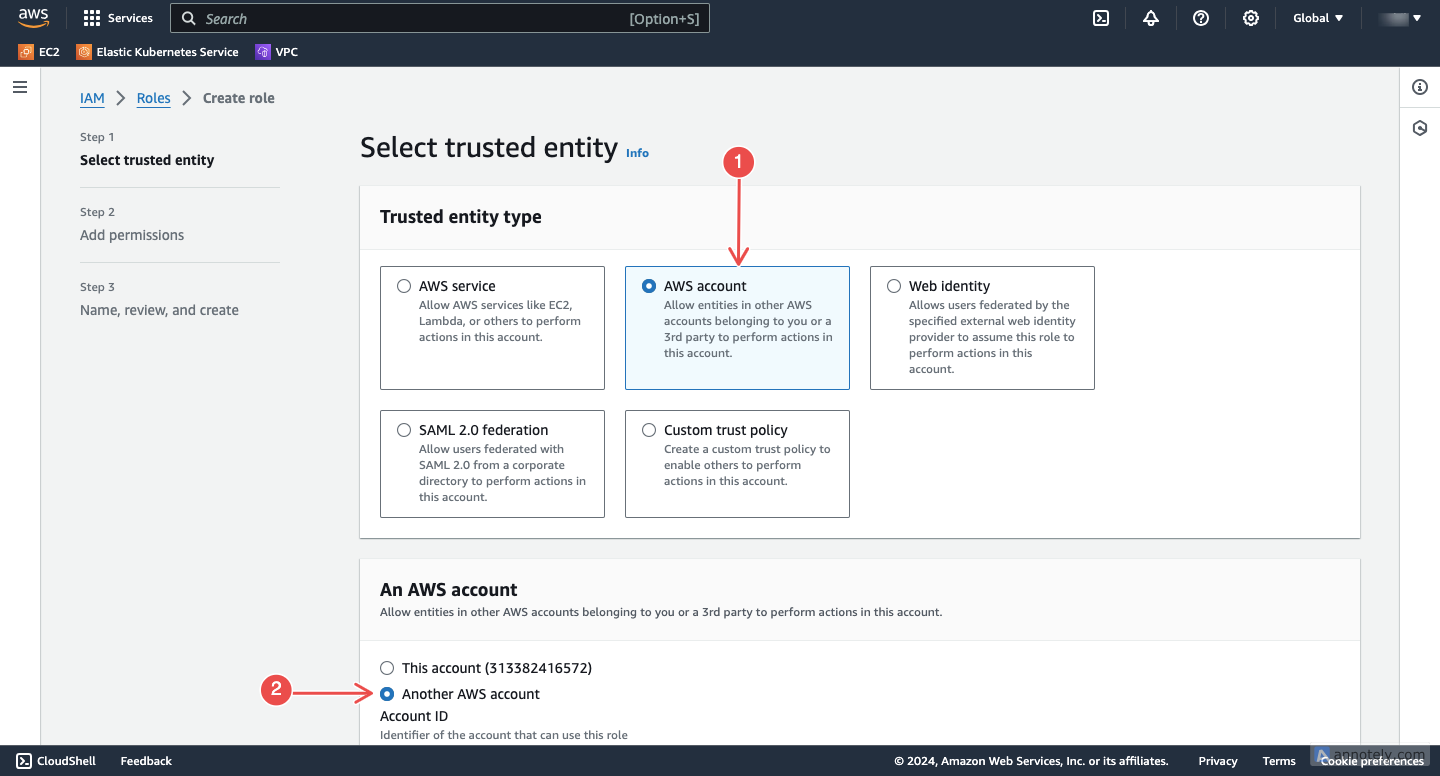
Specify the trusted account and External ID: When prompted to choose a trusted entity, select Another AWS Account and enter Neubird’s AWS account ID. Use the external ID as an additional layer of security; it’s unique to your account and helps prevent unauthorized access.

Fig.3 - Specify the trusted account and External ID
-
Assign permissions: Choose the ReadOnlyAccess permission policy, which grants Hawkeye view-only access to AWS resources like CloudTrail, CloudWatch, and configuration settings.

Fig.4 - Assign permissions
Step 2: Add the AWS connection in Hawkeye
After setting up the IAM role, go to Hawkeye’s dashboard to complete the connection setup:
- Enter your Role ARN and External ID from AWS.
- Choose the AWS regions you want Hawkeye to monitor.
This completes the setup, and Hawkeye will start collecting data within the scope of permissions you granted.
Why use an IAM Role?
Using a dedicated IAM role allows Hawkeye to access AWS resources securely without storing your account credentials. It also enables you to control which services Hawkeye can view and makes it easier to revoke access if needed.
Example 2: GitHub
Hawkeye’s integration with GitHub follows a different approach because GitHub provides a more streamlined, app-based permission model.
Setting up your GitHub connection
In GitHub, instead of manually configuring permissions, you’ll connect through the Neubird app. When you authorize this app, GitHub provides a preset list of permissions.
- Choose GitHub as the connection type in Hawkeye: Select GitHub from the list of integrations in the Connections section.
- Continue to GitHub for authorization: After choosing GitHub, you’ll be redirected to GitHub, where you’ll install the Neubird app on either your personal or organization account.
- Grant access to repositories: Select the repositories Hawkeye should monitor. You can choose All repositories or limit it to specific repositories.
GitHub’s app-based permissions model
Using the GitHub app makes it easy to manage permissions without creating custom access configurations. The app permissions are defined by GitHub and automatically include only the minimum required to pull data like commits, pull requests, and issues. This saves you time in setup and ensures that Hawkeye can securely access the information it needs.
Best practices for configuring permissions in Hawkeye
The following are some things to keep in mind when managing permissions in Hawkeye.
-
Follow the principle of least privilege: Grant only the minimal set of permissions necessary for Hawkeye to perform its functions. For instance, if Hawkeye is monitoring metrics and logs in an AWS environment, assign “read-only” permissions rather than full administrative access. This approach reduces security risks by limiting Hawkeye’s access, preventing unauthorized actions on critical resources.
-
Use Role-Based Access Control (RBAC): Assign roles based on the user’s job responsibilities rather than giving direct access to all features in Hawkeye. By organizing users into roles (e.g., “Viewer” for read-only access, “Administrator” for configuration changes), you control which users can perform specific actions, improving security and preventing errors from excessive permissions.
-
Regularly review and audit permissions: Periodically assess the permissions assigned to each role or integration in Hawkeye. Removing or adjusting permissions that are no longer needed helps maintain a secure and efficient environment. Auditing ensures compliance with security standards and highlights any over-privileged accounts that could pose risks.
-
Monitor permissions requests and notifications: Use Hawkeye’s notification features to stay informed about any changes to permissions, such as new integrations or modifications to existing connections. Monitoring these requests provides visibility into who is requesting additional access and helps you approve or deny them appropriately, improving your control over system security.